Week-7 (C# Console Programming)
CE103 Algorithms and Programming I
Week-7
C# Functional Console Programming
C# Functional Console Programming
C# Introduction
C# Hello World - Your First C# Program
In this tutorial, we will learn how to write a simple "Hello World!" program in C#. This will get you familiar with the basic syntax and requirements of a C# program.
The “Hello World!” program is often the first program we see when we dive into a new language. It simply prints Hello World! on the output screen.
The purpose of this program is to get us familiar with the basic syntax and requirements of a programming language.
"Hello World!" in C
// Hello World! program
namespace HelloWorld
{
    class Hello {
        static void Main(string[] args)
        {
            System.Console.WriteLine("Hello World!");
        }
    }
}
When you run the program, the output will be:
How the "Hello World!" program in C# works?
Let's break down the program line by line.
// Hello World! Program
// indicates the beginning of a comment in C#. Comments are not executed by the C# compiler.
They are intended for the developers to better understand a piece of code. To learn more about comments in C#, visit C# comments.
namespace HelloWorld{...}
The namespace keyword is used to define our own namespace. Here we are creating a namespace called HelloWorld.
Just think of namespace as a container which consists of classes, methods and other namespaces. To get a detailed overview of namespaces, visit C# Namespaces.
class Hello{...}
The above statement creates a class named - Helloin C#. Since, C# is an object-oriented programming language, creating a class is mandatory for the program’s execution.
static void Main(string[] args){...}
Main() is a method of class Hello. The execution of every C# program starts from the Main() method. So it is mandatory for a C# program to have a Main() method.
The signature/syntax of the Main() method is:
We’ll learn more about methods in the later chapters.
System.Console.WriteLine("Hello World!");
For now, just remember that this is the piece of code that prints Hello World! to the output screen.You’ll learn more about how it works in the later chapters.
Alternative Hello World! implementation
Here’s an alternative way to write the “Hello World!” program.
// Hello World! program
using System;

namespace HelloWorld
{
    class Hello {
        static void Main(string[] args)
        {
            Console.WriteLine("Hello World!");
        }
    }
}
Notice in this case, we’ve written using System; at the start of the program. By using this, we can now replace
with
This is a convenience we’ll be using in our later chapters as well.
Things to remember from this article
- Every C# program must have a class definition.
- The execution of program begins from the
Main()method. Main()method must be inside a class definition.
This is just a simple program for introducing C# to a newbie. If you did not understand certain things in this article, that's okay (even I did not when I started). As we move on with this tutorial series, everything will start to make sense.
C# Keywords and Identifiers
In this tutorial, we will learn about keywords (reserved words) and identifiers in C# programming language.
C# Keywords
Keywords are predefined sets of reserved words that have special meaning in a program. The meaning of keywords can not be changed, neither can they be directly used as identifiers in a program.
For example,
Here, long is a keyword and mobileNum is a variable (identifier). long has a special meaning in C# i.e. it is used to declare variables of type long and this function cannot be changed.
Also, keywords like long, int, char, etc can not be used as identifiers. So, we cannot have something like:
C# has a total of 79 keywords. All these keywords are in lowercase. Here is a complete list of all C# keywords.
| abstract | as | base | bool |
|---|---|---|---|
| break | byte | case | catch |
| char | checked | class | const |
| continue | decimal | default | delegate |
| do | double | else | enum |
| event | explicit | extern | false |
| finally | fixed | float | for |
| foreach | goto | if | implicit |
| in | in (generic modifier) | int | interface |
| internal | is | lock | long |
| namespace | new | null | object |
| operator | out | out (generic modifier) | override |
| params | private | protected | public |
| readonly | ref | return | sbyte |
| sealed | short | sizeof | stackalloc |
| static | string | struct | switch |
| this | throw | true | try |
| typeof | uint | ulong | unchecked |
| unsafe | ushort | using | using static |
| void | volatile | while |
Although keywords are reserved words, they can be used as identifiers if @ is added as prefix. For example,
The above statement will create a variable @void of type int.
Contextual Keywords
Besides regular keywords, C# has 25 contextual keywords. Contextual keywords have specific meaning in a limited program context and can be used as identifiers outside that context. They are not reserved words in C#.
| add | alias | ascending |
|---|---|---|
| async | await | descending |
| dynamic | from | get |
| global | group | into |
| join | let | orderby |
| partial (type) | partial (method) | remove |
| select | set | value |
| var | when (filter condition) | where (generic type constraint) |
| yield |
If you are interested to know the function of every keywords, I suggest you visit C# keywords (official C# docs).
C# Identifiers
Identifiers are the name given to entities such as variables, methods, classes, etc. They are tokens in a program which uniquely identify an element. For example,
int value;
Here, value is the name of variable. Hence it is an identifier. Reserved keywords can not be used as identifiers unless @ is added as prefix. For example,
int break;
This statement will generate an error in compile time.
To learn more about variables, visit C# Variables.
Rules for Naming an Identifier
- An identifier can not be a C# keyword.
- An identifier must begin with a letter, an underscore or
@symbol. The remaining part of identifier can contain letters, digits and underscore symbol. - Whitespaces are not allowed. Neither it can have symbols other than letter, digits and underscore.
- Identifiers are case-sensitive. So, getName, GetName and getname represents 3 different identifiers.
Here are some of the valid and invalid identifiers:
| Identifiers | Remarks |
|---|---|
| number | Valid |
| calculateMarks | Valid |
| hello$ | Invalid (Contains $) |
| name1 | Valid |
| @if | Valid (Keyword with prefix @) |
| if | Invalid (C# Keyword) |
| My name | Invalid (Contains whitespace) |
| _hello_hi | Valid |
Example: Find list of keywords and identifiers in a program
Just to clear the concept, let's find the list of keywords and identifiers in the program we wrote in C# Hello World.
using System;
namespace HelloWorld
{
    class Hello
{
        static void Main(string[] args)
        {
          Console.WriteLine("Hello World!");
        }
    }
}
| Keywords | Identifiers |
|---|---|
| using | System |
| namespace | HelloWorld (namespace) |
| class | Hello (class) |
| static | Main (method) |
| void | args |
| string | Console |
| WriteLine |
The "Hello World!" inside WriteLine method is a string literal.
C# Variables and (Primitive) Data Types
In this tutorial, we will learn about variables, how to create variables in C# and different data types that C# programming language supports.
A variable is a symbolic name given to a memory location. Variables are used to store data in a computer program.
How to declare variables in C#?
Here's an example to declare a variable in C#.
In this example, a variable age of type int (integer) is declared and it can only store integer values.
We can assign a value to the variable later in our program like such:
However, the variable can also be initialized to some value during declaration. For example,
Here, a variable age of type int is declared and initialized to 24 at the same time.
Since, it’s a variable, we can change the value of variables as well. For example,
Here, the value of age is changed to 35 from 24.
Variables in C# must be declared before they can be used. This means, the name and type of variable must be known before they can be assigned a value. This is why C# is called a statically-typed language.
Once declared, the datatype of a variable can not be changed within a scope. A scope can be thought as a block of code where the variable is visible or available to use. If you don’t understand the previous statement, don’t worry we’ll learn about scopes in the later chapters.
For now remember,we can not do the following in C#:
Implicitly typed variables
Alternatively in C#, we can declare a variable without knowing its type using var keyword. Such variables are called implicitly typed local variables.
Variables declared using var keyword must be initialized at the time of declaration.
var value = 5;
The compiler determines the type of variable from the value that is assigned to the variable. In the above example, value is of type int. This is equivalent to:
int value; value = 5;
You can learn more about implicitly typed local variables.
Rules for Naming Variables in C
There are certain rules we need to follow while naming a variable. The rules for naming a variable in C# are:
- The variable name can contain letters (uppercase and lowercase), underscore( _ ) and digits only.
- The variable name must start with either letter, underscore or @ symbol. For example,
Rules for naming variables in C#
| Variable Names | Remarks |
|---|---|
| name | Valid |
| subject101 | Valid |
| _age | Valid (Best practice for naming private member variables) |
| @break | Valid (Used if name is a reserved keyword) |
| 101subject | Invalid (Starts with digit) |
| your_name | Valid |
| your name | Invalid (Contains whitespace) |
- C# is case sensitive. It means
ageandAgerefers to 2 different variables.
- A variable name must not be a C# keyword. For example,
if,for,usingcan not be a variable name. We will be discussing more about C# keywords in the next tutorial.
Best Practices for Naming a Variable
- Choose a variable name that make sense. For example, name, age, subject makes more sense than n, a and s.
- Use camelCase notation (starts with lowercase letter) for naming local variables. For example, numberOfStudents, age, etc.
- Use PascalCase or CamelCase (starts with uppercase letter) for naming public member variables. For example, FirstName, Price, etc.
- Use a leading underscore (_) followed by camelCase notation for naming private member variables. For example, _bankBalance, _emailAddress, etc.
You can learn more about naming conventions in C# here.
Don't worry about public and private member variables. We will learn about them in later chapters.
C# Primitive Data Types
Variables in C# are broadly classified into two types: Value types and Reference types. In this tutorial we will be discussing about primitive (simple) data types which is a subclass of Value types.
Reference types will be covered in later tutorials. However, if you want to know more about variable types, visit C# Types and variables (official C# docs).
Boolean (bool)
- Boolean data type has two possible values:
trueorfalse - Default value:
false - Boolean variables are generally used to check conditions such as in if statements, loops, etc.
For Example:
using System;
namespace DataType
{
    class BooleanExample
    {
        public static void Main(string[] args)
        {
            bool isValid = true;
            Console.WriteLine(isValid);
        }
    }
}
When we run the program, the output will be:
Signed Integral
These data types hold integer values (both positive and negative). Out of the total available bits, one bit is used for sign.
1. sbyte
- Size: 8 bits
- Range: -128 to 127.
- Default value: 0
For example:
using System;
namespace DataType
{
    class SByteExample
    {
        public static void Main(string[] args)
        {
            sbyte level = 23;
            Console.WriteLine(level);
        }
    }
}
When we run the program, the output will be:
Try assigning values out of range i.e. less than -128 or greater than 127 and see what happens.
2. short
- Size: 16 bits
- Range: -32,768 to 32,767
- Default value: 0
For example:
using System;
namespace DataType
{
    class ShortExample
    {
        public static void Main(string[] args)
        {
            short value = -1109;
            Console.WriteLine(value);
        }
    }
}
When we run the program, the output will be:
3. int
- Size: 32 bits
- Range: -231 to 231-1
- Default value: 0
For example:
using System;
namespace DataType
{
    class IntExample
    {
        public static void Main(string[] args)
        {
            int score = 51092;
            Console.WriteLine(score);
        }
    }
}
When we run the program, the output will be:
4. long
- Size: 64 bits
- Range: -263 to 263-1
- Default value:
0L[L at the end represent the value is of long type]
For example:
using System;
namespace DataType
{
    class LongExample
    {
        public static void Main(string[] args)
        {
            long range = -7091821871L;
            Console.WriteLine(range);
        }
    }
}
When we run the program, the output will be:
Unsigned Integral
These data types only hold values equal to or greater than 0. We generally use these data types to store values when we are sure, we won't have negative values.
1. byte
- Size: 8 bits
- Range: 0 to 255.
- Default value: 0
For example:
using System;
namespace DataType
{
    class ByteExample
    {
        public static void Main(string[] args)
        {
            byte age = 62;
            Console.WriteLine(level);
        }
    }
}
When we run the program, the output will be:
2. ushort
- Size: 16 bits
- Range: 0 to 65,535
- Default value: 0
For example:
using System;
namespace DataType
{
    class UShortExample
    {
        public static void Main(string[] args)
        {
            ushort value = 42019;
            Console.WriteLine(value);
        }
    }
}
When we run the program, the output will be:
3. uint
- Size: 32 bits
- Range: 0 to 232-1
- Default value: 0
For example:
using System;
namespace DataType
{
    class UIntExample
    {
        public static void Main(string[] args)
        {
            uint totalScore = 1151092;
            Console.WriteLine(totalScore);
        }
    }
}
When we run the program, the output will be:
4. ulong
- Size: 64 bits
- Range: 0 to 264-1
- Default value: 0
For example:
using System;
namespace DataType
{
    class ULongExample
    {
        public static void Main(string[] args)
        {
            ulong range = 17091821871L;
            Console.WriteLine(range);
        }
    }
}
When we run the program, the output will be:
Floating Point
These data types hold floating point values i.e. numbers containing decimal values. For example, 12.36, -92.17, etc.
1. float
- Single-precision floating point type
- Size: 32 bits
- Range: 1.5 × 10−45 to 3.4 × 1038
- Default value: 0.0F [F at the end represent the value is of float type]
For example:
using System;
namespace DataType
{
    class FloatExample
    {
        public static void Main(string[] args)
        {
            float number = 43.27F;
            Console.WriteLine(number);
        }
    }
}
When we run the program, the output will be:
2. double
- Double-precision floating point type. What is the difference between single and double precision floating point?
- Size: 64 bits
- Range: 5.0 × 10−324 to 1.7 × 10308
- Default value: 0.0D [D at the end represent the value is of double type]
For example:
using System;
namespace DataType
{
    class DoubleExample
    {
        public static void Main(string[] args)
        {
            double value = -11092.53D;
            Console.WriteLine(value);
        }
    }
}
When we run the program, the output will be:
Character (char)
- It represents a 16 bit unicode character.
- Size: 16 bits
- Default value: '\0'
- Range: U+0000 ('\u0000') to U+FFFF ('\uffff')
For example:
using System;
namespace DataType
{
    class CharExample
    {
        public static void Main(string[] args)
        {
            char ch1 ='\u0042';
            char ch2 = 'x';
            Console.WriteLine(ch1);
            Console.WriteLine(ch2);
        }
    }
}
When we run the program, the output will be:
The unicode value of 'B' is '\u0042', hence printing ch1 will print 'B'.
Decimal
- Decimal type has more precision and a smaller range as compared to floating point types (double and float). So it is appropriate for monetary calculations.
- Size: 128 bits
- Default value: 0.0M [M at the end represent the value is of decimal type]
- Range: (-7.9 x 1028 to 7.9 x 1028) / (100 to 28)
For example:
using System;
namespace DataType
{
    class DecimalExample
    {
        public static void Main(string[] args)
        {
         decimal bankBalance = 53005.25M;
            Console.WriteLine(bankBalance);
        }
    }
}
When we run the program, the output will be:
The suffix M or m must be added at the end otherwise the value will be treated as a double and an error will be generated.
C# Literals
Let's look at the following statement:
Here,
intis a data type- number is a variable and
41is a literal
Literals are fixed values that appear in the program. They do not require any computation. For example, 5, false, 'w' are literals that appear in a program directly without any computation.
Boolean Literals
- true and false are the available boolean literals.
- They are used to initialize boolean variables.
For example:
Integer Literals
-
Integer literals are used to initialize variables of integer data types i.e.
sbyte,short,int,long,byte,ushort,uintandulong. -
If an integer literal ends with
Lorl, it is of type long. For best practice useL(notl).
- If an integer literal starts with a
0x, it represents hexadecimal value. Number with no prefixes are treated as decimal value. Octal and binary representation are not allowed in C#.
Floating Point Literals
-
Floating point literals are used to initialize variables of float and double data types.
-
If a floating point literal ends with a suffix
forF, it is of type float. Similarly, if it ends withdorD, it is of type double. If neither of the suffix is present, it is of type double by default. -
These literals contains e or E when expressed in scientific notation.
double number = 24.67;// double by default
float value = -12.29F;
double scientificNotation = 6.21e2;// equivalent to 6.21 x 10² i.e. 621
Character and String Literals
-
Character literals are used to initialize variables of char data types.
-
Character literals are enclosed in single quotes. For example,
'x','p', etc. -
They can be represented as character, hexadecimal escape sequence, unicode representation or integral values casted to char.
char ch1 = 'R';// character
char ch2 = '\x0072';// hexadecimal
char ch3 = '\u0059';// unicode
char ch4 = (char)107;// casted from integer
-
String literals are the collection of character literals.
-
They are enclosed in double quotes. For example, "Hello", "Easy Programming", etc.
- C# also supports escape sequence characters such as:
| Character | Meaning | | --- | --- | |\'| Single quote | |\"| Double quote | |\\| Backslash | |\n| Newline | |\r| Carriage return | |\t| Horizontal Tab | |\a| Alert | |\b| Backspace |
C# Operators
In this article, we will learn everything about different types of operators in C# programming language and how to use them.
Operators are symbols that are used to perform operations on operands. Operands may be variables and/or constants.
For example, in 2+3, + is an operator that is used to carry out addition operation, while 2 and 3 are operands.
Operators are used to manipulate variables and values in a program. C# supports a number of operators that are classified based on the type of operations they perform.
1. Basic Assignment Operator
Basic assignment operator (=) is used to assign values to variables. For example,
Here, 50.05 is assigned to x.
Example 1: Basic Assignment Operator
using System;

namespace Operator
{
    class AssignmentOperator
    {
        public static void Main(string[] args)
        {
            int firstNumber, secondNumber;
            // Assigning a constant to variable
            firstNumber = 10;
            Console.WriteLine("First Number = {0}", firstNumber);

            // Assigning a variable to another variable
            secondNumber = firstNumber;
            Console.WriteLine("Second Number = {0}", secondNumber);
        }
    }
}
When we run the program, the output will be:
This is a simple example that demonstrates the use of assignment operator.
You might have noticed the use of curly brackets { } in the example. We will discuss about them in string formatting. For now, just keep in mind that {0} is replaced by the first variable that follows the string, {1} is replaced by the second variable and so on.
2. Arithmetic Operators
Arithmetic operators are used to perform arithmetic operations such as addition, subtraction, multiplication, division, etc.
For example,
C# Arithmetic Operators
| Operator | Operator Name | Example |
|---|---|---|
| + | Addition Operator | 6 + 3 evaluates to 9 |
| - | Subtraction Operator | 10 - 6 evaluates to 4 |
| * | Multiplication Operator | 4 * 2 evaluates to 8 |
| / | Division Operator | 10 / 5 evaluates to 2 |
| % | Modulo Operator (Remainder) | 16 % 3 evaluates to 1 |
Example 2: Arithmetic Operators
using System;

namespace Operator
{
    class ArithmeticOperator
    {
        public static void Main(string[] args)
        {
            double firstNumber = 14.40, secondNumber = 4.60, result;
            int num1 = 26, num2 = 4, rem;

            // Addition operator
            result = firstNumber + secondNumber;
            Console.WriteLine("{0} + {1} = {2}", firstNumber, secondNumber, result);

            // Subtraction operator
            result = firstNumber - secondNumber;
            Console.WriteLine("{0} - {1} = {2}", firstNumber, secondNumber, result);

            // Multiplication operator
            result = firstNumber * secondNumber;
            Console.WriteLine("{0} * {1} = {2}", firstNumber, secondNumber, result);

            // Division operator
            result = firstNumber / secondNumber;
            Console.WriteLine("{0} / {1} = {2}", firstNumber, secondNumber, result);

            // Modulo operator
            rem = num1 % num2;
            Console.WriteLine("{0} % {1} = {2}", num1, num2, rem);
        }
    }
}
When we run the program, the output will be:
Arithmetic operations are carried out in the above example. Variables can be replaced by constants in the statements. For example,
3. Relational Operators
Relational operators are used to check the relationship between two operands. If the relationship is true the result will be true, otherwise it will result in false.
Relational operators are used in decision making and loops.
C# Relational Operators
| Operator | Operator Name | Example |
|---|---|---|
| == | Equal to | 6 == 4 evaluates to false |
| > | Greater than | 3 > -1 evaluates to true |
| < | Less than | 5 < 3 evaluates to false |
| >= | Greater than or equal to | 4 >= 4 evaluates to true |
| <= | Less than or equal to | 5 <= 3 evaluates to false |
| != | Not equal to | 10 != 2 evaluates to true |
Example 3: Relational Operators
using System;

namespace Operator
{
    class RelationalOperator
    {
        public static void Main(string[] args)
        {
            bool result;
            int firstNumber = 10, secondNumber = 20;

            result = (firstNumber==secondNumber);
            Console.WriteLine("{0} == {1} returns {2}",firstNumber, secondNumber, result);

            result = (firstNumber > secondNumber);
            Console.WriteLine("{0} > {1} returns {2}",firstNumber, secondNumber, result);

            result = (firstNumber < secondNumber);
            Console.WriteLine("{0} < {1} returns {2}",firstNumber, secondNumber, result);

            result = (firstNumber >= secondNumber);
            Console.WriteLine("{0} >= {1} returns {2}",firstNumber, secondNumber, result);

            result = (firstNumber <= secondNumber);
            Console.WriteLine("{0} <= {1} returns {2}",firstNumber, secondNumber, result);

            result = (firstNumber != secondNumber);
            Console.WriteLine("{0} != {1} returns {2}",firstNumber, secondNumber, result);
        }
    }
}
When we run the program, the output will be:
10 == 20 returns False
10 > 20 returns False
10 < 20 returns True
10 >= 20 returns False
10 <= 20 returns True
10 != 20 returns True
4. Logical Operators
- Logical operators are used to perform logical operation such as
and,or. Logical operators operates on boolean expressions (trueandfalse) and returns boolean values. Logical operators are used in decision making and loops. - Here is how the result is evaluated for logical
ANDandORoperators. - C# Logical operators
| Operand 1 | Operand 2 | OR (|) | AND (&&) |
|---|---|---|---|
| true | true | true | true |
| true | false | true | false |
| false | true | true | false |
| false | false | false | false |
In simple words, the table can be summarized as:
- If one of the operand is true, the
ORoperator will evaluate it totrue. - If one of the operand is false, the
ANDoperator will evaluate it tofalse.
Example 4: Logical Operators
using System;

namespace Operator
{
    class LogicalOperator
    {
        public static void Main(string[] args)
        {
            bool result;
            int firstNumber = 10, secondNumber = 20;

            // OR operator
            result = (firstNumber == secondNumber) || (firstNumber > 5);
            Console.WriteLine(result);

            // AND operator
            result = (firstNumber == secondNumber) && (firstNumber > 5);
            Console.WriteLine(result);
        }
    }
}
When we run the program, the output will be:
5. Unary Operators
Unlike other operators, the unary operators operates on a single operand. C# unary operators
| Operator | Operator Name | Description |
|---|---|---|
| + | Unary Plus | Leaves the sign of operand as it is |
| - | Unary Minus | Inverts the sign of operand |
| ++ | Increment | Increment value by 1 |
| -- | Decrement | Decrement value by 1 |
| ! | Logical Negation (Not) | Inverts the value of a boolean |
Example 5: Unary Operators
using System;

namespace Operator
{
    class UnaryOperator
    {
        public static void Main(string[] args)
        {
            int number = 10, result;
            bool flag = true;

            result = +number;
            Console.WriteLine("+number = " + result);

            result = -number;
            Console.WriteLine("-number = " + result);

            result = ++number;
            Console.WriteLine("++number = " + result);

            result = --number;
            Console.WriteLine("--number = " + result);

            Console.WriteLine("!flag = " + (!flag));
        }
    }
}
When we run the program, the output will be:
The increment (++) and decrement (--) operators can be used as prefix and postfix. If used as prefix, the change in value of variable is seen on the same line and if used as postfix, the change in value of variable is seen on the next line. This will be clear by the example below.
Example 6: Post and Pre Increment operators in C
using System;

namespace Operator
{
    class UnaryOperator
    {
        public static void Main(string[] args)
        {
            int number = 10;

            Console.WriteLine((number++));
            Console.WriteLine((number));

            Console.WriteLine((++number));
            Console.WriteLine((number));
        }
    }
}
When we run the program, the output will be:
We can see the effect of using ++ as prefix and postfix. When ++ is used after the operand, the value is first evaluated and then it is incremented by 1. Hence the statement
Console.WriteLine((number++));
prints 10 instead of 11. After the value is printed, the value of number is incremented by 1.
The process is opposite when ++ is used as prefix. The value is incremented before printing. Hence the statement
Console.WriteLine((++number));
prints 12.
The case is same for decrement operator (--).
6. Ternary Operator
The ternary operator ? : operates on three operands. It is a shorthand for if-then-else statement. Ternary operator can be used as follows:
The ternary operator works as follows:
- If the expression stated by Condition is
true, the result of Expression1 is assigned to variable. - If it is
false, the result of Expression2 is assigned to variable.
Example 7: Ternary Operator
using System;

namespace Operator
{
    class TernaryOperator
    {
        public static void Main(string[] args)
        {
            int number = 10;
            string result;

            result = (number % 2 == 0)? "Even Number" : "Odd Number";
            Console.WriteLine("{0} is {1}", number, result);
        }
    }
}
When we run the program, the output will be:
To learn more, visit C# ternary operator.
7. Bitwise and Bit Shift Operators
Bitwise and bit shift operators are used to perform bit manipulation operations.
C# Bitwise and Bit Shift operators
| Operator | Operator Name |
|---|---|
| ~ | Bitwise Complement |
| & | Bitwise AND |
| | | Bitwise OR |
| ^ | Bitwise Exclusive OR |
| << | Bitwise Left Shift |
| >> | Bitwise Right Shift |
Example 8: Bitwise and Bit Shift Operator
using System;

namespace Operator
{
    class BitOperator
    {
        public static void Main(string[] args)
        {
            int firstNumber = 10;
            int secondNumber = 20;
            int result;

            result = ~firstNumber;
            Console.WriteLine("~{0} = {1}", firstNumber, result);

            result = firstNumber & secondNumber;
            Console.WriteLine("{0} & {1} = {2}", firstNumber,secondNumber, result);

            result = firstNumber | secondNumber;
            Console.WriteLine("{0} | {1} = {2}", firstNumber,secondNumber, result);

            result = firstNumber ^ secondNumber;
            Console.WriteLine("{0} ^ {1} = {2}", firstNumber,secondNumber, result);

            result = firstNumber << 2;
            Console.WriteLine("{0} << 2 = {1}", firstNumber, result);

            result = firstNumber >> 2;
            Console.WriteLine("{0} >> 2 = {1}", firstNumber, result);
        }
    }
}
When we run the program, the output will be:
To learn more, visit C# Bitwise and Bit Shift operator.
8. Compound Assignment Operators
- C# Compound Assignment Operators
| Operator | Operator Name | Example | Equivalent To |
|---|---|---|---|
| += | Addition Assignment | x += 5 |
x = x + 5 |
| -= | Subtraction Assignment | x -= 5 |
x = x - 5 |
| *= | Multiplication Assignment | x *= 5 |
x = x * 5 |
| /= | Division Assignment | x /= 5 |
x = x / 5 |
| %= | Modulo Assignment | x %= 5 |
x = x % 5 |
| &= | Bitwise AND Assignment | x &= 5 |
x = x & 5 |
| |= | Bitwise OR Assignment | x \|= 5 |
x = x \| 5 |
| ^= | Bitwise XOR Assignment | x ^= 5 |
x = x ^ 5 |
| <<= | Left Shift Assignment | x <<= 5 |
x = x << 5 |
| >>= | Right Shift Assignment | x >>= 5 |
x = x >> 5 |
| => | Lambda Operator | x => x*x |
Returns x*x |
Example 9: Compound Assignment Operator
using System;

namespace Operator
{
    class BitOperator
    {
        public static void Main(string[] args)
        {
            int number = 10;

            number += 5;
            Console.WriteLine(number);

            number -= 3;
            Console.WriteLine(number);

            number *= 2;
            Console.WriteLine(number);

            number /= 3;
            Console.WriteLine(number);

            number %= 3;
            Console.WriteLine(number);

            number &= 10;
            Console.WriteLine(number);

            number |= 14;
            Console.WriteLine(number);

            number ^= 12;
            Console.WriteLine(number);

            number <<= 2;
            Console.WriteLine(number);

            number >>= 3;
            Console.WriteLine(number);
        }
    }
}
When we run the program, the output will be:
We will discuss about Lambda operators in later tutorial.
C# Operator Precedence and Associativity
In this tutorial we you will learn about operator precedence and associativity in C#. This will give us an idea of how an expression is evaluated by the C# compiler.
C# Operator Precedence
Operator precedence is a set of rules which defines how an expression is evaluated. In C#, each C# operator has an assigned priority and based on these priorities, the expression is evaluated.
For example, the precedence of multiplication (*) operator is higher than the precedence of addition (+) operator. Therefore, operation involving multiplication is carried out before addition.
Take a look at the statement below.
What will be the value of x after executing this statement?
The operand 3 is associated with + and *. As stated earlier, multiplication has a higher precedence than addition. So, the operation 3 * 5 is carried out instead of 4 + 3. The value of variable x will be 19.
If addition would have a higher precedence, 4 + 3 would be evaluated first and the value of x would be 35.
Operator Precedence Table
The higher the precedence of operator is, the higher it appears in the table
C# Operator Precedence
| Category | Operators |
|---|---|
| Postfix Increment and Decrement | ++, -- |
| Prefix Increment, Decrement and Unary | ++, --, +, -, !, ~ |
| Multiplicative | *, /, % |
| Additive | +, - |
| Shift | <<, >> |
| Relational | <, <=, >, >= |
| Equality | ==, != |
| Bitwise AND | & |
| Bitwise XOR | ^ |
| Bitwise OR | | |
| Logical AND | && |
| Logical OR | | |
| Ternary | ? : |
| Assignment | =, +=, -=, *=, /=, %=, &=, |=, ^=, <<=, >>= |
The assignment operators have the lowest precedence while the postfix increment and decrement operators have the highest precedence.
Example 1: Operator Precedence
using System;

namespace Operator
{
    class OperatorPrecedence
    {
        public static void Main(string[] args)
        {
            int result1;
            int a = 5, b = 6, c = 4;
            result1 = --a * b - ++c;
            Console.WriteLine(result1);

            bool result2;
            result2 = b >= c + a;
            Console.WriteLine(result2);
        }
    }
}
When we run the program, the output will be:
Let's understand how the expression is evaluated in the program.
The precedence of -- and ++ is higher than *, and precedence of * is higher than -. Hence the statement,
is equivalent to
The expression inside parentheses is always evaluated first no matter what the precedence of operators outside it is.
- At first, (--a) is evaluated resulting into
4.
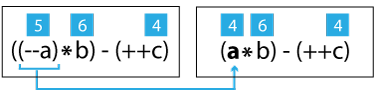
- Then (++c) is evaluated resulting into
5.

- Now, (a * b) is evaluated resulting into
24.

- Finally, the subtraction is carried out resulting into
19. - Hence the final value of result1 will be
19.
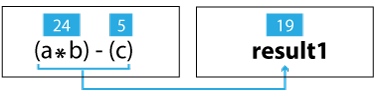
In the next expression, the precedence of + is higher than >=. So, c and a is added first and the sum is compared with b to produce false.
Associativity of Operators in C
In the previous section, we discussed about operator precedence. If two operators with different precedence are used, the operator with higher precedence is evaluated first.
But what if both the operators have same precedence?
In such case, the expression is evaluated based on the associativity of operator (left to right or right to left).
For example:
Here, both * and / have the same precedence. But since the associativity of these operators is from left to right, a * b is evaluated first and then division is carried out. The final result of this expression will be 10.
In this particular example, the associativity does not really matter. Because even if division was carried out before multiplication, the result would be unaffected.
Let's take a look at another example.
The associativity of = operator is from right to left. So the value of c (i.e. 3) is assigned to b, and then the value of b is assigned to a. So after executing this statement, the values of a, b and c will be 3.
The table below shows the associativity of C# operators: C# Associativity of operators
| Category | Operators | Associativity |
|---|---|---|
| Postfix Increment and Decrement | ++, -- | Left to Right |
| Prefix Increment, Decrement and Unary | ++, --, +, -, !, ~ | Right to Left |
| Multiplicative | *, /, % | Left to Right |
| Additive | +, - | Left to Right |
| Shift | <<, >> | Left to Right |
| Relational | <, <=, >, >= | Left to Right |
| Equality | ==, != | Left to Right |
| Bitwise AND | & | Left to Right |
| Bitwise XOR | ^ | Left to Right |
| Bitwise OR | | | Left to Right |
| Logical AND | && | Left to Right |
| Logical OR | | | Left to Right |
| Ternary | ? : | Right to Left |
| Assignment | =, +=, -=, *=, /=, %=, &=, |=, ^=, <<=, >>= | Right to Left |
Almost all the operators have associativity from left to right. The operators having associativity from right to left are:
- Unary operators
- Prefix Increment and Decrement Operators
- Ternary Operator
- Assignment Operators
Example 2: Associativity of Operators
using System;
namespace Operator
{
class OperatorPrecedence
{
public static void Main(string[] args)
{
int a = 5, b = 6, c = 3;
int result = a * b / c;
Console.WriteLine(result);
a = b = c;
Console.WriteLine("a = {0}, b = {1}, c = {2}", a, b, c);
}
}
}
When we run the program, the output will be:
C# Bitwise and Bit Shift Operators
In this tutorial, we will learn in detail about bitwise and bit shift operators in C#. C# provides 4 bitwise and 2 bit shift operators.
Bitwise and bit shift operators are used to perform bit level operations on integer (int, long, etc) and boolean data. These operators are not commonly used in real life situations.
If you are interested to explore more, visit practical applications of bitwise operations.
The bitwise and bit shift operators available in C# are listed below.
List of C# Bitwise Operators
| Operator | Operator Name |
|---|---|
| ~ | Bitwise Complement |
| & | Bitwise AND |
| | | Bitwise OR |
| ^ | Bitwise Exclusive OR (XOR) |
| << | Bitwise Left Shift |
| >> | Bitwise Right Shift |
Bitwise OR
- Bitwise OR operator is represented by
|. - It performs bitwise OR operation on the corresponding bits of two operands.
- If either of the bits is
1, the result is1. Otherwise the result is0. - If the operands are of type
bool, the bitwise OR operation is equivalent to logical OR operation between them.
For Example,
Bitwise OR operation between 14 and 11:
Example 1: Bitwise OR
using System;

namespace Operator
{
    class BitWiseOR
    {
        public static void Main(string[] args)
        {
            int firstNumber = 14, secondNumber = 11, result;
            result = firstNumber | secondNumber;
            Console.WriteLine("{0} | {1} = {2}", firstNumber, secondNumber, result);
        }
    }
}
When we run the program, the output will be:
Bitwise AND
- Bitwise AND operator is represented by
&. - It performs bitwise AND operation on the corresponding bits of two operands.
- If either of the bits is
0, the result is0. - Otherwise the result is
1. - If the operands are of type
bool, the bitwise AND operation is equivalent to logical AND operation between them.
-
For Example,
Bitwise AND operation between 14 and 11:
Example 2: Bitwise AND
using System;

namespace Operator
{
    class BitWiseAND
    {
        public static void Main(string[] args)
        {
            int firstNumber = 14, secondNumber = 11, result;
            result = firstNumber & secondNumber;
            Console.WriteLine("{0} & {1} = {2}", firstNumber, secondNumber, result);
        }
    }
}
When we run the program, the output will be:
Bitwise XOR
- Bitwise XOR operator is represented by
^. - It performs bitwise XOR operation on the corresponding bits of two operands.
- If the corresponding bits are same, the result is
0. - If the corresponding bits are different, the result is
1. - If the operands are of type
bool, the bitwise XOR operation is equivalent to logical XOR operation between them.
For Example,
Bitwise XOR operation between 14 and 11:
If you want to more about the usage of Bitwise XOR, visit The Magic of XOR
Example 3: Bitwise XOR
using System;

namespace Operator
{
    class BitWiseXOR
    {
        public static void Main(string[] args)
        {
            int firstNumber = 14, secondNumber = 11, result;
            result = firstNumber^secondNumber;
            Console.WriteLine("{0} ^ {1} = {2}", firstNumber, secondNumber, result);
        }
    }
}
When we run the program, the output will be:
Bitwise Complement
Bitwise Complement operator is represented by ~. It is a unary operator, i.e. operates on only one operand. The ~ operator inverts each bits i.e. changes 1 to 0 and 0 to 1.
For Example,
Bitwise Complement operation on 26:
Example 4: Bitwise Complement
using System;

namespace Operator
{
    class BitWiseComplement
    {
        public static void Main(string[] args)
        {
            int number = 26, result;
            result = ~number;
            Console.WriteLine("~{0} = {1}", number, result);
        }
    }
}
When we run the program, the output will be:
We got -27 as output when we were expecting 229. Why did this happen?
It happens because the binary value 11100101 which we expect to be 229 is actually a 2's complement representation of -27. Negative numbers in computer are represented in 2's complement representation.
For any integer n, 2's complement of n will be -(n+1).
2's complement
| Decimal | Binary | 2's Complement |
|---|---|---|
| 0 | 00000000 | -(11111111 + 1) = -00000000 = -0 (In Decimal) |
| 1 | 00000001 | -(11111110 + 1) = -11111111 = -256 (In Decimal) |
| 229 | 11100101 | -(00011010 + 1) = -00011011 = -27 |
Overflow values are ignored in 2's complement.
The bitwise complement of 26 is 229 (in decimal) and the 2's complement of 229 is -27. Hence the output is -27 instead of 229.
Bitwise Left Shift
Bitwise left shift operator is represented by <<. The << operator shifts a number to the left by a specified number of bits. Zeroes are added to the least significant bits.
In decimal, it is equivalent to
For Example,
Bitwise Lift Shift operation on 42:
42 << 1 = 84 (In binary 1010100)
42 << 2 = 168 (In binary 10101000)
42 << 4 = 672 (In binary 1010100000)
Example 5: Bitwise Left Shift
using System;

namespace Operator
{
    class LeftShift
    {
        public static void Main(string[] args)
        {
            int number = 42;

            Console.WriteLine("{0}<<1 = {1}", number, number<<1);
            Console.WriteLine("{0}<<2 = {1}", number, number<<2);
            Console.WriteLine("{0}<<4 = {1}", number, number<<4);
        }
    }
}
When we run the program, the output will be:
Bitwise Right Shift
Bitwise right shift operator is represented by >>. The >> operator shifts a number to the right by a specified number of bits. The first operand is shifted to right by the number of bits specified by second operand.
In decimal, it is equivalent to
For Example,
Bitwise Lift Shift operation on 42:
Example 6: Bitwise Right Shift
using System;

namespace Operator
{
    class LeftShift
    {
        public static void Main(string[] args)
        {
            int number = 42;

            Console.WriteLine("{0}>>1 = {1}", number, number>>1);
            Console.WriteLine("{0}>>2 = {1}", number, number>>2);
            Console.WriteLine("{0}>>4 = {1}", number, number>>4);
        }
    }
}
When we run the program, the output will be:
C# Basic Input and Output
In this tutorial, we will learn how to take input from user and and display output in C# using various methods
C# Output
In order to output something in C#, we can use
Here, System is a namespace, Console is a class within namespace System and WriteLine and Write are methods of class Console.
Let's look at a simple example that prints a string to output screen.
Example 1: Printing String using WriteLine()
using System;

namespace Sample
{
    class Test
    {
        public static void Main(string[] args)
        {
            Console.WriteLine("C# is cool");
        }
    }
}
When we run the program, the output will be
Difference between WriteLine() and Write() method
The main difference between WriteLine() and Write() is that the Write() method only prints the string provided to it, while the WriteLine() method prints the string and moves to the start of next line as well.
Let's take at a look at the example below to understand the difference between these methods.
Example 2: How to use WriteLine() and Write() method?
using System;

namespace Sample
{
    class Test
    {
        public static void Main(string[] args)
        {
            Console.WriteLine("Prints on ");
            Console.WriteLine("New line");

            Console.Write("Prints on ");
            Console.Write("Same line");
        }
    }
}
When we run the program, the output will be
Printing Variables and Literals using WriteLine() and Write()
The WriteLine() and Write() method can be used to print variables and literals. Here's an example.
Example 3: Printing Variables and Literals
using System;

namespace Sample
{
    class Test
    {
        public static void Main(string[] args)
        {
            int value = 10;

            // Variable
            Console.WriteLine(value);
            // Literal
            Console.WriteLine(50.05);
        }
    }
}
When we run the program, the output will be
Combining (Concatenating) two strings using + operator and printing them
Strings can be combined/concatenated using the + operator while printing.
Example 4: Printing Concatenated String using + operator
using System;

namespace Sample
{
    class Test
    {
        public static void Main(string[] args)
        {
            int val = 55;
            Console.WriteLine("Hello " + "World");
            Console.WriteLine("Value = " + val);
        }
    }
}
When we run the program, the output will be
Printing concatenated string using Formatted String [Better Alternative]
A better alternative for printing concatenated string is using formatted string. Formatted string allows programmer to use placeholders for variables.
For example, The following line,
can be replaced by,
{0} is the placeholder for variable val which will be replaced by value of val. Since only one variable is used so there is only one placeholder.
Multiple variables can be used in the formatted string. We will see that in the example below.
Example 5: Printing Concatenated string using String formatting
using System;

namespace Sample
{
    class Test
    {
        public static void Main(string[] args)
        {
            int firstNumber = 5, secondNumber = 10, result;
            result = firstNumber + secondNumber;
            Console.WriteLine("{0} + {1} = {2}", firstNumber, secondNumber, result);
        }
    }
}
When we run the program, the output will be
Here, {0} is replaced by firstNumber, {1} is replaced by secondNumber and {2} is replaced by result. This approach of printing output is more readable and less error prone than using + operator.
To know more about string formatting, visit C# string formatting.
C# Input
In C#, the simplest method to get input from the user is by using the ReadLine() method of the Console class. However, Read() and ReadKey() are also available for getting input from the user. They are also included in Console class.
Example 6: Get String Input From User
using System;

namespace Sample
{
    class Test
    {
        public static void Main(string[] args)
        {
            string testString;
            Console.Write("Enter a string - ");
            testString = Console.ReadLine();
            Console.WriteLine("You entered '{0}'", testString);
        }
    }
}
When we run the program, the output will be:
Difference between ReadLine(), Read() and ReadKey() method:
The difference between ReadLine(), Read() and ReadKey() method is:
ReadLine(): TheReadLine()method reads the next line of input from the standard input stream. It returns the same string.Read(): TheRead()method reads the next character from the standard input stream. It returns the ascii value of the character.ReadKey(): TheReadKey()method obtains the next key pressed by user. This method is usually used to hold the screen until user press a key.
If you want to know more about these methods, here is an interesting discussion on StackOverflow on: Difference between Console.Read() and Console.ReadLine()?.
Example 7: Difference between Read() and ReadKey() method
using System;

namespace Sample
{
    class Test
    {
        public static void Main(string[] args)
        {
            int userInput;

            Console.WriteLine("Press any key to continue...");
            Console.ReadKey();
            Console.WriteLine();

            Console.Write("Input using Read() - ");
            userInput = Console.Read();
            Console.WriteLine("Ascii Value = {0}",userInput);
        }
    }
}
When we run the program, the output will be
From this example, it must be clear how ReadKey() and Read() method works. While using ReadKey(), as soon as the key is pressed, it is displayed on the screen.
When Read() is used, it takes a whole line but only returns the ASCII value of first character. Hence, 76 (ASCII value of L) is printed.
Reading numeric values (integer and floating point types)
Reading a character or string is very simple in C#. All you need to do is call the corresponding methods as required.
But, reading numeric values can be slightly tricky in C#. We’ll still use the same ReadLine() method we used for getting string values. But since the ReadLine() method receives the input as string, it needs to be converted into integer or floating point type.
One simple approach for converting our input is using the methods of Convert class.
Example 8: Reading Numeric Values from User using Convert class
using System;

namespace UserInput
{
    class MyClass
    {
        public static void Main(string[] args)
        {
            string userInput;
            int intVal;
            double doubleVal;

            Console.Write("Enter integer value: ");
            userInput = Console.ReadLine();
            /* Converts to integer type */
            intVal = Convert.ToInt32(userInput);
            Console.WriteLine("You entered {0}",intVal);

            Console.Write("Enter double value: ");
            userInput = Console.ReadLine();
            /* Converts to double type */
            doubleVal = Convert.ToDouble(userInput);
            Console.WriteLine("You entered {0}",doubleVal);
        }
    }
}
When we run the program, the output will be
The ToInt32() and ToDouble() method of Convert class converts the string input to integer and double type respectively. Similarly we can convert the input to other types. Here is a complete list of available methods for Convert class.
There are other ways to get numeric inputs from user. To learn more, visit Reading an integer from user input.
C# Expressions, Statements and Blocks (With Examples)
In this article, we will learn about C# expressions, C# statements, difference between expression and statement, and C# blocks.
Expressions, statements and blocks are the building block of a C# program. We have been using them since our first "Hello World" program.
C# Expressions
An expression in C# is a combination of operands (variables, literals, method calls) and operators that can be evaluated to a single value. To be precise, an expression must have at least one operand but may not have any operator.
Let's look at the example below:
Here, 42.05 is an expression. Also, temperature = 42.05 is an expression too.
Here, a + b + c is an expression.
Here, (age>=18 && age<58) is an expression that returns a boolean value. "Eligible to work" is also an expression.
C# Statements
A statement is a basic unit of execution of a program. A program consists of multiple statements.
For example:
In the above example, both lines above are statements.
There are different types of statements in C#. In this tutorial, we’ll mainly focus on two of them:
- Declaration Statement
- Expression Statement
Declaration Statement
Declaration statements are used to declare and initialize variables.
For example:
Both char ch; and int maxValue = 55; are declaration statements.
Expression Statement
An expression followed by a semicolon is called an expression statement.
For example:
/* Assignment */
area = 3.14 * radius * radius;
/* Method call is an expression*/
System.Console.WriteLine("Hello");
Here, 3.14 * radius * radius is an expression and area = 3.14 * radius * radius; is an expression statement.
Likewise, System.Console.WriteLine("Hello"); is both an expression and a statement.
Beside declaration and expression statement, there are:
- Selection Statements (if...else, switch)
- Iteration Statements (do, while, for, foreach)
- Jump Statements (break, continue, goto, return, yield)
- Exception Handling Statements (throw, try-catch, try-finally, try-catch-finally)
These statements will be discussed in later tutorials.
If you want to learn more about statements, visit C# Statements ( C# reference)
C# Blocks
A block is a combination of zero or more statements that is enclosed inside curly brackets { }.
For example:
Example 1: C# Blocks with statements
using System;

namespace Blocks
{
    class BlockExample
    {
        public static void Main(string[] args)
        {
            double temperature = 42.05;
            if (temperature > 32)
            {    // Start of block
                Console.WriteLine("Current temperature = {0}", temperature);
                Console.WriteLine("It's hot");
            }    // End of block
        }
    }
}
When we run the program, the output will be:
Here, the two statements inside { }:
and
forms a block.
Example 2: C# Blocks without statements
A block may not have any statements within it as shown in the below example.
using System;

namespace Blocks
{
    class BlockExample
    {
        public static void Main(string[] args)
        {
            double temperature = 42.05;
            if (temperature > 32)
            {    // Start of block
                // No statements
            }    // End of block
        }
    }
}
Here, the curly braces { } after if(temperature > 32) contains only comments and no statements.
C# Comments
In this article, we will learn about C# comments, different style of comments, and why and how to use them in a program.
Comments are used in a program to help us understand a piece of code. They are human readable words intended to make the code readable. Comments are completely ignored by the compiler.
In C#, there are 3 types of comments:
- Single Line Comments (
//) - Multi Line Comments (
/* */) - XML Comments (
///)
Single Line Comments
Single line comments start with a double slash //. The compiler ignores everything after // to the end of the line. For example,
Here, Adding 5 and 7 is the comment.
Example 1: Using single line comment
// Hello World Program
using System;

namespace HelloWorld
{
    class Program
    {
        public static void Main(string[] args)  // Execution Starts from Main method
        {
            // Prints Hello World
            Console.WriteLine("Hello World!");
        }
    }
}
The above program contains 3 single line comments:
and
Single line comments can be written in a separate line or along with the codes in same line. However, it is recommended to use comments in a separate line.
Multi Line Comments
Multi line comments start with /* and ends with */. Multi line comments can span over multiple lines.
Example 2: Using multi line comment
/*    This is a Hello World Program in C#.    This program prints Hello World.*/
using System;

namespace HelloWorld
{
    class Program
    {
        public static void Main(string[] args)
        {
            /* Prints Hello World     */
            Console.WriteLine("Hello World!");
        }
    }
}
The above program contains 2 multi line comments:
and
Here, we may have noticed that it is not compulsory for a multi line comment to span over multiple lines./* … */ can be used instead of single line comments.
XML Documentation Comments
XML documentation comment is a special feature in C#. It starts with a triple slash /// and is used to categorically describe a piece of code.. This is done using XML tags within a comment. These comments are then, used to create a separate XML documentation file.
If you are not familiar with XML, see What is XML?
Example 3: Using XML documentation comment
/// <summary>
///  This is a hello world program.
/// </summary>

using System;

namespace HelloWorld
{
    class Program
    {
        public static void Main(string[] args)
        {
            Console.WriteLine("Hello World!");
        }
    }
}
The XML comment used in the above program is
The XML documentation (.xml file) generated will contain:
<?xml version="1.0"?>
<doc>
    <assembly>
        <name>HelloWorld</name>
    </assembly>
    <members>
    </members>
</doc>
Visit XML Documentation Comments if you are interested in learning more.
Use Comments the Right Way
Comments are used to explain parts of code but they should not be overused .
For example:
Using comment in the above example is not necessary. It is obvious that the line will print Hello World. Comments should be avoided in such cases.
- Instead comments should be used in the program to explain complex algorithms and techniques.
- Comments should be short and to the point instead of a long description.
- As a rule of thumb, it is better to explain why instead of how, using comments.
Flow Control
C# if, if...else, if...else if and Nested if Statement
In this article, we will learn how to use if, if...else, if...else if statement in C# to control the flow of our program’s execution.
Testing a condition is inevitable in programming. We will often face situations where we need to test conditions (whether it is true or false) to control the flow of program. These conditions may be affected by user's input, time factor, current environment where the program is running, etc.
In this article, we'll learn to test conditions using if statement in C#.
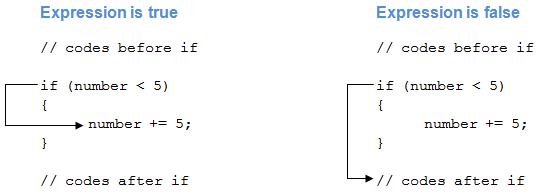
C# if (if-then) Statement
C# if-then statement will execute a block of code if the given condition is true. The syntax of if-then statement in C# is:
- The boolean-expression will return either true or
false. - If the boolean-expression returns
true, the statements inside the body of if ( inside{...}) will be executed. - If the boolean-expression returns
false, the statements inside the body of if will be ignored.
For example,
In this example, the statement
will be executed only if the value of number is less than 5.
Remember the += operator?
How if statement works?
Example 1: C# if Statement
using System;
namespace Conditional
{
class IfStatement
{
public static void Main(string[] args)
{
int number = 2;
if (number < 5)
{
Console.WriteLine("{0} is less than 5", number);
}
Console.WriteLine("This statement is always executed.");
}
}
}
When we run the program, the output will be:
The value of number is initialized to 2. So the expression number < 5 is evaluated to true. Hence, the code inside the if block are executed. The code after the if statement will always be executed irrespective to the expression.
Now, change the value of number to something greater than 5, say 10. When we run the program the output will be:
This statement is always executed.
The expression number < 5 will return false, hence the code inside if block won't be executed.
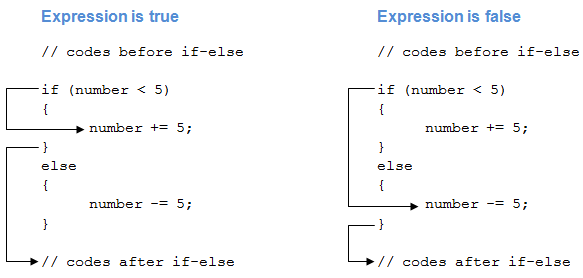
C# if...else (if-then-else) Statement
The if statement in C# may have an optional else statement. The block of code inside the else statement will be executed if the expression is evaluated to false.
The syntax of if...else statement in C# is:
if (boolean-expression)
{
    // statements executed if boolean-expression is true
}
else
{
// statements executed if boolean-expression is false
}
For example,
In this example, the statement
will be executed only if the value of number is less than 5.
The statement
will be executed if the value of number is greater than or equal to 5.
How if...else Statement works?
Working of if...else Statement
Example 2: C# if...else Statement
using System;

namespace Conditional
{
    class IfElseStatement
    {
        public static void Main(string[] args)
        {
            int number = 12;

            if (number < 5)
            {
                Console.WriteLine("{0} is less than 5", number);
            }
            else
            {
                Console.WriteLine("{0} is greater than or equal to 5", number);
            }

            Console.WriteLine("This statement is always executed.");
        }
    }
}
When we run the program, the output will be:
Here, the value of number is initialized to 12. So the expression number < 5 is evaluated to false. Hence, the code inside the else block are executed. The code after the if..else statement will always be executed irrespective to the expression.
Now, change the value of number to something less than 5, say 2. When we run the program the output will be:
The expression number < 5 will return true, hence the code inside if block will be executed.
Ternary operator in C# provides a shortcut for C# if...else statement.
C# if...else if (if-then-else if) Statement
When we have only one condition to test, if-then and if-then-else statement works fine. But what if we have a multiple condition to test and execute one of the many block of code.
For such case, we can use if..else if statement in C#. The syntax for if...else if statement is:
if (boolean-expression-1)
{
    // statements executed if boolean-expression-1 is true
}
else if (boolean-expression-2)
{
    // statements executed if boolean-expression-2 is true
}
else if (boolean-expression-3)
{
    // statements executed if boolean-expression-3 is true
}
.
.
.
else
{
    // statements executed if all above expressions are false
}
The if...else if statement is executed from the top to bottom. As soon as a test expression is true, the code inside of that if ( or else if ) block is executed. Then the control jumps out of the if...else if block.
If none of the expression is true, the code inside the else block is executed.
Alternatively, we can use switch statement in such condition.
Example 3: C# if...else if Statement
using System;

namespace Conditional
{
    class IfElseIfStatement
    {
        public static void Main(string[] args)
        {
            int number = 12;

            if (number < 5)
            {
                Console.WriteLine("{0} is less than 5", number);
            }
            else if (number > 5)
            {
                Console.WriteLine("{0} is greater than 5", number);
            }
            else
            {
                Console.WriteLine("{0} is equal to 5");
            }
        }
    }
}
When we run the program, the output will be:
The value of number is initialized to 12. The first test expression number < 5 is false, so the control will move to the else if block. The test expression number > 5 is true hence the block of code inside else if will be executed.
Similarly, we can change the value of number to alter the flow of execution.
Nested if...else Statement
An if...else statement can exist within another if...else statement. Such statements are called nested if...else statement.
The general structure of nested if...else statement is:
if (boolean-expression){
    if (nested-expression-1){
        // code to be executed
    }else{
    // code to be executed
    }
}else{
    if (nested-expression-2){
        // code to be executed
    }else{
        // code to be executed
    }
}
Nested if statements are generally used when we have to test one condition followed by another. In a nested if statement, if the outer if statement returns true, it enters the body to check the inner if statement.
Example 4: Nested if...else Statement
The following program computes the largest number among 3 numbers using nested if...else statement.
using System;

namespace Conditional{
    class Nested{
        public static void Main(string[] args){
            int first = 7, second = -23, third = 13;
            if (first > second){
                if (firstNumber > third){
                    Console.WriteLine("{0} is the largest", first);
                }else{
                    Console.WriteLine("{0} is the largest", third);
                }
            }else{
                  if (second > third){
                    Console.WriteLine("{0} is the largest", second);
                    }else{
                    Console.WriteLine("{0} is the largest", third);
                    }
            }
        }
    }
}
When we run the program, the output will be:
C# switch Statement
In this article, we will learn about switch statement in C# and how to use them with examples.
Switch statement can be used to replace the if...else if statement in C#. The advantage of using switch over if...else if statement is the codes will look much cleaner and readable with switch.
The syntax of switch statement is:
switch (variable/expression)
{
    case value1:
        // Statements executed if expression(or variable) = value1
        break;
    case value2:
        // Statements executed if expression(or variable) = value1
        break;
    ... ... ...
    ... ... ...
    default:
        // Statements executed if no case matches
}
The switch statement evaluates the expression (or variable) and compare its value with the values (or expression) of each case (value1, value2, …). When it finds the matching value, the statements inside that case are executed.
But, if none of the above cases matches the expression, the statements inside default block is executed. The default statement at the end of switch is similar to the else block in if else statement.
However a problem with the switch statement is, when the matching value is found, it executes all statements after it until the end of switch block.
To avoid this, we use break statement at the end of each case. The break statement stops the program from executing non-matching statements by terminating the execution of switch statement.
To learn more about break statement, visit C# break statement.
Example 1: C# switch Statement
using System;

namespace Conditional
{
    class SwitchCase
    {
        public static void Main(string[] args)
        {
            char ch;
            Console.WriteLine("Enter an alphabet");
            ch = Convert.ToChar(Console.ReadLine());

            switch(Char.ToLower(ch))
            {
                case 'a':
                    Console.WriteLine("Vowel");
                    break;
                case 'e':
                    Console.WriteLine("Vowel");
                    break;
                case 'i':
                    Console.WriteLine("Vowel");
                    break;
                case 'o':
                    Console.WriteLine("Vowel");
                    break;
                case 'u':
                    Console.WriteLine("Vowel");
                    break;
                default:
                    Console.WriteLine("Not a vowel");
                    break;
            }
        }
    }
}
When we run the program, the output will be:
In this example, the user is prompted to enter an alphabet. The alphabet is converted to lowercase by using ToLower() method if it is in uppercase.
Then, the switch statement checks whether the alphabet entered by user is any of a, e, i, o or u.
If one of the case matches, Vowel is printed otherwise the control goes to default block and Not a vowel is printed as output.
Since, the output for all vowels are the same, we can join the cases as:
Example 2: C# switch Statement with grouped cases
using System;

namespace Conditional
{
    class SwitchCase
    {
        public static void Main(string[] args)
        {
            char ch;
            Console.WriteLine("Enter an alphabet");
            ch = Convert.ToChar(Console.ReadLine());

            switch(Char.ToLower(ch))
            {
                case 'a':
                case 'e':
                case 'i':
                case 'o':
                case 'u':
                    Console.WriteLine("Vowel");
                    break;
                default:
                    Console.WriteLine("Not a vowel");
                    break;
            }
        }
    }
}
The output of both programs is same. In the above program, all vowels print the output Vowel and breaks from the switch statement.
Although switch statement makes the code look cleaner than if...else if statement, switch is restricted to work with limited data types. Switch statement in C# only works with:
- Primitive data types: bool, char and integral type
- Enumerated Types (Enum)
- String Class
- Nullable types of above data types
Example 3: Simple calculator program using C# switch Statement
using System;

namespace Conditional
{
    class SwitchCase
    {
        public static void Main(string[] args)
        {
            char op;
            double first, second, result;

            Console.Write("Enter first number: ");
            first = Convert.ToDouble(Console.ReadLine());
            Console.Write("Enter second number: ");
            second = Convert.ToDouble(Console.ReadLine());
            Console.Write("Enter operator (+, -, *, /): ");
            op = (char)Console.Read();

            switch(op)
            {
                case '+':
                    result = first + second;
                    Console.WriteLine("{0} + {1} = {2}", first, second, result);
                    break;

                case '-':
                    result = first - second;
                    Console.WriteLine("{0} - {1} = {2}", first, second, result);
                    break;

                case '*':
                    result = first * second;
                    Console.WriteLine("{0} * {1} = {2}", first, second, result);
                    break;

                case '/':
                    result = first / second;
                    Console.WriteLine("{0} / {1} = {2}", first, second, result);
                    break;

                default:
                    Console.WriteLine("Invalid Operator");
                    break;

            }
        }
    }
}
When we run the program, the output will be:
Enter first number: -13.11
Enter second number: 2.41
Enter operator (+, -, *, /): *
-13.11 * 2.41 = -31.5951
The above program takes two operands and an operator as input from the user and performs the operation based on the operator.
The inputs are taken from the user using the ReadLine() and Read() method. To learn more, visit C# Basic Input and Output.
The program uses switch case statement for decision making. Alternatively, we can use if-else if ladder to perform the same operation.
C# ternary (? :) Operator
In this article, we will learn about C# ternary operator and how to use it to control the flow of program.
Ternary operator are a substitute for if...else statement. So before you move any further in this tutorial, go through C# if...else statement (if you haven't).
The syntax of ternary operator is:
The ternary operator works as follows:
- If the expression stated by
Conditionistrue, the result ofExpression1is returned by the ternary operator. - If it is
false, the result ofExpression2is returned.
For example, we can replace the following code
with
Why is it called ternary operator?
This operator takes 3 operand, hence called ternary operator.
Example 1: C# Ternary Operator
using System;

namespace Conditional
{
    class Ternary
    {
        public static void Main(string[] args)
        {
            int number = 2;
            bool isEven;

            isEven = (number % 2 == 0) ? true : false ;
            Console.WriteLine(isEven);
        }
    }
}
When we run the program, the output will be:
In the above program, 2 is assigned to a variable number. Then, the ternary operator is used to check if number is even or not.
Since, 2 is even, the expression (number % 2 == 0) returns true. We can also use ternary operator to return numbers, strings and characters.
Instead of storing the return value in variable isEven, we can directly print the value returned by ternary operator as,
When to use ternary operator?
Ternary operator can be used to replace multi lines of code with a single line. However, we shouldn't overuse it.
For example, we can replace the following if..else if code
if (a > b){
    result = "a is greater than b";
}else if (a < b){
    result = "b is greater than a";
}else{
    result = "a is equal to b";
}
with a single line of code
As we can see, the use of ternary operator may decrease the length of code but it makes us difficult to understand the logic of the code.
Hence, it's better to only use ternary operator to replace simple if else statement
C# for loop
In this article, we will learn about for loop in C# and different ways to use them in a program.
In programming, it is often desired to execute certain block of statements for a specified number of times. A possible solution will be to type those statements for the required number of times. However, the number of repetition may not be known in advance (during compile time) or maybe large enough (say 10000).
The best solution to such problem is loop. Loops are used in programming to repeatedly execute a certain block of statements until some condition is met.
In this article, we’ll look at for loop in C#.
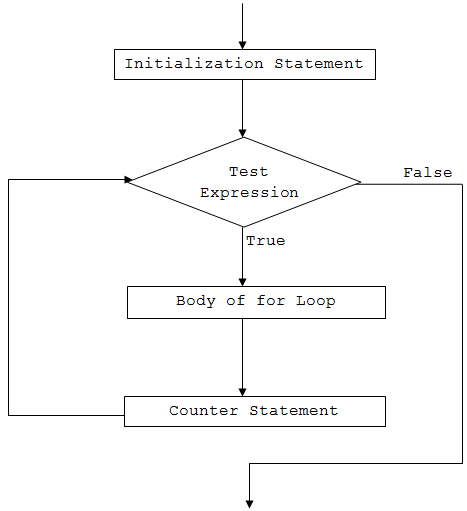
C# for loop
The for keyword is used to create for loop in C#. The syntax for for loop is:
How for loop works?
- C# for loop has three statements:
initialization,conditionanditerator.
- The
initializationstatement is executed at first and only once. Here, the variable is usually declared and initialized.
- Then, the
conditionis evaluated. Theconditionis a boolean expression, i.e. it returns eithertrueorfalse.
- If the
conditionis evaluated totrue: - The statements inside the for loop are executed.
- Then, the
iteratorstatement is executed which usually changes the value of the initialized variable. - Again the
conditionis evaluated. - The process continues until the
conditionis evaluated tofalse.
- If the
conditionis evaluated tofalse, the for loop terminates.
for Loop Flowchart
Working of C# for loop
Example 1: C# for Loop
using System;

namespace Loop
{
    class ForLoop
    {
        public static void Main(string[] args)
        {
            for (int i=1; i<=5; i++)
            {
                Console.WriteLine("C# For Loop: Iteration {0}", i);
            }
        }
    }
}
When we run the program, the output will be:
C# For Loop: Iteration 1
C# For Loop: Iteration 2
C# For Loop: Iteration 3
C# For Loop: Iteration 4
C# For Loop: Iteration 5
In this program,
initializationstatement isint i=1conditionstatement isi<=5iteratorstatement isi++
When the program runs,
- First, the variable i is declared and initialized to 1.
- Then, the condition (
i<=5) is evaluated.
- Since, the condition returns
true, the program then executes the body of the for loop. It prints the given line with Iteration 1 (Iteration simply means repetition).
- Now, the iterator (
i++) is evaluated. This increments the value of i to 2.
- The condition (
i<=5) is evaluated again and at the end, the value of i is incremented by 1. The condition will evaluate totruefor the first 5 times.
- When the value of i will be 6 and the condition will be
false, hence the loop will terminate.
Example 2: for loop to compute sum of first n natural numbers
using System;

namespace Loop
{
    class ForLoop
    {
        public static void Main(string[] args)
        {
            int n = 5,sum = 0;

            for (int i=1; i<=n; i++)
            {
                // sum = sum + i;
                sum += i;
            }

            Console.WriteLine("Sum of first {0} natural numbers = {1}", n, sum);
        }
    }
}
When we run the program, the output will be:
Here, the value of sum and n are initialized to 0 and 5 respectively. The iteration variable i is initialized to 1 and incremented on each iteration.
Inside the for loop, value of sum is incremented by i i.e. sum = sum + i. The for loop continues until i is less than or equal to n (user's input).
Let's see what happens in the given program on each iteration.
Initially, i = 1, sum = 0 and n = 3
| For loop execution steps | Iteration | Value of i | i<=5 | Value of sum |
|---|---|---|---|---|
| 1 | 1 | true | 0+1 = 1 | --- |
| 2 | 2 | true | 1+2 = 3 | --- |
| 3 | 3 | true | 3+3 = 6 | --- |
| 4 | 4 | true | 6+4 = 10 | --- |
| 5 | 5 | true | 10+5 = 15 | --- |
| 6 | 6 | false | Loop terminates | --- |
So, the final value of sum will be 15 when n = 5.
Multiple expressions inside a for loop
We can also use multiple expressions inside a for loop. It means we can have more than one initialization and/or iterator statements within a for loop. Let's see the example below.
Example 3: for loop with multiple initialization and iterator expressions
using System;

namespace Loop
{
    class ForLoop
    {
        public static void Main(string[] args)
        {
            for (int i=0, j=0; i+j<=5; i++, j++)
            {
                Console.WriteLine("i = {0} and j = {1}", i,j);
            }
        }
    }
}
When we run the program, the output will be:
In this program, we have declared and initialized two variables: i and j in the initialization statement.
Also, we have two expressions in the iterator part. That means both i and j are incremented by 1 on each iteration.
For loop without initialization and iterator statements
The initialization, condition and the iterator statement are optional in a for loop. It means we can run a for loop without these statements as well.
In such cases, for loop acts as a while loop. Let's see the example below.
Example 4: for loop without initialization and iterator statement
using System;

namespace Loop
{
    class ForLoop
    {
        public static void Main(string[] args)
        {
            int i = 1;
            for ( ; i<=5; )
            {
                Console.WriteLine("C# For Loop: Iteration {0}", i);
                i++;
            }
        }
    }
}
When we run the program, the output will be:
C# For Loop: Iteration 1
C# For Loop: Iteration 2
C# For Loop: Iteration 3
C# For Loop: Iteration 4
C# For Loop: Iteration 5
In this example, we haven't used the initialization and iterator statement.
The variable i is initialized above the for loop and its value is incremented inside the body of loop. This program is same as the one in Example 1.
Similarly, the condition is also an optional statement. However if we don't use test expression, the for loop won't test any condition and will run forever (infinite loop).
Infinite for loop
If the condition in a for loop is always true, for loop will run forever. This is called infinite for loop.
Example 5: Infinite for loop
using System;

namespace Loop
{
    class ForLoop
    {
        public static void Main(string[] args)
        {
            for (int i=1 ; i>0; i++)
            {
                Console.WriteLine("C# For Loop: Iteration {0}", i);
            }
        }
    }
}
Here, i is initialized to 1 and the condition is i>0. On each iteration we are incrementing the value of i by 1, so the condition will never be false. This will cause the loop to execute infinitely.
We can also create an infinite loop by replacing the condition with a blank. For example,
or
C# while and do...while loop
In this article, we will learn about while and do...while loop in C#, how to use them and difference between them.
In programming, it is often desired to execute certain block of statements for a specified number of times. A possible solution will be to type those statements for the required number of times. However, the number of repetition may not be known in advance (during compile time) or maybe large enough (say 10000).
The best solution to such problem is loop. Loops are used in programming to repeatedly execute a certain block of statements until some condition is met.
In this article, we'll learn to use while loops in C#.
C# while loop
The while keyword is used to create while loop in C#. The syntax for while loop is:
How while loop works?
- C# while loop consists of a
test-expression. - If the
test-expressionis evaluated totrue, - statements inside the while loop are executed.
- after execution, the
test-expressionis evaluated again. - If the
test-expressionis evaluated tofalse, the while loop terminates.
while loop Flowchart
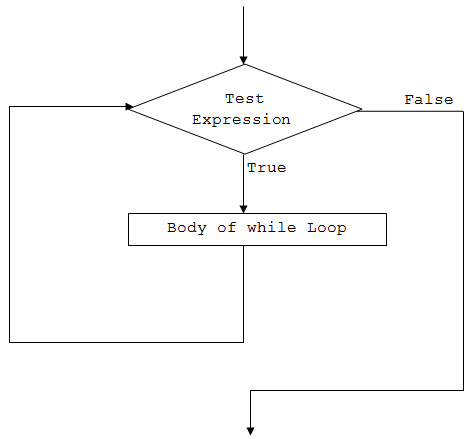
Example 1: while Loop
using System;

namespace Loop
{
    class WhileLoop
    {
        public static void Main(string[] args)
        {
            int i=1;
            while (i<=5)
            {
                Console.WriteLine("C# For Loop: Iteration {0}", i);
                i++;
            }
        }
    }
}
When we run the program, the output will be:
C# For Loop: Iteration 1
C# For Loop: Iteration 2
C# For Loop: Iteration 3
C# For Loop: Iteration 4
C# For Loop: Iteration 5
Initially the value of i is 1.
When the program reaches the while loop statement,
- the test expression
i <=5is evaluated. Since i is 1 and1 <= 5istrue, it executes the body of the while loop. Here, the line is printed on the screen with Iteration 1, and the value of i is increased by 1 to become 2. - Now, the test expression (
i <=5) is evaluated again. This time too, the expression returnstrue(2 <= 5), so the line is printed on the screen and the value of i is now incremented to 3.. - This goes and the while loop executes until i becomes 6. At this point, the test-expression will evaluate to
falseand hence the loop terminates.
Example 2: while loop to compute sum of first 5 natural numbers
using System;

namespace Loop
{
    class WhileLoop
    {
        public static void Main(string[] args)
        {
            int i=1, sum=0;

            while (i<=5)
            {
                sum += i;
                i++;
            }
            Console.WriteLine("Sum = {0}", sum);
        }
    }
}
When we run the program, the output will be:
This program computes the sum of first 5 natural numbers.
- Initially the value of sum is initialized to 0.
- On each iteration, the value of sum is updated to
sum+iand the value of i is incremented by 1. - When the value of i reaches 6, the test expression
i<=5will return false and the loop terminates.
Let's see what happens in the given program on each iteration.
Initially, i = 1, sum = 0, While loop execution steps
| For loop execution steps | Iteration | Value of i | i<=5 | Value of sum |
|---|---|---|---|---|
| 1 | 1 | true | 0+1 = 1 | --- |
| 2 | 2 | true | 1+2 = 3 | --- |
| 3 | 3 | true | 3+3 = 6 | --- |
| 4 | 4 | true | 6+4 = 10 | --- |
| 5 | 5 | true | 10+5 = 15 | --- |
| 6 | 6 | false | Loop terminates | --- |
So, the final value of sum will be 15.
C# do...while loop
The do and while keyword is used to create a do...while loop. It is similar to a while loop, however there is a major difference between them.
In while loop, the condition is checked before the body is executed. It is the exact opposite in do...while loop, i.e. condition is checked after the body is executed.
This is why, the body of do...while loop will execute at least once irrespective to the test-expression.
The syntax for do...while loop is:
How do...while loop works?
- The body of do...while loop is executed at first.
- Then the
test-expressionis evaluated. - If the
test-expressionistrue, the body of loop is executed. - When the
test-expressionisfalse, do...while loop terminates.
do...while loop Flowchart

Example 3: do...while loop
using System;

namespace Loop
{
    class DoWhileLoop
    {
        public static void Main(string[] args)
        {
            int i = 1, n = 5, product;

            do
            {
                product = n * i;
                Console.WriteLine("{0} * {1} = {2}", n, i, product);
                i++;
            } while (i <= 10);
        }
    }
}
When we run the program, the output will be:
5 * 1 = 5
5 * 2 = 10
5 * 3 = 15
5 * 4 = 20
5 * 5 = 25
5 * 6 = 30
5 * 7 = 35
5 * 8 = 40
5 * 9 = 45
5 * 10 = 50
As we can see, the above program prints the multiplication table of a number (5).
- Initially, the value of i is 1. The program, then enters the body of do..while loop without checking any condition (as opposed to while loop).
- Inside the body, product is calculated and printed on the screen. The value of i is then incremented to 2.
- After the execution of the loop’s body, the test expression
i <= 10is evaluated. In total, the do...while loop will run for 10 times. - Finally, when the value of i is 11, the test-expression evaluates to
falseand hence terminates the loop.
Infinite while and do...while loop
If the test expression in the while and do...while loop never evaluates to false, the body of loop will run forever. Such loops are called infinite loop.
For example:
Infinite while loop
Infinite do...while loop
The infinite loop is useful when we need a loop to run as long as our program runs.
For example, if your program is an animation, you will need to constantly run it until it is stopped. In such cases, an infinite loop is necessary to keep running the animation repeatedly.
Nested Loops in C#: for, while, do-while
In this article, we will learn about nested loops in C#. We'll learn to use nested for, while and do-while loops in a program.
A loop within another loop is called nested loop. This is how a nested loop looks like:
As you can see, the outer loop encloses the inner loop. The inner loop is a part of the outer loop and must start and finish within the body of outer loop.
On each iteration of outer loop, the inner loop is executed completely.
Nested for loop
A for loop inside another for loop is called nested for loop.
For example:
for (int i=0; i<5; i++)
{
    // body of outer for loop
    for (int j=0; j<5; j++)
    {
        // body of inner for loop
    }
    // body of outer for loop
}
Example 1: Nested for Loop
using System;

namespace Loop
{
    class NestedForLoop
    {
        public static void Main(string[] args)
        {
            int outerLoop = 0, innerLoop = 0;
            for (int i=1; i<=5; i++)
            {
                outerLoop ++;
                for (int j=1; j<=5; j++)
                {
                    innerLoop++;
                }
            }
            Console.WriteLine("Outer Loop runs {0} times", outerLoop);
            Console.WriteLine("Inner Loop runs {0} times", innerLoop);
        }
    }
}
When we run the program, the output will be:
In this program, the outer loop runs for 5 times. Each time the outer loop runs, the inner loop runs for 5 times making it run 25 times altogether.
Example 2: Nested for Loop to Print Pattern
using System;

namespace Loop{
    class NestedForLoop{
        public static void Main(string[] args){
            for (int i=1; i<=5; i++){
                for (int j=1; j<=i; j++){
                  Console.Write(j + " ");
                }
              Console.WriteLine();
            }
        }
    }
}
When we run the program, the output will be:
Nested while loop
A while loop inside another while loop is called nested while loop.
For example:
while (condition-1)
{
    // body of outer while loop
    while (condition-2)
    {
        // body of inner while loop
    }
    // body of outer while loop
}
Example 3: Nested while Loop
using System;

namespace Loop
{
    class NestedWhileLoop
    {
        public static void Main(string[] args)
        {
            int i=0;
            while (i<2)
            {
                int j=0;
                while (j<2)
                {
                    Console.Write("({0},{1}) ", i,j);
                    j++;
                }
                i++;
                Console.WriteLine();
            }
        }
    }
}
When we run the program, the output will be:
Nested do-while loop
A do-while loop inside another do-while loop is called nested do-while loop.
For example:
do
{
    // body of outer while loop
    do
    {
        // body of inner while loop
    } while (condition-2);
    // body of outer while loop
} while (condition-1);
Example 4: Nested do-while Loop
using System;

namespace Loop
{
    class NestedWhileLoop
    {
        public static void Main(string[] args)
        {
            int i=0;
            do
            {
                int j=0;
                do
                {
                    Console.Write("({0},{1}) ", i,j);
                    j++;
                } while (j<2);
                i++;
                Console.WriteLine();

            } while (i<2);
        }
    }
}
When we run the program, the output will be:
Different inner and outer nested loops
It is not mandatory to nest same type of loop. We can put a for loop inside a while loop or a do-while loop inside a for loop.
Example 5: C# Nested Loop: Different inner and outer loops
using System;

namespace Loop
{
    class NestedLoop
    {
        public static void Main(string[] args)
        {
            int i=1;
            while (i<=5)
            {
                for (int j=1; j<=i; j++)
                {
                    Console.Write(i + " ");
                }

                Console.WriteLine();
                i++;
            }
        }
    }
}
When we run the program, the output will be:
In the above program, a for loop is placed within a while loop. We can use different types of loop inside a loop.
C# break Statement
In this tutorial, you will learn about the working C# break statement with the help of examples.
In C#, we use the break statement to terminate the loop.
As we know, loops iterate over a block of code until the test expression is false. However, sometimes we may need to terminate the loop immediately without checking the test expression.
In such cases, the break statement is used. The syntax of break statement is,
Before we learn about break, make sure to learn about
Example: C# break statement with for loop
using System;

namespace CSharpBreak {

  class Program {
    static void Main(string[] args) {

      for (int i = 1; i <= 4; ++i) {

        // terminates the loop
        if (i == 3) {
          break;
        }

        Console.WriteLine(i);
      }

      Console.ReadLine();

    }
  }
}
Output
In the above program, our for loop runs 4 times from i = 1 to 4. However, when i is equal to 3, the break statement is encountered.
Now, the loop is terminated suddenly. So, we only get 1 and 2 as output.
Note: The break statement is used with decision-making statements like if..else.
Example: C# break statement with while loop
using System;

namespace WhileBreak {

  class Program {
    static void Main(string[] args) {
      int i = 1;
      while (i <= 5) {
        Console.WriteLine(i);
         i++;
           if (i == 4) {
             // terminates the loop
             break;
           }
      }
      Console.ReadLine();
    }
  }
}
Output
In the above example, we have created a while loop that is supposed to run from i = 1 to 5.
However, when i is equal to 4, the break statement is encountered.
Now, the while loop is terminated.
Working of break statement in C

break Statement with Nested Loop
We can also use the break statement with nested loops. For example,
using System;

namespace NestedBreak {
  class Program {
    static void Main(string[] args) {
      int sum = 0;
      for(int i = 1; i <= 3; i++) { //outer loop
      // inner loop
      for(int j = 1; j <= 3; j++) {
        if (i == 2) {
          break;
        }
      Console.WriteLine("i = " + i + " j = " +j);
      }
    }
    Console.ReadLine();
    }
  }
}
Output
In the above example, we have used the break statement inside the inner for loop. Here, the break statement is executed when i == 2.
Hence, the value of i = 2 is never printed.
Note: The break statement only terminates the inner for loop. This is because we have used the break statement inside the inner loop.
If you want to learn the working of nested loops, visit C# Nested Loops.
break with foreach Loop
We can also use the break statement with foreach loops. For example,
using System;

namespace ForEachBreak {
  class Program {
    static void Main(string[] args) {
      int[] num = { 1, 2, 3, 4, 5 };

      // use of for each loop
      foreach(int number in num) {

        // terminates the loop
         if(number==3) {
           break;
           }

      Console.WriteLine(number);
        }
    }
  }
}
Output
In the above example, we have created an array with values: 1, 2, 3, 4, 5. Here, we have used the foreach loop to print each element of the array.
However, the loop only prints 1 and 2. This is because when the number is equal to 3, the break statement is executed.
This immediately terminates the foreach loop.
break with Switch Statement
We can also use the break statement inside a switch case statement. For example,
using System;

namespace ConsoleApp1 {

  class Program {
    static void Main(string[] args) {
      char ch='e';

       switch (ch) {
         case 'a':
           Console.WriteLine("Vowel");
           break;

         case 'e':
           Console.WriteLine("Vowel");
           break;

         case 'i':
           Console.WriteLine("Vowel");
           break;

         case 'o':
           Console.WriteLine("Vowel");
           break;

         case 'u':
           Console.WriteLine("Vowel");
           break;

         default:
           Console.WriteLine("Not a vowel");
       }
    }
  }
}
Output
Here, we have used the break statement inside each case. It helps us to terminate the switch statement when a matching case is found.
To learn more, visit C# switch statement.
C# continue Statement
In this tutorial, you will learn about the working of C# continue statement with the help of examples.
In C#, we use the continue statement to skip a current iteration of a loop.
When our program encounters the continue statement, the program control moves to the end of the loop and executes the test condition (update statement in case of for loop).
The syntax for continue is:
Before we learn about continue, make sure to learn about
Example1: C# continue with for loop
using System;

namespace ContinueLoop {

  class Program {
    static void Main(string[] args){
      for (int i = 1; i <= 5; ++i{
        if (i == 3) {
          continue;
        }
        Console.WriteLine(i);
      }
    }
  }
}
Output
In the above example, we have used the for loop to print numbers from i = 1 to 5. However, the number 3 is not printed.
This is because when the value of i is 3, the continue statement is executed.
This skips the current iteration of loop and moves the program control to the update statement. Hence, the value 3 is not printed.
Note: The continue statement is usually used with the if...else statement.
Example: C# continue with while loop
using System;

namespace ContinueWhile {
  class Program{
    static void Main(string[] args) {
      int i = 0;
      while (i < 5) {
        i++;

        if (i == 3) {
          continue;
        }

        Console.WriteLine(i);
      }
    }
  }
}
Output
Here, we have used the continue statement inside the while loop. Similar to the earlier program, when the value of i is 3, the continue statement is executed.
Hence, 3 is not printed on the screen.
Working of C# continue Statement

continue with Nested Loop
We use the continue statement with nested as well. For example:
using System;

namespace ContinueNested {
    class Program {
       static void Main(string[] args) {

      int sum = 0;

      // outer loop
      for(int i = 1; i <= 3; i++) {

      // inner loop
      for(int j = 1; j <= 3; j++) {
        if (j == 2) {
          continue;
        }

      Console.WriteLine("i = " + i + " j = " +j);
      }
     }
    }
   }
}
Output
In the above example, we have used the continue statement inside the inner for loop. Here, the continue statement is executed when j == 2.
Hence, the value of j = 2 is ignored.
If you want to learn the working of nested loops, visit C# Nested Loops.
C# continue with foreach Loop
We can also use the continue statement with foreach loops. For example,
using System;

namespace ContinueForeach {
  class Program {
    static void Main(string[] args) {

      int[] num = { 1, 2, 3, 4, 5 };
      foreach(int number in num) {

        // skips the iteration
        if(number==3) {
          continue;
         }

        Console.WriteLine(number);
      }
    }
  }
}
Output
In the above example, we have created an array with values: 1, 2, 3, 4, 5. Here, we have used the foreach loop to print each element of the array.
However, the loop doesn't print the value 3. This is because when the number is equal to 3, the continue statement is executed.
Hence, the print statement for this iteration is skipped.
Arrays
C# Arrays
In this tutorial, we will learn about C# arrays. We will learn to create, initialize, and access array with the help of examples.
An array is a collection of similar types of data.
For example, Suppose we need to record the age of 5 students. Instead of creating 5 separate variables, we can simply create an array:

Elements of an Array
1. C# Array Declaration
In C#, here is how we can declare an array.
Here,
dataType- data type likeint,string,char, etcarrayName- it is an identifier
Let's see an example,
Here, we have created an array named age. It can store elements of int type.
But how many elements can it store?
To define the number of elements that an array can hold, we have to allocate memory for the array in C#. For example,
Here, new int[5] represents that the array can store 5 elements. We can also say the size/length of the array is 5.
Note: We can also declare and allocate the memory of an array in a single line. For example,
2. Array initialization in C
In C#, we can initialize an array during the declaration.
For example,
Here, we have created an array named numbers and initialized it with values 1, 2, 3, 4, and 5 inside the curly braces.
Note that we have not provided the size of the array. In this case, the C# automatically specifies the size by counting the number of elements in the array (i.e. 5).
In an array, we use an index number to determine the position of each array element. We can use the index number to initialize an array in C#.
For example,
// declare an array
int[] age = new int[5];

//initializing array
age[0] = 12;
age[1] = 4;
age[2] = 5;
...
C# Array Initialization

Note:
- An array index always starts at 0. That is, the first element of an array is at index 0.
- If the size of an array is 5, the index of the last element will be at 4 (5 - 1).
3. Access Array Elements
We can access the elements in the array using the index of the array. For example,
Here,
array[2]- access the 3rd elementarray[4]- access the 5th element
Example: C# Array
using System;

namespace AccessArray {
  class Program  {
    static void Main(string[] args) {

      // create an array
      int[] numbers = {1, 2, 3};

      //access first element
      Console.WriteLine("Element in first index : " + numbers[0]);

      //access second element
      Console.WriteLine("Element in second index : " + numbers[1]);

      //access third element
      Console.WriteLine("Element in third index : " + numbers[2]);

      Console.ReadLine();

    }
  }
}
Output
In the above example, we have created an array named numbers with elements 1, 2, 3. Here, we are using the index number to access elements of the array.
numbers[0]- access first element, 1numbers[1]- access second element, 2numbers[3]- access third element, 3
4. Change Array Elements
We can also change the elements of an array. To change the element, we simply assign a new value to that particular index. For example,
using System;

namespace ChangeArray {
  class Program {
    static void Main(string[] args) {
      // create an array
      int[] numbers = {1, 2, 3};
      Console.WriteLine("Old Value at index 0: " + numbers[0]);
      // change the value at index 0
      numbers[0] = 11;
      //print new value
      Console.WriteLine("New Value at index 0: " + numbers[0]);
      Console.ReadLine();
    }
  }
}
Output
In the above example, the initial value at index 0 is 1. Notice the line,
Here, we are assigning a new value of 11 to the index 0. Now, the value at index 0 is changed from 1 to 11.
5. Iterating C# Array using Loops
In C#, we can use loops to iterate through each element of an array. For example,
Example: Using for loop
using System;

namespace AccessArrayFor {
  class Program {
    static void Main(string[] args) {

      int[] numbers = { 1, 2, 3};

      for(int i=0; i < numbers.Length; i++) {
        Console.WriteLine("Element in index " + i + ": " + numbers[i]);
      }

      Console.ReadLine();
    }
  }
}
Output
In the above example, we have used a for loop to iterate through the elements of the array, numbers. Notice the line,
Here, the Length property of the array gives the size of the array.
We can also use a foreach loop to iterate through the elements of an array. For example,
Example: Using foreach loop
using System;

namespace AccessArrayForeach {
  class Program {
    static void Main(string[] args) {
      int[] numbers = {1, 2, 3};

      Console.WriteLine("Array Elements: ");

      foreach(int num in numbers) {
        Console.WriteLine(num);
      }

      Console.ReadLine();
    }
  }
}
Output
6. C# Array Operations using System.Linq
In C#, we have the System.Linq namespace that provides different methods to perform various operations in an array. For example,
Example: Find Minimum and Maximum Element
using System;

 // provides us various methods to use in an array
using System.Linq;

namespace ArrayMinMax {
  class Program  {
    static void Main(string[] args) {

      int[] numbers = {51, 1, 3, 4, 98};

      // get the minimum element
      Console.WriteLine("Smallest  Element: " + numbers.Min());

      // Max() returns the largest number in array
      Console.WriteLine("Largest Element: " + numbers.Max());

      Console.ReadLine();
    }
  }
}
Output
In the above example,
numbers.Min()- returns the smallest number in an array, 1numbers.Max()- returns the largest number in an array, 98
Example: Find the Average of an Array
using System;
// provides us various methods to use in an array
using System.Linq;

namespace ArrayFunction {
  class Program  {
    static void Main(string[] args) {

      int[] numbers = {30, 31, 94, 86, 55};

      // get the sum of all array elements
      float sum = numbers.Sum();

      // get the total number of elements present in the array
      int count = numbers.Count();

      float average = sum/count;

      Console.WriteLine("Average : " + average);

      // compute the average
      Console.WriteLine("Average using Average() : " + numbers.Average());

      Console.ReadLine();
    }
  }
}
Output
In the above example, we have used
numbers.Sum()to get the sum of all the elements of the arraynumbers.Count()to get the total number of element present inside the array
We then divide the sum by count to get the average.
Here, we have also used the numbers.Average() method of the System.Linq namespace to get the average directly.
Note: It is compulsory to use the System.Linq namespace while using Min(), Max(), Sum(), Count(), and Average() methods.
C# Multidimensional Array
In this tutorial, we will learn about the multidimensional array in C# using the example of two-dimensional array.
Before we learn about the multidimensional arrays, make sure to know about the single-dimensional array in C#.
In a multidimensional array, each element of the array is also an array. For example,
Here, x is a multidimensional array which has two elements: {1, 2, 3} and {3, 4, 5}. And, each element of the array is also an array with 3 elements.
Two-dimensional array in C
A two-dimensional array consists of single-dimensional arrays as its elements. It can be represented as a table with a specific number of rows and columns.

C# Two-dimensional array
Here, rows {1, 2, 3} and {3, 4, 5} are elements of a 2D array.
1. Two-Dimensional Array Declaration
Here's how we declare a 2D array in C#.
Here, x is a two-dimensional array with 2 elements. And, each element is also an array with 3 elements.
So, all together the array can store 6 elements (2 * 3).
Note: The single comma [ , ] represents the array is 2 dimensional.
2. Two-Dimensional Array initialization
In C#, we can initialize an array during the declaration. For example,
Here, x is a 2D array with two elements {1, 2, 3} and {3, 4, 5}. We can see that each element of the array is also an array.
We can also specify the number of rows and columns during the initialization. For example,
3. Access Elements from 2D Array
We use the index number to access elements of a 2D array.
For example,
// a 2D array
int[ , ] x = { { 1, 2 ,3}, { 3, 4, 5 } };

// access first element from first row
x[0, 0];  // returns 1

// access third element from second row
x[1, 2];  // returns 5

// access third element from first row
x[0, 2];  // returns 3
Elements of Two-Dimensional array in C#

Example: C# 2D Array
using System;

namespace MultiDArray {
  class Program {
    static void Main(string[] args) {

        //initializing 2D array
       int[ , ] numbers = {{2, 3}, {4, 5}};

        // access first element from the first row
       Console.WriteLine("Element at index [0, 0] : "+numbers[0, 0]);

        // access first element from second row
       Console.WriteLine("Element at index [1, 0] : "+numbers[1, 0]);
    }
  }
}
Output
In the above example, we have created a 2D array named numbers with rows {2, 3} and {4, 5}.
Here, we are using the index numbers to access elements of the 2D array.
numbers[0, 0]- access the first element from the first row (2)numbers[1, 0]- access the first element from the second row (4)
Change Array Elements
We can also change the elements of a two-dimensional array. To change the element, we simply assign a new value to that particular index. For example,
using System;

namespace MultiDArray {
  class Program {
    static void Main(string[] args) {

    int[ , ] numbers = {{2, 3}, {4, 5}};
     // old element
    Console.WriteLine("Old element at index [0, 0] : "+numbers[0, 0]);
      // assigning new value
    numbers[0, 0] = 222;
      // new element
    Console.WriteLine("New element at index [0, 0] : "+numbers[0, 0]);
    }
  }
}
Output
In the above example, the initial value at index [0, 0] is 2. Notice the line,
Here, we are assigning a new value 222 at index [0, 0]. Now, the value at index [0, 0] is changed from 2 to 222.
Iterating C# Array using Loop
using System;
namespace MultiDArray {
class Program {
static void Main(string[] args) {
int[ , ] numbers = { {2, 3, 9}, {4, 5, 9} };
for(int i = 0; i < numbers.GetLength(0); i++) {
Console.Write("Row "+ i+": ");
for(int j = 0; j < numbers.GetLength(1); j++) {
Console.Write(numbers[i, j]+" ");
}
Console.WriteLine();
}
}
}
}
Output
In the above example, we have used a nested for loop to iterate through the elements of a 2D array. Here,
numbers.GetLength(0)- gives the number of rows in a 2D arraynumbers.GetLength(1)- gives the number of elements in the row
Note: We can also create a 3D array. Technically, a 3D array is an array that has multiple two-dimensional arrays as its elements. For example,
Here, [ , , ] (2 commas) denotes the 3D array.
C# Jagged Array
In this tutorial, we will learn about the C# jagged array. We will learn to declare, initialize, and access the jagged array with the help of examples.
In C#, a jagged array consists of multiple arrays as its element. However, unlike multidimensional arrays, each array inside a jagged array can be of different sizes.
Before you learn about jagged array, make sure to know about
C# Jagged Array Declaration
Here's a syntax to declare a jagged array in C#.
Let's see an example,
Here,
int- data type of the array[][]- represents jagged arrayjaggedArray- name of the jagged array[2][]- represents the number of elements (arrays) inside the jagged array
Since we know each element of a jagged array is also an array, we can set the size of the individual array.
For example,
// set size of the first array as 3
jaggedArray[0] = new int[3];
// set size of second array as 2
jaggedArray[1] = new int[2];
Initializing Jagged Array
There are different ways to initialize a jagged array. For example,
1. Using the index number
Once we declare a jagged array, we can use the index number to initialize it. For example,
// initialize the first array
jaggedArray[0][0] = 1;
jaggedArray[0][1] = 3;
jaggedArray[0][2] = 5;
// initialize the second array
jaggedArray[1][0] = 2;
jaggedArray[1][1] = 4;
Here,
- index at the first square bracket represents the index of the jagged array element
- index at the second square bracket represents the index of the element inside each element of the jagged array
2. Initialize without setting size of array elements
// declaring string jagged array
int[ ][ ] jaggedArray = new int[2] [ ];
// initialize each array
jaggedArray[0] = new int[] {1, 3, 5};
jaggedArray[1] = new int[] {2, 4};
3. Initialize while declaring Jagged Array
Accessing elements of a jagged array
We can access the elements of the jagged array using the index number. For example,
// access first element of second array
jaggedArray[1][0];
// access second element of the second array
jaggedArray[1][1];
// access second element of the first array
jaggedArray[0][1];
Example: C# Jagged Array
using System;
namespace JaggedArray {
class Program {
static void Main(string[] args) {
// create a jagged array
int[ ][ ] jaggedArray = {
new int[] {1, 3, 5},
new int[] {2, 4},
};
// print elements of jagged array
Console.WriteLine("jaggedArray[1][0]: " + jaggedArray[1][0]);
Console.WriteLine("jaggedArray[1][1]: " + jaggedArray[1][1]);
Console.WriteLine("jaggedArray[0][2]: " + jaggedArray[0][2]);
Console.ReadLine();
}
}
}
Output
Here, inside a jagged array,
- jaggedArray[1][0] - first element of the second array
- jaggedArray[1][1] - second element of the second array
- jaggedArray[0][2] - third element of the first array
Iterating through a jagged array
In C#, we can use loops to iterate through each element of the jagged array. For example,
using System;
namespace JaggedArray {
class Program {
static void Main(string[] args) {
// declare a jagged array
int[][] jaggedArray = new int[2][];
// set size of Jagged Array Elements
jaggedArray[0] = new int[3];
jaggedArray[1] = new int[2];
// initialize the first array
jaggedArray[0][0] = 1;
jaggedArray[0][1] = 3;
jaggedArray[0][2] = 5;
// initialize the second array
jaggedArray[1][0] = 2;
jaggedArray[1][1] = 2;
// outer for loop
for (int i = 0; i < jaggedArray.Length; i++) {
Console.Write("Element "+ i +": ");
// inner for loop
for (int j = 0; j < jaggedArray[i].Length; j++) {
Console.Write(jaggedArray[i][j] + " ");
}
Console.WriteLine();
}
Console.ReadLine();
}
}
}
Output
In the above example, we have used a nested for loop to iterate through the jagged array. Here,
1. Outer for loop
- to access the elements (arrays) of the jagged array
jaggedArray.Length- gives the size of jagged array
2. Inner for loop
- to access the elements of the individual array inside the jagged array.
jaggedArray[i].Length- gives the size of elements of theitharray inside the jagged array
Jagged Array with Multidimensional Array
In C#, we can also use multidimensional arrays as Jagged Array Elements. For example,
int[ ][ , ] jaggedArrayTwoD = new int[2][ , ] {
new int[,] { {1, 8}, {6, 7} },
new int[,] { {0, 3}, {5, 6}, {9, 10} }
};
Here, each element of the jagged array is a multidimensional array:
new int[,] { {1, 8}, {6, 7} }- 2D array with 2 elementsnew int[ , ] { {0, 3}, {5, 6}, {9, 10} }- 2D array with 3 elements
Let's see an example,
using System;
namespace JaggedArray {
class Program {
static void Main(string[] args) {
// declare and initialize jagged array with 2D array
int[][,] jaggedArray = new int[3][ , ] {
new int[ , ] { {1, 8}, {6, 7} },
new int[ , ] { {0, 3}, {5, 6}, {9, 10} },
new int[ , ] { {11, 23}, {100, 88}, {0, 10} }
};
Console.WriteLine(jaggedArray[0][0, 1]);
Console.WriteLine(jaggedArray[1][2, 1]);
Console.WriteLine(jaggedArray[2][1, 0]);
Console.ReadLine();
}
}
}
Output
In the above example, notice the code,
Here,
[0]- represents the first element (2D array) of the jagged array[0, 1]- represents the second element of the first array inside the 2D array
C# foreach loop
In this tutorial, we will learn about foreach loops (an alternative to for loop) and how to use them with arrays and collections.
C# provides an easy to use and more readable alternative to for loop, the foreach loop when working with arrays and collections to iterate through the items of arrays/collections. The foreach loop iterates through each item, hence called foreach loop.
Before moving forward with foreach loop, visit:
- C# for loop
- C# arrays
- C# collections
Syntax of foreach loop
Here iterable-item can be an array or a class of collection.
How foreach loop works?

The in keyword used along with foreach loop is used to iterate over the iterable-item. The in keyword selects an item from the iterable-item on each iteration and store it in the variable element.
On first iteration, the first item of iterable-item is stored in element. On second iteration, the second element is selected and so on.
The number of times the foreach loop will execute is equal to the number of elements in the array or collection.
Here is an example of iterating through an array using the for loop:
Example 1: Printing array using for loop
using System;
namespace Loop
{
class ForLoop
{
public static void Main(string[] args)
{
char[] myArray = {'H','e','l','l','o'};
for(int i = 0; i < myArray.Length; i++)
{
Console.WriteLine(myArray[i]);
}
}
}
}
The same task can be done using the foreach loop.
Example 2: Printing array using foreach loop
using System;
namespace Loop
{
class ForEachLoop
{
public static void Main(string[] args)
{
char[] myArray = {'H','e','l','l','o'};
foreach(char ch in myArray)
{
Console.WriteLine(ch);
}
}
}
}
When we run the both program, the output will be:
In the above program, the foreach loop iterates over the array, myArray. On first iteration, the first element i.e. myArray[0] is selected and stored in ch. Similarly on the last iteration, the last element i.e. myArray[4] is selected. Inside the body of loop, the value of ch is printed.
When we look at both programs, the program that uses foreach loop is more readable and easy to understand. This is because of its simple and expressive syntax. Hence, foreach loop is preferred over for loop when working with arrays and collections.
Example 3: Traversing an array of gender using foreach loop
This program computes the number of male and female candidates.
using System;
namespace Loop{
class ForEachLoop{
public static void Main(string[] args){
char[] gender = {'m','f','m','m','m','f','f','m','m','f'};
int male = 0, female = 0;
foreach (char g in gender) {
if (g == 'm')
male++;
else if (g =='f')
female++;
}
Console.WriteLine("Number of male = {0}", male);
Console.WriteLine("Number of female = {0}", female);
}
}
}
When we run the program, the output will be:
Example 4: foreach loop with List (Collection)
This program computes the sum of elements in a List.
using System;
using System.Collections.Generic;
namespace Loop {
class ForEachLoop {
public static void Main(string[] args) {
var numbers = new List<int>() { 5, -8, 3, 14, 9, 17, 0, 4 };
int sum = 0;
foreach (int number in numbers) {
sum += number;
}
Console.WriteLine("Sum = {0}", sum);
Console.ReadLine();
}
}
}
When we run the program, the output will be:
In this program, foreach loop is used to traverse through a collection. Traversing a collection is similar to traversing through an array.The first element of collection is selected on the first iteration, second element on second iteration and so on till the last element.
C# Class and Object - OOP (I)
C# Class and Object
In this tutorial, you will learn about the concept of classes and objects in C# with the help of examples.
C# is an object-oriented program. In object-oriented programming(OOP), we solve complex problems by dividing them into objects.
To work with objects, we need to perform the following activities:
- create a class
- create objects from the class
C# Class
Before we learn about objects, we need to understand the working of classes. Class is the blueprint for the object.
We can think of the class as a sketch (prototype) of a house. It contains all the details about the floors, doors, windows, etc. We can build a house based on these descriptions. House is the object.
Like many houses can be made from the sketch, we can create many objects from a class.
Create a class in C#
We use the class keyword to create an object. For example,
Here, we have created a class named ClassName. A class can contain
- fields - variables to store data
- methods - functions to perform specific tasks
Let's see an example,
In the above example,
- Dog - class name
- breed - field
- bark() - method
Note: In C#, fields and methods inside a class are called members of a class.
C# Objects
An object is an instance of a class. Suppose, we have a class Dog. Bulldog, German Shepherd, Pug are objects of the class.
Creating an Object of a class
In C#, here's how we create an object of the class.
Here, we have used the new keyword to create an object of the class. And, obj is the name of the object. Now, let us create an object from the Dog class.
Now, the bullDog object can access the fields and methods of the Dog class.
Access Class Members using Object
We use the name of objects along with the . operator to access members of a class. For example,
using System;
namespace ClassObject {
class Dog {
string breed;
public void bark() {
Console.WriteLine("Bark Bark !!");
}
static void Main(string[] args) {
// create Dog object
Dog bullDog = new Dog();
// access breed of the Dog
bullDog.breed = "Bull Dog";
Console.WriteLine(bullDog.breed);
// access method of the Dog
bullDog.bark();
Console.ReadLine();
}
}
}
--
Output
In the above program, we have created an object named bullDog from the Dog class. Notice that we have used the object name and the . (dot operator) to access the breed field
and the bark() method
Creating Multiple Objects of a Class
We can create multiple objects from the same class. For example,
using System;
namespace ClassObject {
class Employee {
string department;
static void Main(string[] args) {
// create Employee object
Employee sheeran = new Employee();
// set department for sheeran
sheeran.department = "Development";
Console.WriteLine("Sheeran: " + sheeran.department);
// create second object of Employee
Employee taylor = new Employee();
// set department for taylor
taylor.department = "Content Writing";
Console.WriteLine("Taylor: " + taylor.department);
Console.ReadLine();
}
}
}
Output
In the above example, we have created two objects: sheeran and taylor from the Employee class.
Here, you can see both the objects have their own version of the department field with different values.
Creating objects in a different class
In C#, we can also create an object of a class in another class.
For example,
using System;
namespace ClassObject {
class Employee {
public string name;
public void work(string work) {
Console.WriteLine("Work: " + work);
}
}
class EmployeeDrive {
static void Main(string[] args) {
// create Employee object
Employee e1= new Employee();
Console.WriteLine("Employee 1");
// set name of the Employee
e1.name="Gloria";
Console.WriteLine("Name: " + e1.name);
//call method of the Employee
e1.work("Coding");
Console.ReadLine();
}
}
}
Output
In the above example, we have two classes: Employee and EmployeeDrive. Here, we are creating an object e1 of the Employee class in the EmployeeDrive class.
We have used the e1 object to access the members of the Employee class from EmployeeDrive. This is possible because the members in the Employee class are public.
Here, public is an access specifier that means the class members are accessible from any other classes. To learn more, visit C# Access Modifiers.
Why Objects and Classes?
Objects and classes help us to divide a large project into smaller sub-problems.
Suppose you want to create a game that has hundreds of enemies and each of them has fields like health, ammo, and methods like shoot() and run().
With OOP we can create a single Enemy class with required fields and methods.
Then, we can create multiple enemy objects from it.
Each of the enemy objects will have its own version of health and ammo fields. And, they can use the common shoot() and run() methods.
Now, instead of thinking of projects in terms of variables and methods, we can think of them in terms of objects.
This helps to manage complexity as well as make our code reusable.
C# Method
In this tutorial, we will learn about the C# method with the help of examples.
A method is a block of code that performs a specific task. Suppose you need to create a program to create a circle and color it. You can create two methods to solve this problem:
- a method to draw the circle
- a method to color the circle
Dividing a complex problem into smaller chunks makes your program easy to understand and reusable.
Declaring a Method in C
Here's the syntax to declare a method in C#.
Here,
- returnType - It specifies what type of value a method returns. For example, if a method has an
intreturn type then it returns anintvalue.
If the method does not return a value, its return type is void.
-
methodName - It is an identifier that is used to refer to the particular method in a program.
-
method body - It includes the programming statements that are used to perform some tasks. The method body is enclosed inside the curly braces
{ }
Let's see an example,
Here, the name of the method is display(). And, the return type is void.
Calling a Method in C
In the above example, we have declared a method named display(). Now, to use the method, we need to call it.
Here's how we can call the display() method.
Working of C# method call

Example: C# Method
using System;
namespace Method {
class Program {
// method declaration
public void display() {
Console.WriteLine("Hello World");
}
static void Main(string[] args) {
// create class object
Program p1 = new Program();
//call method
p1.display();
Console.ReadLine();
}
}
}
Output
In the above example, we have created a method named display(). We have created an object p1 of the Program class.
Notice the line,
Here, we are using the object to call the display() method.
C# Method Return Type
A C# method may or may not return a value. If the method doesn't return any value, we use the void keyword (shown in the above example).
If the method returns any value, we use the return statement to return any value. For example,
Here, we are returning the variable sum. One thing you should always remember is that the return type of the method and the returned value should be of the same type.
In our code, the return type is int. Hence, the data type of sum should be of int as well.
Example: Method Return Type
using System;
namespace Method {
class Program {
// method declaration
static int addNumbers() {
int sum = 5 + 14;
return sum;
}
static void Main(string[] args) {
// call method
int sum = addNumbers();
Console.WriteLine(sum);
Console.ReadLine();
}
}
}
Output
In the above example, we have a method named addNumbers() with the int return type.
Here, we are storing the returned value from the addNumbers() to sum. We have used int data type to store the value because the method returns an int value.
Note: As the method is static we do not create a class object before calling the method. The static method belongs to the class rather than the object of a class.
C# Methods Parameters
In C#, we can also create a method that accepts some value. These values are called method parameters. For example,
Here, a and b are two parameters passed to the addNumber() function.
If a method is created with parameters, we need to pass the corresponding values(arguments) while calling the method. For example,
Representation of the C# method returning a value
Here, We have passed 2 arguments (100, 100).

Example 1: C# Methods with Parameters
using System;
namespace Method {
class Program {
int addNumber (int a, int b) {
int sum = a + b;
return sum;
}
static void Main(string[] args) {
// create class object
Program p1 = new Program();
//call method
int sum = p1.addNumber(100,100);
Console.WriteLine("Sum: " + sum);
Console.ReadLine();
}
}
}
Output
C# Methods with Single Parameter
In C#, we can also create a method with a single parameter. For example,
using System;
namespace Method {
class Program {
string work(string work) {
return work;
}
static void Main(string[] args) {
// create class object
Program p1 = new Program();
//call method
string work = p1.work("Cleaning"); ;
Console.WriteLine("Work: " + work);
Console.ReadLine();
}
}
}
Output
Here, the work() method has a single parameter work.
Built-in methods
So far we have defined our own methods. These are called user-defined methods.
However, in C#, there are various methods that can be directly used in our program. They are called built-in methods. For example,
Sqrt()- computes the square root of a numberToUpper()- converts a string to uppercase
Example: Math.Sqrt() Method
using System;
namespace Method {
class Program {
static void Main(string[] args) {
// Built in method
double a = Math.Sqrt(9);
Console.WriteLine("Square root of 9: " + a);
}
}
}
Output
In the above program, we have used
to compute the square root of 9. Here, the Sqrt() is a built-in method that is defined inside the Math class.
We can simply use built-in methods in our program without writing the method definition. To learn more, visit C# built-in methods.
Method Overloading in C
In C#, we can create two or more methods with the same name. It is known as method overloading.
For example,
using System;
namespace MethodOverload {
class Program {
// method with one parameter
void display(int a) {
Console.WriteLine("Arguments: " + a);
}
// method with two parameters
void display(int a, int b) {
Console.WriteLine("Arguments: " + a + " and " + b);
}
static void Main(string[] args) {
Program p1 = new Program();
p1.display(100);
p1.display(100, 200);
Console.ReadLine();
}
}
}
Output
In the above example, we have overloaded the display() method. It is possible because:
- one method has one parameter
- another has two parameter
To know more visit C# Method Overloading
C# Access Modifiers
In this tutorial, we will learn about the public, private, protected, and internal access modifiers in C# with the help of examples.
In C#, access modifiers specify the accessibility of types (classes, interfaces, etc) and type members (fields, methods, etc). For example,
Here,
- name - public field that can be accessed from anywhere
- num - private field can only be accessed within the Student class
Types of Access Modifiers
In C#, there are 4 basic types of access modifiers.
- public
- private
- protected
- internal
1. public access modifier
When we declare a type or type member public, it can be accessed from anywhere. For example,
using System;
namespace MyApplication {
class Student {
public string name = "Sheeran";
public void print() {
Console.WriteLine("Hello from Student class");
}
}
class Program {
static void Main(string[] args) {
// creating object of Student class
Student student1 = new Student();
// accessing name field and printing it
Console.WriteLine("Name: " + student1.name);
// accessing print method from Student
student1.print();
Console.ReadLine();
}
}
}
Output
In the above example, we have created a class named Student with a field name and a method print().
// accessing name field and printing it
Console.WriteLine("Name: " + student1.name);
// accessing print method from Student
student1.print();
Since the field and method are public, we are able to access them from the Program class.
Note: We have used the object student1 of the Student class to access its members. To learn more, visit the C# class and objects.
2. private access modifier
When we declare a type member with the private access modifier, it can only be accessed within the same class or struct. For example,
using System;
namespace MyApplication {
class Student {
private string name = "Sheeran";
private void print() {
Console.WriteLine("Hello from Student class");
}
}
class Program {
static void Main(string[] args) {
// creating object of Student class
Student student1 = new Student();
// accessing name field and printing it
Console.WriteLine("Name: " + student1.name);
// accessing print method from Student
student1.print();
Console.ReadLine();
}
}
}
In the above example, we have created a class named Student with a field name and a method print().
// accessing name field and printing it
Console.WriteLine("Name: " + student1.name);
// accessing print method from Student
student1.print();
Since the field and method are private, we are not able to access them from the Program class. Here, the code will generate the following error.
Error CS0122 'Student.name' is inaccessible due to its protection level
Error CS0122 'Student.print()' is inaccessible due to its protection level
3. protected access modifier
When we declare a type member as protected, it can only be accessed from the same class and its derived classes. For example,
using System;
namespace MyApplication {
class Student {
protected string name = "Sheeran";
}
class Program {
static void Main(string[] args) {
// creating object of student class
Student student1 = new Student();
// accessing name field and printing it
Console.WriteLine("Name: " + student1.name);
Console.ReadLine();
}
}
}
In the above example, we have created a class named Student with a field name. Since the field is protected, we are not able to access it from the Program class.
Here, the code will generate the following error.
Now, let's try to access the protected member from a derived class.
using System;
namespace MyApplication {
class Student {
protected string name = "Sheeran";
}
// derived class
class Program : Student {
static void Main(string[] args) {
// creating object of derived class
Program program = new Program();
// accessing name field and printing it
Console.WriteLine("Name: " + program.name);
Console.ReadLine();
}
}
}
Output
In the above example, we have created a class Student with a protected field name. Notice that we have inherited the Program class from the Student class.
Since the protected member can be accessed from derived classes, we are able to access name from the Program class.
4. internal access modifier
When we declare a type or type member as internal, it can be accessed only within the same assembly.
An assembly is a collection of types (classes, interfaces, etc) and resources (data). They are built to work together and form a logical unit of functionality.
That's why when we run an assembly all classes and interfaces inside the assembly run together. To learn more, visit the C# Assembly.
Example: internal within the same Assembly
using System;
namespace Assembly {
class Student {
internal string name = "Sheeran";
}
class Program {
static void Main(string[] args) {
// creating object of Student class
Student theStudent = new Student();
// accessing name field and printing it
Console.WriteLine("Name: " + theStudent.name);
Console.ReadLine();
}
}
}
Output
In the above example, we have created a class named Student with a field name. Since the field is internal, we are able to access it from the Program class as they are in the same assembly.
If we use internal within a single assembly, it works just like the public access modifier.
Example: internal in different Assembly
Let's create one assembly first.
// Code on Assembly1
using System;
namespace Assembly1 {
public class StudentName {
internal string name = "Sheeran";
}
class Program {
static void Main(string[] args) {
}
}
}
Here, this code is in Assembly1. We have created an internal field name inside the class StudentName. Now, this field can only be accessed from the same assembly Assembly1.
Now, let's create another assembly.
// Code on Assembly2
using System;
// access Assembly1
using Assembly1;
namespace Assembly2 {
class Program {
static void Main(string[] args) {
StudentName student = new StudentName();
// accessing name field from Assembly1
Console.Write(student.name);
Console.ReadLine();
}
}
}
Here, this code is in Assembly2. We are trying to access the name field of the StudentName class(Assembly1). To access fields from Assembly1, we first need to set the reference of Assembly1 in Assembly2. Now the code
allows us to use the code from Assembly1 to Assembly2.
Here, when we try to access the name field from Assembly2, we get an error.
This is because name is an internal field present in Assembly1.
5. protected internal access modifier
The protected internal is a combination of protected and internal access modifiers.
When we declare a member protected internal, it can be accessed from the same assembly and the derived class of the containing class from any other assembly.
// Code on Assembly1
using System;
namespace Assembly1 {
public class Greet {
protected internal string msg="Hello";
}
class Program {
static void Main(string[] args) {
Greet greet = new Greet();
Console.WriteLine(greet.msg);
Console.ReadLine();
}
}
}
Output
The above code is in Assembly1.
In the above example, we have created a class named Greet with a field msg. Since the field is protected internal, we are able to access it from the Program class as they are in the same assembly.
Let's derive a class from Greet in another assembly and try to access the protected internal field msg from it.
// Code on Assembly2
using System;
// access Assembly1
using Assembly1;
namespace Assembly2 {
// derived class of Greet
class Program: Greet {
static void Main(string[] args) {
Program greet = new Program();
// accessing name field from Assembly1
Console.Write(greet.msg);
Console.ReadLine();
}
}
}
Output
The above code is in Assembly2.
In the above example, we have inherited the Program class from the Greet class(from Assembly1).
We are able to access the msg from the Greet class of Assembly1 from Assembly2.
This is because the msg is a protected internal field and we are trying to access it from the child class of Greet.
6. private protected access modifier
The private protected access modifier is a combination of private and protected. It is available from the C# version 7.2 and later.
When we declare a member private protected, it can only be accessed within the same class, and its derived class within the same assembly. For example,
// Code in Assembly1
using System;
namespace Assembly1 {
public class StudentName {
private protected string name = "Sheeran";
}
//derived class of StudentName class
class Program1 : StudentName {
static void Main(string[] args) {
Program1 student = new Program1();
// accessing name field from base class
Console.Write(student.name);
Console.ReadLine();
}
}
}
Output
The above code is in Assembly1
In the above example, we have created a class StudentName with a private protected field name.
Notice that we have inherited the Program1 class from the StudentName class.
Since the private protected member can be accessed from derived classes within the same assembly, we are able to access name from the Program1 class.
Let's derive a class from StudentName in another assembly and try to access the private protected field name from it.
For example,
// Code in Assembly2
using System;
//access Assembly1
using Assembly1;
namespace Assembly2 {
//derived class of StudentName
class Program : StudentName {
static void Main(string[] args) {
Program student = new Program();
// accessing name field from Assembly1
Console.Write(student.name);
Console.ReadLine();
}
}
}
The above code is in Assembly2
In the above example, when we try to access the name field from the derived class of StudentName, we get an error.
This is because the name field is in Assembly1 and the derived class is in Assembly2.
Note: We can also use access modifiers with types (classes, interface, etc). However, we can only use types with public and internal access modifiers.
C# Variable Scope
In this tutorial, you will learn about variable scope in C# with the help of examples.
A variable scope refers to the availability of variables in certain parts of the code.
In C#, a variable has three types of scope:
- Class Level Scope
- Method Level Scope
- Block Level Scope
C# Class Level Variable Scope
In C#, when we declare a variable inside a class, the variable can be accessed within the class. This is known as class level variable scope.
Class level variables are known as fields and they are declared outside of methods, constructors, and blocks of the class. For example,
using System;
namespace VariableScope {
class Program {
// class level variable
string str = "Class Level";
public void display() {
Console.WriteLine(str);
}
static void Main(string[] args) {
Program ps = new Program();
ps.display();
Console.ReadLine();
}
}
}
Output
In the above example, we have initialized a variable named str inside the Program class.
Since it is a class level variable, we can access it from a method present inside the class.
This is because the class level variable is accessible throughout the class.
Note: We cannot access the class level variable through static methods. For example, suppose we have a static method inside the Program class.
Method Level Variable Scope
When we declare a variable inside a method, the variable cannot be accessed outside of the method. This is known as method level variable scope. For example,
using System;
namespace VariableScope {
class Program {
public void method1() {
// display variable inside method
string str = "method level";
}
public void method2() {
// accessing str from method2()
Console.WriteLine(str);
}
static void Main(string[] args) {
Program ps = new Program();
ps.method2();
Console.ReadLine();
}
}
}
In the above example, we have created a variable named str inside method1().
Here, str is a method level variable. So, it cannot be accessed outside method1().
However, when we try to access the str variable from the method2()
we get an error.
This is because method level variables have scope inside the method where they are created.
For example,
using System;
namespace VariableScope {
class Program {
public void display() {
string str = "inside method";
// accessing method level variable
Console.WriteLine(str);
}
static void Main(string[] args) {
Program ps = new Program();
ps.display();
Console.ReadLine();
}
}
}
Output
Here, we have created the str variable and accessed it within the same method display(). Hence, the code runs without any error.
Block Level Variable Scope in C
When we declare a variable inside a block (for loop, while loop, if..else), the variable can only be accessed within the block. This is known as block level variable scope.
For example,
using System;
namespace VariableScope {
class Program {
public void display() {
for(int i=0;i<=3;i++) {
}
Console.WriteLine(i);
}
static void Main(string[] args) {
Program ps = new Program();
ps.display();
Console.ReadLine();
}
}
}
In the above program, we have initialized a block level variable i inside the for loop.
Since i is a block level variable, when we try to access the variable outside the for loop,
we get an error.
C# Constructor
In this tutorial, we will learn about the C# constructors and their types with the help of examples.
In C#, a constructor is similar to a method that is invoked when an object of the class is created.
However, unlike methods, a constructor:
- has the same name as that of the class
- does not have any return type
Create a C# constructor
Here's how we create a constructor in C#
Here, Car() is a constructor. It has the same name as its class.
Call a constructor
Once we create a constructor, we can call it using the new keyword. For example,
In C#, a constructor is called when we try to create an object of a class. For example,
Here, we are calling the Car() constructor to create an object car1. To learn more about objects, visit C# Class and Objects.
Types of Constructors
There are the following types of constructors:
- Parameterless Constructor
- Parameterized Constructor
- Default Constructor
1. Parameterless Constructor
When we create a constructor without parameters, it is known as a parameterless constructor.
For example,
using System;
namespace Constructor {
class Car {
// parameterless constructor
Car() {
Console.WriteLine("Car Constructor");
}
static void Main(string[] args) {
// call constructor
new Car();
Console.ReadLine();
}
}
}
Output
In the above example, we have created a constructor named Car().
We can call a constructor by adding a new keyword to the constructor name.
2. C# Parameterized Constructor
In C#, a constructor can also accept parameters. It is called a parameterized constructor. For example,
using System;
namespace Constructor {
class Car {
string brand;
int price;
// parameterized constructor
Car(string theBrand, int thePrice) {
brand = theBrand;
price = thePrice;
}
static void Main(string[] args) {
// call parameterized constructor
Car car1 = new Car("Bugatti", 50000);
Console.WriteLine("Brand: " + car1.brand);
Console.WriteLine("Price: " + car1.price);
Console.ReadLine();
}
}
}
Output
In the above example, we have created a constructor named Car().
The constructor takes two parameters: theBrand and thePrice.
Notice the statement,
Here, we are passing the two values to the constructor. The values passed to the constructor are called arguments. We must pass the same number and type of values as parameters.
3. Default Constructor
If we have not defined a constructor in our class, then the C# will automatically create a default constructor with an empty code and no parameters. For example,
using System;
namespace Constructor {
class Program {
int a;
static void Main(string[] args) {
// call default constructor
Program p1 = new Program();
Console.WriteLine("Default value of a: " + p1.a);
Console.ReadLine();
}
}
}
Output
In the above example, we have not created any constructor in the Program class. However, while creating an object, we are calling the constructor.
Program p1 = new Program();
Here, C# automatically creates a default constructor. The default constructor initializes any uninitialized variable with the default value.
Hence, we get 0 as the value of the int variable a.
Note: In the default constructor, all the numeric fields are initialized to 0, whereas string and object are initialized as null.
4. Copy Constructor in C
We use a copy constructor to create an object by copying data from another object. For example,
using System;
namespace Constructor {
class Car {
string brand;
// constructor
Car (string theBrand) {
brand = theBrand;
}
// copy constructor
Car(Car c1) {
brand = c1.brand;
}
static void Main(string[] args) {
// call constructor
Car car1 = new Car("Bugatti");
Console.WriteLine("Brand of car1: " + car1.brand);
// call the copy constructor
Car car2 = new Car(car1);
Console.WriteLine("Brand of car2: " + car2.brand);
Console.ReadLine();
}
}
}
Output
In the above program, we have used a copy constructor.
Here, this constructor accepts an object of Car as its parameter. So, when creating the car2 object, we have passed the car1 object as an argument to the copy constructor.
Inside the copy constructor, we have assigned the value of the brand for car1 object to the brand variable for car2 object. Hence, both objects have the same value of the brand.
5. Private Constructor
We can create a private constructor using the private access specifier. This is known as a private constructor in C#.
Once the constructor is declared private, we cannot create objects of the class in other classes.
Example 1: Private Constructor
using System;
namespace Constructor {
class Car {
// private constructor
private Car () {
Console.WriteLine("Private Constructor");
}
}
class CarDrive {
static void Main(string[] args) {
// call private constructor
Car car1 = new Car();
Console.ReadLine();
}
}
}
In the above example, we have created a private constructor Car(). Since private members are not accessed outside of the class, when we try to create an object of Car
we get an error
Note: If a constructor is private, we cannot create objects of the class. Hence, all fields and methods of the class should be declared static, so that they can be accessed using the class name.
6. C# Static Constructor
In C#, we can also make our constructor static. We use the static keyword to create a static constructor. For example,
using System;
namespace Constructor {
class Car {
// static constructor
static Car () {
Console.WriteLine("Static Constructor");
}
// parameterless constructor
Car() {
Console.WriteLine("Default Constructor");
}
static void Main(string[] args) {
Car car1 = new Car(); // call parameterless constructor
Car car2 = new Car(); // call parameterless constructor again
Console.ReadLine();
}
}
}
In the above example, we have created a static constructor.
We cannot call a static constructor directly. However, when we call a regular constructor, the static constructor gets called automatically.
Here, we are calling the Car() constructor. You can see that the static constructor is also called along with the regular constructor.
Output
The static constructor is called only once during the execution of the program. That's why when we call the constructor again, only the regular constructor is called.
Note: We can have only one static constructor in a class. It cannot have any parameters or access modifiers.
C# Constructor Overloading
In C#, we can create two or more constructor in a class. It is known as constructor overloading.
For example,
using System;
namespace ConstructorOverload {
class Car {
// constructor with no parameter
Car() {
Console.WriteLine("Car constructor");
}
// constructor with one parameter
Car(string brand) {
Console.WriteLine("Car constructor with one parameter");
Console.WriteLine("Brand: " + brand);
}
static void Main(string[] args) {
// call constructor with no parameter
Car car = new Car();
Console.WriteLine();
// call constructor with parameter
Car car2 = new Car("Bugatti");
Console.ReadLine();
}
}
}
Output
In the above example, we have overloaded the Car constructor:
- one constructor has one parameter
- another has two parameter
Based on the number of the argument passed during the constructor call, the corresponding constructor is called.
Here,
- Object car - calls constructor with one parameter
- Object car2 - calls constructor with two parameter
To learn more visit C# Constructor Overloading.
C# this Keyword
In this article, we will learn about this keyword in C# with the help of examples.
In C#, this keyword refers to the current instance of a class.
For example,
using System;
namespace ThisKeyword {
class Test {
int num;
Test(int num) {
// this.num refers to the instance field
this.num = num;
Console.WriteLine("object of this: " + this);
}
static void Main(string[] args) {
Test t1 = new Test(4);
Console.WriteLine("object of t1: " + t1);
Console.ReadLine();
}
}
}
Output
In the above example, we have created an object named t1 of the class Test. We have printed the name of the object t1 and this keyword of the class.
Here, we can see the name of both t1 and this is the same. This is because this keyword refers to the current instance of the class which is t1.
Here are some of the major uses of this keyword in C#.
C# this with Same Name Variables
We cannot declare two or more variables with the same name inside a scope (class or method). However, instance variables and parameters may have the same name. For example,
using System;
namespace ThisKeyword {
class Test {
int num;
Test(int num) {
num = num;
}
static void Main(string[] args) {
Test t1 = new Test(4);
Console.WriteLine("value of num: " + t1.num);
Console.ReadLine();
}
}
}
Output
In the above program, the instance variable and the parameter have the same name: num. We have passed 4 as a value to the constructor.
However, we are getting 0 as an output. This is because the C# gets confused because the names of the instance variable and the parameter are the same.
We can solve this issue by using this.
Example: this with Same Name Variables
using System;
namespace ThisKeyword {
class Test {
int num;
Test(int num) {
// this.num refers to the instance field
this.num = num;
}
static void Main(string[] args) {
Test t1 = new Test(4);
Console.WriteLine("value of num: " +t1.num);
Console.ReadLine();
}
}
}
Output
Now, we are getting the expected output that is 4. It is because this.num refers to the instance variable of the class.
So, there is no confusion between the names of the instance variable and the parameter.
Invoke Constructor of the Same Class Using this
While working with constructor overloading, we might have to invoke one constructor from another constructor. In this case, we can use this keyword. For example,
using System;
namespace ThisKeyword {
class Test {
Test(int num1, int num2) {
Console.WriteLine("Constructor with two parameter");
}
// invokes the constructor with 2 parameters
Test(int num) : this(33, 22) { Console.WriteLine("Constructor with one parameter"); }
public static void Main(String[] args) {
Test t1 = new Test(11);
Console.ReadLine();
}
}
}
Output
In the above example, we have used : followed by this keyword to call constructor Test(int num1, num2) from the constructor Test(int num).
When we call the Test(int num) constructor the Test(int num1, int num2) constructor executes first.
Note: Calling one constructor from another constructor is known as constructor chaining.
C# this as an object argument
We can use this keyword to pass the current object as an argument to a method. For example,
using System;
namespace ThisKeyword {
class Test {
int num1;
int num2;
Test() {
num1 = 22;
num2 = 33;
}
// method that accepts this as argument
void passParameter(Test t1) {
Console.WriteLine("num1: " + num1);
Console.WriteLine("num2: " + num2);
}
void display() {
// passing this as a parameter
passParameter(this);
}
public static void Main(String[] args) {
Test t1 = new Test();
t1.display();
Console.ReadLine();
}
}
}
Output
In the above program, we have a method passParameter(). It accepts the object of the class as an argument.
Here, we have passed this to the passParameter() method. As this refers to the instance of the class, we are able to access the value of num1 and num2.
this to declare a C# indexer
Indexers allow objects of a class to be indexed just like arrays. We use this keyword to declare an indexer in C#. For example,
using System;
namespace ThisKeyword {
class Student {
private string[] name = new string[3];
// declaring an indexer
public string this[int index] { // returns value of array element
get { return name[index]; } // sets value of array element
set { name[index] = value; }
}
}
class Program {
public static void Main() {
Student s1 = new Student();
s1[0] = "Ram";
s1[1] = "Shyam";
s1[2] = "Gopal";
for (int i = 0; i < 3; i++) {
Console.WriteLine(s1[i] + " ");
}
}
}
}
Output
In the above program, we have created an indexer using this keyword.
The array name[] is private. So, we cannot access it from the Program class.
Now, to access and set the value of the array, we use an indexer.
As we have used this to create an indexer, we must use the object of the Student class to access the indexer. To know more about the indexer, visit C# indexer.
C# static Keyword
In this tutorial, we will learn about the static keyword in C# with the help of examples.
In C#, if we use a static keyword with class members, then there will be a single copy of the type member.
And, all objects of the class share a single copy instead of creating individual copies.
C# Static Variables
If a variable is declared static, we can access the variable using the class name. For example,
using System;
namespace StaticKeyword {
class Student {
// static variable
public static string department = "Computer Science";
}
class Program {
static void Main(string[] argos) {
// access static variable
Console.WriteLine("Department: " + Student.department);
Console.ReadLine();
}
}
}
Output
In the above example, we have created a static variable named department. Since the variable is static, we have used the class name Student to access the variable.
Static Variables Vs Instance Variables
In C#, every object of a class will have its own copy of instance variables. For example,
class Student {
// instance variable
public string studentName;
}
class Program {
static void Main(string[] args) {
Student s1 = new Student();
Student s2 = new Student();
}
}
Here, both the objects s1 and s2 will have separate copies of the variable studentName. And, they are different from each other.
However, if we declare a variable static, all objects of the class share the same static variable. And, we don't need to create objects of the class to access the static variables.
Example: C# Static Variable Vs. Instance Variable
using System;
namespace StaticKeyword {
class Student {
static public string schoolName = "Programiz School";
public string studentName;
}
class Program {
static void Main(string[] args) {
Student s1 = new Student();
s1.studentName = "Ram";
// calls instance variable
Console.WriteLine("Name: " + s1.studentName);
// calls static variable
Console.WriteLine("School: " + Student.schoolName);
Student s2 = new Student();
s2.studentName = "Shyam";
// calls instance variable
Console.WriteLine("Name: " + s2.studentName);
// calls static variable
Console.WriteLine("School: " + Student.schoolName);
Console.ReadLine();
}
}
}
Output
In the above program, the Student class has a non-static variable named studentName and a static variable named schoolName.
Inside the Program class,
s1.studentName/s2.studentName- calls the non-static variable using objects s1 and s2 respectivelyStudent.schoolName- calls the static variable by using the class name
Since the schoolName is the same for all students, it is good to make the schoolName static. It saves memory and makes the program more efficient.
C# Static Methods
Just like static variables, we can call the static methods using the class name.
class Test {
public static void display() {....}
}
class Program {
static void Main(string[] args) {
Test.display();
}
}
Here, we have accessed the static method directly from Program classes using the class name.
When we declare a method static, all objects of the class share the same static method.
Example: C# Static and Non-static Methods
using System;
namespace StaticKeyword {
class Test {
public void display1() {
Console.WriteLine("Non static method");
}
public static void display2() {
Console.WriteLine("Static method");
}
}
class Program {
static void Main(string[] args) {
Test t1 = new Test();
t1.display1();
Test.display2();
Console.ReadLine();
}
}
}
Output
In the above program, we have declared a non-static method named display1() and a static method named display2() inside the class Test.
Inside the Program class,
t1.display1()- access the non-static method using s1 objectTest.display2()- access the static method using the class name Test
Note: In C#, the Main method is static. So, we can call it without creating the object.
C# Static Class
In C#, when we declare a class as static, we cannot create objects of the class. For example,
using System;
namespace StaticKeyword {
static class Test {
static int a = 5;
static void display() {
Console.WriteLine("Static method");
}
static void Main(string[] args) {
// creating object of Test
Test t1 = new Test();
Console.WriteLine(a);
display();
}
}
}
In the above example, we have a static class Test. We have created an object t1 of the class Test.
Since we cannot make an object of the static class, we get the following error:
error CS0723: Cannot declare a variable of static type 'Test'
error CS0712: Cannot create an instance of the static class
Notice the field and method of the static class are also static because we can only have static members inside the static class.
Note: We cannot inherit a static class in C#. For example,
Access static Members within the Class
If we are accessing the static variables and methods inside the same class, we can directly access them without using the class name. For example,
using System;
namespace StaticKeyword {
class Test {
static int age = 25;
public static void display() {
Console.WriteLine("Static method");
}
static void Main(string[] args) {
Console.WriteLine(age);
display();
Console.ReadLine();
}
}
}
Output
Here, we are accessing the static field age and static method display() without using the class name.
C# String
In this tutorial, we will learn about C# string and its methods with the help of examples.
In C#, a string is a sequence of characters. For example, "hello" is a string containing a sequence of characters 'h', 'e', 'l', 'l', and 'o'.
We use the string keyword to create a string. For example,
Here, we have created a string named str and assigned the text "C# Programming". We use double quotes to represent strings in C#.
Example: Create string in C
using System;
namespace CsharpString {
class Test {
public static void Main(string [] args) {
// create string
string str1 = "C# Programming"; string str2 = "Programiz";
// print string
Console.WriteLine(str1);
Console.WriteLine(str2);
Console.ReadLine();
}
}
}
Output
In the above example, we have created two strings named str1 and str2 and printed them.
Note: A string variable in C# is not of primitive types like int, char, etc. Instead, it is an object of the String class.
String Operations
C# string provides various methods to perform different operations on strings. We will look into some of the commonly used string operations.
1. Get the Length of a string
To find the length of a string, we use the Length property. For example,
using System;
namespace CsharpString {
class Test {
public static void Main(string [] args) {
// create string
string str = "C# Programming";
Console.WriteLine("string: " + str);
// get length of str
int length = str.Length;
Console.WriteLine("Length: "+ length);
Console.ReadLine();
}
}
}
Output
In the above example, the Length property calculates the total number of characters in the string and returns it.
2. Join two strings in C
We can join two strings in C# using the Concat() method. For example,
using System;
namespace CsharpString {
class Test {
public static void Main(string [] args) {
// create string
string str1 = "C# ";
Console.WriteLine("string str1: " + str1);
// create string
string str2 = "Programming";
Console.WriteLine("string str2: " + str2);
// join two strings
string joinedString = string.Concat(str1, str2);
Console.WriteLine("Joined string: " + joinedString);
Console.ReadLine();
}
}
}
Output
In the above example, we have created two strings named str1 and str2. Notice the statement,
Here, the Concat() method joins str1 and str2 and assigns it to the joinedString variable.
We can also join two strings using the + operator in C#. To learn more, visit C# string Concat.
3. C# compare two strings
In C#, we can make comparisons between two strings using the Equals() method. The Equals() method checks if two strings are equal or not. For example,
using System;
namespace CsharpString {
class Test {
public static void Main(string [] args) {
// create string
string str1 = "C# Programming";
string str2 = "C# Programming";
string str3 = "Programiz";
// compare str1 and str2
Boolean result1 = str1.Equals(str2);
Console.WriteLine("string str1 and str2 are equal: " + result1);
//compare str1 and str3
Boolean result2 = str1.Equals(str3);
Console.WriteLine("string str1 and str3 are equal: " + result2);
Console.ReadLine();
}
}
}
Output
In the above example, we have created 3 strings named str1, str2, and str3. Here, we are using the Equals() method to check if one string is equal to another.
Immutability of String Objects
In C#, strings are immutable. This means, once we create a string, we cannot change that string.
To understand it, consider an example:
Here, we have created a string variable named str. The variable holds the string "Hello ".
Now suppose we want to change the string str.
Here, we are using the Concat() method to add the string "World" to the previous string str.
But how are we able to modify the string when they are immutable?
Let's see what has happened here,
- C# takes the value of the string
"Hello ". - Creates a new string by adding
"World"to the string"Hello ". - Creates a new string object, gives it a value
"Hello World", and stores it in str. - The original string,
"Hello ", that was assigned to str is released for garbage collection because no other variable holds a reference to it.
String Escape Sequences
The escape character is used to escape some of the characters present inside a string. In other words, we use escape sequences to insert special characters inside the string.
Suppose we need to include double quotes inside a string.
Since strings are represented by double quotes, the compiler will treat "This is the " as the string. And the above code will cause an error.
To solve this issue, we use the escape character \" in C#. For example,
Now by using \ before double quote ", we can include it in the string.
Some of the escape sequences in C# are as follows:
| Escape Sequence | Character Name |
|---|---|
\' |
single quote |
\" |
double quote |
\\ |
backslash |
\0 |
null |
\n |
new line |
\t |
horizontal tab |
String interpolation
In C#, we can use string interpolation to insert variables inside a string. For string interpolation, the string literal must begin with the $ character. For example,
using System;
namespace CsharpString {
class Test {
public static void Main(string [] args) {
// create string
string name = "Programiz";
// string interpolation
string message = $"Welcome to {name}";
Console.WriteLine(message);
Console.ReadLine();
}
}
}
Output
In the above example, we are using the name variable inside the message string.
Notice that,
- the string literal starts with
$ - the name variable is placed inside the curly braces
{}
Methods of C# string
There are various string methods in C#. Some of them are as follows:
| Methods | Description |
|---|---|
Format() |
returns a formatted string |
Split() |
splits the string into substring |
Substring() |
returns substring of a string |
Compare() |
compares string objects |
Replace() |
replaces the specified old character with the specified new character |
Contains() |
checks whether the string contains a substring |
Join() |
joins the given strings using the specified separator |
Trim() |
removes any leading and trailing whitespaces |
EndsWith() |
checks if the string ends with the given string |
IndexOf() |
returns the position of the specified character in the string |
Remove() |
returns characters from a string |
ToUpper() |
converts the string to uppercase |
ToLower() |
converts the string to lowercase |
PadLeft() |
returns string padded with spaces or with a specified Unicode character on the left |
PadRight() |
returns string padded with spaces or with a specified Unicode character on the right |
StartsWith() |
checks if the string begins with the given string |
ToCharArray() |
converts the string to a char array |
LastIndexOf() |
returns index of the last occurrence of a specified string |
C# Inheritance - OOP (II)
C# Inheritance
In this tutorial, we will learn about C# inheritance and its types with the help of examples.
In C#, inheritance allows us to create a new class from an existing class. It is a key feature of Object-Oriented Programming (OOP).
The class from which a new class is created is known as the base class (parent or superclass). And, the new class is called derived class (child or subclass)
The derived class inherits the fields and methods of the base class. This helps with the code reusability in C#.
How to perform inheritance in C#?
In C#, we use the : symbol to perform inheritance. For example,
class Animal {
// fields and methods
}
// Dog inherits from Animal
class Dog : Animal {
// fields and methods of Animal
// fields and methods of Dog
}
Here, we are inheriting the derived class Dog from the base class Animal. The Dog class can now access the fields and methods of Animal class.

C# Inheritance
Example: C# Inheritance
using System;
namespace Inheritance {
// base class
class Animal {
public string name;
public void display() {
Console.WriteLine("I am an animal");
}
}
// derived class of Animal
class Dog : Animal {
public void getName() {
Console.WriteLine("My name is " + name);
}
}
class Program {
static void Main(string[] args) {
// object of derived class
Dog labrador = new Dog();
// access field and method of base class
labrador.name = "Rohu"; labrador.display();
// access method from own class
labrador.getName();
Console.ReadLine();
}
}
}
Output
In the above example, we have derived a subclass Dog from the superclass Animal. Notice the statements,
Here, we are using labrador (object of Dog) to access the name and display() of the Animal class. This is possible because the derived class inherits all fields and methods of the base class.
Also, we have accessed the name field inside the method of the Dog class.
is-a relationship
In C#, inheritance is an is-a relationship. We use inheritance only if there is an is-a relationship between two classes. For example,
- Dog is an Animal
- Apple is a Fruit
- Car is a Vehicle
We can derive Dog from Animal class. Similarly, Apple from Fruit class and Car from Vehicle class.
protected Members in C# Inheritance
When we declare a field or method as protected, it can only be accessed from the same class and its derived classes.
Example: protected Members in Inheritance
using System;
namespace Inheritance {
// base class
class Animal {
protected void eat() { Console.WriteLine("I can eat"); }
}
// derived class of Animal
class Dog : Animal {
static void Main(string[] args) {
Dog labrador = new Dog();
// access protected method from base class
labrador.eat();
Console.ReadLine();
}
}
}
Output
In the above example, we have created a class named Animal. The class includes a protected method eat().
We have derived the Dog class from the Animal class. Notice the statement,
Since the protected method can be accessed from derived classes, we are able to access the eat() method from the Dog class.
Types of inheritance
There are the following types of inheritance:
1. Single Inheritance
In single inheritance, a single derived class inherits from a single base class.

2. Multilevel Inheritance
In multilevel inheritance, a derived class inherits from a base and then the same derived class acts as a base class for another class.

3. Hierarchical Inheritance
In hierarchical inheritance, multiple derived classes inherit from a single base class.

4. Multiple Inheritance
In multiple inheritance, a single derived class inherits from multiple base classes. C# doesn't support multiple inheritance. However, we can achieve multiple inheritance through interfaces.

5. Hybrid Inheritance
Hybrid inheritance is a combination of two or more types of inheritance. The combination of multilevel and hierarchical inheritance is an example of Hybrid inheritance.

Method Overriding in C# Inheritance
If the same method is present in both the base class and the derived class, the method in the derived class overrides the method in the base class. This is called method overriding in C#. For example,
using System;
namespace Inheritance {
// base class
class Animal {
public virtual void eat() {
Console.WriteLine("I eat food");
}
}
// derived class of Animal
class Dog : Animal {
// overriding method from Animal
public override void eat() {
Console.WriteLine("I eat Dog food");
}
}
class Program {
static void Main(string[] args) {
// object of derived class
Dog labrador = new Dog();
// accesses overridden method
labrador.eat();
}
}
}
Output
In the above example, the eat() method is present in both the base class and derived class.
When we call eat() using the Dog object labrador,
the method inside Dog is called. This is because the method inside Dog overrides the same method inside Animal.
Notice, we have used virtual and override with methods of the base class and derived class respectively. Here,
virtual- allows the method to be overridden by the derived classoverride- indicates the method is overriding the method from the base class
base Keyword in C# Inheritance
In the previous example, we saw that the method in the derived class overrides the method in the base class.
However, what if we want to call the method of the base class as well?
In that case, we use the base keyword to call the method of the base class from the derived class.
Example: base keyword in C# inheritance
using System;
namespace Inheritance {
// base class
class Animal {
public virtual void eat() {
Console.WriteLine("Animals eat food.");
}
}
// derived class of Animal
class Dog : Animal {
// overriding method from Animal
public override void eat() {
// call method from Animal class
base.eat();
Console.WriteLine("Dogs eat Dog food.");
}
}
class Program {
static void Main(string[] args) {
Dog labrador = new Dog();
labrador.eat();
}
}
}
Output
In the above example, the eat() method is present in both the base class Animal and the derived class Dog. Notice the statement,
Here, we have used the base keyword to access the method of Animal class from the Dog class.
Importance of Inheritance in C
To understand the importance of Inheritance, let's consider a situation.
Suppose we are working with regular polygons such as squares, rectangles, and so on. And, we have to find the perimeter of these polygons based on the input.
1. Since the formula to calculate perimeter is common for all regular polygons, we can create a RegularPolygon class and a method calculatePerimeter() to calculate perimeter.
2. And inherit Square and Rectangle classes from the RegularPolygon class. Each of these classes will have properties to store the length and number of sides because they are different for all polygons.
We pass the value of the length and sides to calculateperimeter() to compute the perimeter.
This is how inheritance makes our code reusable and more intuitive.
Example: Importance of Inheritance
using System;
namespace Inheritance {
class RegularPolygon {
public void calculatePerimeter(int length, int sides) {
int result = length * sides;
Console.WriteLine("Perimeter: " + result);
}
}
class Square : RegularPolygon {
public int length = 200;
public int sides = 4;
public void calculateArea() {
int area = length * length;
Console.WriteLine("Area of Square: " + area);
}
}
class Rectangle : RegularPolygon {
public int length = 100;
public int breadth = 200;
public int sides = 4;
public void calculateArea() {
int area = length * breadth;
Console.WriteLine("Area of Rectangle: " + area);
}
}
class Program {
static void Main(string[] args) {
Square s1 = new Square();
s1.calculateArea();
s1.calculatePerimeter(s1.length, s1.sides);
Rectangle t1 = new Rectangle();
t1.calculateArea();
t1.calculatePerimeter(t1.length, t1.sides);
}
}
}
Output
In the above example, we have created a RegularPolygon class that has a method to calculate the perimeter of the regular polygon.
Here, the Square and Rectangle inherit from RegularPolygon.
The formula to calculate the perimeter is common for all, so we have reused the calculatePerimeter() method of the base class.
And since the formula to calculate the area is different for different shapes, we have created a separate method inside the derived class to calculate the area.
C# abstract class and method
In this tutorial, we will learn about C# abstract class and method with the help of examples.
Abstract Class
In C#, we cannot create objects of an abstract class. We use the abstract keyword to create an abstract class. For example,
// create an abstract class
abstract class Language {
// fields and methods
}
...
// try to create an object Language
// throws an error
Language obj = new Language();
An abstract class can have both abstract methods (method without body) and non-abstract methods (method with the body).
For example,
abstract class Language {
// abstract method
public abstract void display1();
// non-abstract method
public void display2() {
Console.WriteLine("Non abstract method");
}
}
Before moving forward, make sure to know about C# inheritance.
Inheriting Abstract Class
As we cannot create objects of an abstract class, we must create a derived class from it.
So that we can access members of the abstract class using the object of the derived class. For example,
using System;
namespace AbstractClass {
abstract class Language {
// non-abstract method
public void display() {
Console.WriteLine("Non abstract method");
}
}
// inheriting from abstract class
class Program : Language {
static void Main (string [] args) {
// object of Program class
Program obj = new Program();
// access method of an abstract class
obj.display();
Console.ReadLine();
}
}
}
Output
In the above example, we have created an abstract class named Language. The class contains a non-abstract method display().
We have created the Program class that inherits the abstract class. Notice the statement,
Here, obj is the object of the derived class Program. We are calling the method of the abstract class using the object obj.
Note: We can use abstract class only as a base class. This is why abstract classes cannot be sealed. To know more, visit C# sealed class and method.
C# Abstract Method
A method that does not have a body is known as an abstract method. We use the abstract keyword to create abstract methods. For example,
Here, display() is an abstract method. An abstract method can only be present inside an abstract class.
When a non-abstract class inherits an abstract class, it should provide an implementation of the abstract methods.
Example: Implementation of the abstract method
using System;
namespace AbstractClass {
abstract class Animal {
// abstract method
public abstract void makeSound();
}
// inheriting from abstract class
class Dog : Animal {
// provide implementation of abstract method
public override void makeSound() { Console.WriteLine("Bark Bark"); }
}
class Program {
static void Main (string [] args) {
// create an object of Dog class
Dog obj = new Dog();
obj.makeSound();
Console.ReadLine();
}
}
}
Output
In the above example, we have created an abstract class named Animal. We have an abstract method makeSound() inside the class.
We have a Dog class that inherits from the Animal class. Dog class provides the implementation of the abstract method makeSound().
// provide implementation of abstract method
public override void makeSound() {
Console.WriteLine("Bark Bark");
}
Notice, we have used override with the makeSound() method. This indicates the method is overriding the method from the base class.
We then used the object of the Dog class to access makeSound().
If the Dog class had not provided the implementation of the abstract method makeSound(), Dog class should have been marked abstract as well.
Note: Unlike the C# inheritance, we cannot use virtual with the abstract methods of the base class. This is because an abstract class is implicitly virtual.
Abstract class with get and set accessors
We can mark get and set accessors as abstract. For example,
using System;
namespace AbstractClass {
abstract class Animal {
protected string name;
// abstract method
public abstract string Name { get; set; }
}
// inheriting from abstract class
class Dog : Animal {
// provide implementation of abstract method
public override string Name {
get {return name;}
set {name = value; }
}
}
class Program {
static void Main (string [] args) {
// create an object of Dog class
Dog obj = new Dog();
obj.Name = "Tom";
Console.WriteLine("Name: " + obj.Name);
Console.ReadLine();
}
}
}
Output
In the above example, we have marked the get and set accessor as abstract.
We are setting and getting the value of the name field of the abstract class Animal using the object of the derived class Dog.
Access Constructor of Abstract Classes
An abstract class can have constructors as well. For example,
using System;
namespace AbstractClass {
abstract class Animal {
public Animal() { Console.WriteLine("Animal Constructor"); }
}
class Dog : Animal {
public Dog() {
Console.WriteLine("Dog Constructor");
}
}
class Program {
static void Main (string [] args) {
// create an object of Dog class
Dog d1 = new Dog();
Console.ReadLine();
}
}
}
Output
In the above example, we have created a constructor inside the abstract class Animal.
Here, when we create an object of the derived class Dog the constructor of the abstract class Animal gets called as well.
Note: We can also use destructors inside the abstract class.
C# Abstraction
The abstract classes are used to achieve abstraction in C#.
Abstraction is one of the important concepts of object-oriented programming. It allows us to hide unnecessary details and only show the needed information.
This helps us to manage complexity by hiding details with a simpler, higher-level idea.
A practical example of abstraction can be motorbike brakes. We know what a brake does. When we apply the brake, the motorbike will stop. However, the working of the brake is kept hidden from us.
The major advantage of hiding the working of the brake is that now the manufacturer can implement brakes differently for different motorbikes. However, what brake does will be the same.
Example: C# Abstraction
using System;
namespace AbstractClass {
abstract class MotorBike {
public abstract void brake();
}
class SportsBike : MotorBike {
// provide implementation of abstract method
public override void brake() {
Console.WriteLine("Sports Bike Brake");
}
}
class MountainBike : MotorBike {
// provide implementation of abstract method
public override void brake() {
Console.WriteLine("Mountain Bike Brake");
}
}
class Program {
static void Main (string [] args) {
// create an object of SportsBike class
SportsBike s1 = new SportsBike();
s1.brake();
// create an object of MountainBike class
MountainBike m1 = new MountainBike();
m1.brake();
Console.ReadLine();
}
}
}
Output
In the above example, we have created an abstract class MotorBike. It has an abstract method brake().
As brake() is an abstract method the implementation of brake() in MotorBike is kept hidden.
Every motorbike has a different implementation of the brake. This is why SportsBike makes its own implementation of brake() and MountainBike makes its own implementation of brake().
Note: We use interfaces to achieve complete abstraction in C#. To learn more, visit C# Interface.
C# Nested Class
In this tutorial, you will learn about the nested class in C# with the help of examples.
In C#, we can define a class within another class. It is known as a nested class.
For example,
Here, we have created the class InnerClass inside the class OuterClass. The InnerClass is called the nested class.
Access Members
To access members of the nested classes we first need to create their objects.
1.Create object of Outer class
Here, we have created the obj1 object of the class OuterClass.
2. Create object of Inner Class
You can see that we have used OuterClass.InnerClass to create the obj2 object of the inner class. This is because InnerClass is the nested class of OuterClass.
Once we have created the object of individual classes, we can use the object name and dot operator to access members of each class.
Example: C# Nested Class
using System;
namespace CsharpNestedClass {
// outer class
public class Car {
public void displayCar() {
Console.WriteLine("Car: Bugatti");
}
// inner class
public class Engine {
public void displayEngine() {
Console.WriteLine("Engine: Petrol Engine");
}
}
}
class Program {
static void Main(string[] args) {
// create object of outer class
Car sportsCar = new Car();
// access method of outer class
sportsCar.displayCar();
// create object of inner class
Car.Engine petrolEngine = new Car.Engine();
// access member of inner class
petrolEngine.displayEngine();
Console.ReadLine();
}
}
}
Output
In the above program, we have nested the Engine class inside the Car class.
Inside the Program class, we have created objects of both the outer class and the inner class.
// object of outer class
Car sportsCar = new Car();
// object of nested class
Car.Engine petrolEngine = new Car.Engine();
We then used these objects to access methods of each class.
sportsCar.displayCar()- access outer class method using the object ofCarpetrolEngine.displayEngine()- access inner class method using the object ofEngine
Note: We cannot access the members of the inner class using the object of the outer class. For example,
Here, we cannot access the displayEngine() method of the inner class Engine using the sportsCar object of the outer class.
Access Outer Class Members Inside Inner Class
We can access members of the outer class inside the inner class. For this we use an object of the outer class. For example,
using System;
namespace CsharpNestedClass {
// outer class
public class Car {
public string brand = "Bugatti";
// nested class
public class Engine {
public void displayCar() {
// object of outer class
Car sportsCar = new Car();
Console.WriteLine("Brand: " + sportsCar.brand);
}
}
}
class Program {
static void Main(string[] args) {
// object of inner class
Car.Engine engineObj = new Car.Engine();
engineObj.displayCar();
Console.ReadLine();
}
}
}
Output
In the above example, we have nested the Engine class inside the Car class. Notice the line,
Here, we have used the object of the class Car to access field brand.
Access static Members of Outer Class Inside Inner Class
If we need to access static members of the outer class, we don't need to create its object. Instead, we can directly use the name of the outer class. For example,
using System;
namespace CsharpNestedClass {
// outer class
public class Car {
//static member of outer class
public static string brand = "Bugatti";
// nested class
public class Engine {
public void display() {
// access static member of outer class
Console.WriteLine("Brand: " + Car.brand);
}
}
}
class Program {
static void Main(string[] args) {
// object of inner class
Car.Engine obj = new Car.Engine();
obj.display();
Console.ReadLine();
}
}
}
Output
In the above example, we have nested the Engine class inside the Car class. Car has a static field brand.
Here, we have accessed the static field brand inside the inner class (Engine) using the name of the outer class (Car).
Inheriting Outer Class
Like a regular class, we can also inherit the outer class. For example,
using System;
namespace CsharpNestedClass {
// outer class
class Computer {
public void display() {
Console.WriteLine("Method of Computer class");
}
// nested class
public class CPU {
}
}
class Laptop : Computer { }
class Program {
static void Main(string[] args) {
// object of derived class
Laptop obj = new Laptop();
obj.display();
Console.ReadLine();
}
}
}
Output
In the above example, we have derived the class Laptop from the outer class Computer.
Because of this we are able to access the display() method of class Computer using the object of the class Laptop.
Inheriting inner class
In C#, we can inherit the inner class as well. For example,
using System;
namespace CsharpNestedClass {
// outer class
class Computer {
// nested class
public class CPU {
public void display() {
Console.WriteLine("Method of CPU class");
}
}
}
// inheriting inner class
class Laptop : Computer.CPU { }
class Program {
static void Main(string[] args) {
// object of derived class
Laptop obj = new Laptop();
obj.display();
Console.ReadLine();
}
}
}
Output
In the above example, we have derived the Laptop class from the inner class CPU.
Notice that we have used the name of the outer class along with the nested class to inherit the inner class.
C# Partial Class and Partial Method
In this article we are going to learn about how and why partial class and partial methods be implemented in C# .
There are many situations when you might need to split a class definition, such as when working on a large scale projects, multiple developers and programmers might need to work on the same class at the same time. In this case we can use a feature called Partial Class.
Introduction to Partial Class
While programming in C# (or OOP), we can split the definition of a class over two or more source files. The source files contains a section of the definition of class, and all parts are combined when the application is compiled. For splitting a class definition, we need to use the partial keyword.
Example 1:
We have a project named as HeightWeightInfo which shows height and weight.
We have a file named as File1.cs with a partial class named as Record.
It has two integer variables h & w and a method/constructor named as Record which is assigning the values of h & w.
namespace HeightWeightInfo
{
class File1
{
}
public partial class Record
{
private int h;
private int w;
public Record(int h, int w)
{
this.h = h;
this.w = w;
}
}
}
Here is another file named as File2.cs with the same partial class Record which has only the method PrintRecord. This method will display the values of h & w.
namespace HeightWeightInfo
{
class File2
{
}
public partial class Record
{
public void PrintRecord()
{
Console.WriteLine("Height:"+ h);
Console.WriteLine("Weight:"+ w);
}
}
}
Here now we can see the main method of the project:
namespace HeightWeightInfo
{
class Program
{
static void Main(string[] args)
{
Record myRecord = new Record(10, 15);
myRecord.PrintRecord();
Console.ReadLine();
}
}
}
Here we have the object of the class Record as myRecord which is passing the parameter values as 10 and 15 to h and w respectively to the method defined in File1.cs.
The method PrintRecord is called by the object myRecord which is defined in the File2.cs.
This shows that the partial keyword helps to combine all the attributes of a class defined in various files to work as a single class.
Places where partial class can be used:
- While working on a larger projects with more than one developer, it helps the developers to work on the same class simultaneously.
- Codes can be added or modified to the class without re-creating source files which are automatically generated by the IDE (i.e. Visual Studio).
Things to Remember about Partial Class
The partial keyword specify that other parts of the class can be defined in the namespace.
It is mandatory to use the partial keyword if we are trying to make a class partial.
All the parts of the class should be in the same namespace and available at compile time to form the final type.
All the parts must have same access modifier i.e. private, public, or so on.
- If any part is declared abstract, then the whole type is considered abstract.
- If any part is declared sealed, then the whole type is considered sealed.
- If any part declares a base type, then the whole type inherits that class.
- Any class member declared in a partial definition are available to all other parts.
- All parts of a partial class should be in the same namespace.
****Note:** The partial modifier is not available on delegate or enumeration declarations
Introduction to Partial Methods
A partial class may contain a partial method. One part of the class contains the signature of the method. An optional implementation may be defined in the same part or another part. If the implementation is not supplied, then the method and all calls are removed at compile time.
Example 2:
Let's take an example as a partial class Car defined in file1.cs
which has three methods InitializeCar(), BuildRim() and BuildWheels().
Among those methods, InitializeCar is defined as partial.
public partial class Car
{
partial void InitializeCar();
public void BuildRim() { }
public void BuildWheels() { }
}
And we have another file named as file2.cs which has two methods BuildEngine and InitializeCar.
The method InitializeCar is partial method which is also defined in file1.cs.
public partial class Car
{
public void BuildEngine() { }
partial void InitializeCar()
{
string str = "Car";
}
}
A partial method declaration consists of two parts:
- The definition as in
file1.cs. - The implementation as in
file2.cs.
They may be in separate parts of the partial class, or in the same part.
Things to remember about Partial Method
partialkeyword.- return type
void. - implicitly
private. - and cannot be
virtual.
C# sealed class and method
In this tutorial, we will learn about the sealed class and method in C# with the help of examples.
Sealed Class
In C#, when we don't want a class to be inherited by another class, we can declare the class as a sealed class.
A sealed class cannot have a derived class. We use the sealed keyword to create a sealed class.
For example,
using System;
namespace SealedClass {
sealed class Animal {
}
// trying to inherit sealed class
// Error Code
class Dog : Animal { }
class Program {
static void Main (string [] args) {
// create an object of Dog class
Dog d1 = new Dog();
Console.ReadLine();
}
}
}
In the above example, we have created a sealed class Animal. Here, we are trying to derive Dog class from the Animal class.
Since a sealed class cannot be inherited, the program generates the following error:
Sealed Method
During method overriding, if we don't want an overridden method to be further overridden by another class, we can declare it as a sealed method.
We use a sealed keyword with an overridden method to create a sealed method.
For example,
using System;
namespace SealedClass {
class Animal {
public virtual void makeSound() {
Console.WriteLine("Animal Sound");
}
}
class Dog : Animal {
// sealed method
sealed public override void makeSound() { Console.WriteLine("Dog Sound"); }
}
class Puppy : Dog {
// trying to override sealed method
public override void makeSound() { Console.WriteLine("Puppy Sound"); }
}
class Program {
static void Main (string [] args) {
// create an object of Puppy class
Puppy d1 = new Puppy();
Console.ReadLine();
}
}
}
In the above example, we have overridden the makeSound() method inside the Dog class.
Notice that we have used the sealed keyword with makeSound(). This means the Puppy class that inherits the Dog class is not allowed to override makeSound().
Hence, we get an error
error CS0239: 'Puppy.makeSound()': cannot override inherited member 'Dog.makeSound()' because it is sealed
when we try to further override the makeSound() method inside the Puppy class.
Note: Sealing an overridden method prevents method overriding in multilevel inheritance.
Why Sealed Class?
- We use sealed classes to prevent inheritance. As we cannot inherit from a sealed class, the methods in the sealed class cannot be manipulated from other classes.
It helps to prevent security issues.
For example,
As class A cannot be inherited, class B cannot override and manipulate the methods of class A.
- One of the best uses of sealed classes is when you have a class with static members.
The Pens class of the System.Drawing namespace is one of the examples of the sealed class.
The Pens class has static members that represent the pens with standard colors.
Pens.Blue represents a pen with blue color.
C# interface
In this tutorial, we will learn about the C# interface with the help of examples.
In C#, an interface is similar to abstract class. However, unlike abstract classes, all methods of an interface are fully abstract (method without body).
We use the interface keyword to create an interface.
For example,
Here,
- IPolygon is the name of the interface.
- By convention, interface starts with I so that we can identify it just by seeing its name.
- We cannot use access modifiers inside an interface.
- All members of an interface are public by default.
- An interface doesn't allow fields.
Implementing an Interface
We cannot create objects of an interface. To use an interface, other classes must implement it.
Same as in C# Inheritance,
we use : symbol to implement an interface.
For example,
using System;
namespace CsharpInterface {
interface IPolygon {
// method without body
void calculateArea(int l, int b);
}
class Rectangle : IPolygon {
// implementation of methods inside interface
public void calculateArea(int l, int b) {
int area = l * b;
Console.WriteLine("Area of Rectangle: " + area);
}
}
class Program {
static void Main (string [] args) {
Rectangle r1 = new Rectangle();
r1.calculateArea(100, 200);
}
}
}
Output
In the above example, we have created an interface named IPolygon.
The interface contains a method calculateArea(int a, int b) without implementation.
Here, the Rectangle class implements IPolygon. And, provides the implementation of the calculateArea(int a, int b) method.
Note: We must provide the implementation of all the methods of interface inside the class that implements it.
Implementing Multiple Interfaces
Unlike inheritance, a class can implement multiple interfaces. For example,
using System;
namespace CsharpInterface {
interface IPolygon {
// method without body
void calculateArea(int a, int b);
}
interface IColor {
void getColor();
}
// implements two interface
class Rectangle : IPolygon, IColor {
// implementation of IPolygon interface
public void calculateArea(int a, int b) {
int area = a * b;
Console.WriteLine("Area of Rectangle: " + area);
}
// implementation of IColor interface
public void getColor() {
Console.WriteLine("Red Rectangle");
}
}
class Program {
static void Main (string [] args) {
Rectangle r1 = new Rectangle();
r1.calculateArea(100, 200);
r1.getColor();
}
}
}
Output
In the above example, we have two interfaces, IPolygon and IColor.
We have implemented both interfaces in the Rectangle class separated by ,.
Now, Rectangle has to implement the method of both interfaces.
Using reference variable of an interface
We can use the reference variable of an interface. For example,
using System;
namespace CsharpInterface {
interface IPolygon {
// method without body
void calculateArea(int l, int b);
}
class Rectangle : IPolygon {
// implementation of methods inside interface
public void calculateArea(int l, int b) {
int area = l * b;
Console.WriteLine("Area of Rectangle: " + area);
}
}
class Program {
static void Main (string [] args) {
// using reference variable of interface
IPolygon r1 = new Rectangle();
r1.calculateArea(100, 200);
}
}
}
Output
In the above example, we have created an interface named IPolygon. The interface contains a method calculateArea(int l, int b) without implementation.
Notice, we have used the reference variable of interface IPolygon. It points to the class Rectangle that implements it.
Though we cannot create objects of an interface, we can still use the reference variable of the interface that points to its implemented class.
Practical Example of Interface
Let's see a more practical example of C# Interface.
using System;
namespace CsharpInterface {
interface IPolygon {
// method without body
void calculateArea();
}
// implements interface
class Rectangle : IPolygon {
// implementation of IPolygon interface
public void calculateArea() {
int l = 30;
int b = 90;
int area = l * b;
Console.WriteLine("Area of Rectangle: " + area);
}
}
class Square : IPolygon {
// implementation of IPolygon interface
public void calculateArea() {
int l = 30;
int area = l * l;
Console.WriteLine("Area of Square: " + area);
}
}
class Program {
static void Main (string [] args) {
Rectangle r1 = new Rectangle();
r1.calculateArea();
Square s1 = new Square();
s1.calculateArea();
}
}
}
Output
In the above program, we have created an interface named IPolygon. It has an abstract method calculateArea().
We have two classes Square and Rectangle that implement the IPolygon interface.
The rule for calculating the area is different for each polygon. Hence, calculateArea() is included without implementation.
Any class that implements IPolygon must provide an implementation of calculateArea(). Hence, implementation of the method in class Rectangle is independent of the method in class Square.
Advantages of C# interface
Now that we know what interfaces are, let's learn about why interfaces are used in C#.
- Similar to abstract classes, interfaces help us to achieve abstraction in C#.
Here, the method calculateArea() inside the interface, does not have a body. Thus, it hides the implementation details of the method.
- Interfaces provide specifications that a class (which implements it) must follow.
In our previous example, we have used calculateArea() as a specification inside the interface IPolygon. This is like setting a rule that we should calculate the area of every polygon.
Now any class that implements the IPolygon interface must provide an implementation for the calculateArea() method.
- Interfaces are used to achieve multiple inheritance in C#.
- Interfaces provide loose coupling(having no or least effect on other parts of code when we change one part of a code).
In our previous example, if we change the implementation of calculateArea() in the Square class it does not affect the Rectangle class.
C# Method Overloading
In this article, you’ll learn about method overloading in C# with the help of examples.
In C#, there might be two or more methods in a class with the same name but different numbers, types, and order of parameters, it is called method overloading.
For example:
void display() { ... }
void display(int a) { ... }
float display(double a) { ... }
float display(int a, float b) { ... }
Here, the display() method is overloaded. These methods have the same name but accept different arguments.
Note: The return types of the above methods are not the same. It is because method overloading is not associated with return types. Overloaded methods may have the same or different return types, but they must have different parameters.
We can perform method overloading in the following ways:
1. By changing the Number of Parameters
We can overload the method if the number of parameters in the methods is different.
Here, we have two methods in a class with the same name - display(). It is possible to have more than one method with the same name because the number of parameters in methods is different.
For example,
using System;
namespace MethodOverload {
class Program {
// method with one parameter
void display(int a) {
Console.WriteLine("Arguments: " + a);
}
// method with two parameters
void display(int a, int b) {
Console.WriteLine("Arguments: " + a + " and " + b);
}
static void Main(string[] args) {
Program p1 = new Program();
p1.display(100);
p1.display(100, 200);
Console.ReadLine();
}
}
}
Output
In the above example, we have overloaded the display() method:
- one method has one parameter
- another has two parameter
Based on the number of the argument passed during the method call, the corresponding method is called.
p1.display(100)- calls the method with single parameterp1.display(100, 200)- calls the method with two parameters
2. By changing the Data types of the parameters
Here, we have two methods - display() with the same number of parameters. It is possible to have more than one display() method with the same number of parameters because the data type of parameters in methods is different.
For example,
using System;
namespace MethodOverload {
class Program {
// method with int parameter
void display(int a) {
Console.WriteLine("int type: " + a);
}
// method with string parameter
void display(string b) {
Console.WriteLine("string type: " + b);
}
static void Main(string[] args) {
Program p1 = new Program();
p1.display(100);
p1.display("Programiz");
Console.ReadLine();
}
}
}
Output
In the above program, we have overloaded the display() method with different types of parameters.
Based on the type of arguments passed during the method call, the corresponding method is called.
p1.display(100)- calls method withinttype parameterp1.display("Programiz")- calls method withstringtype parameter
3. By changing the Order of the parameters
Here, we have two methods - display(). It is possible to have more than one display() method with the same number and type of parameter because the order of data type of parameters in methods is different.
For example,
using System;
namespace MethodOverload {
class Program {
// method with int and string parameters
void display(int a, string b) {
Console.WriteLine("int: " + a);
Console.WriteLine("string: " + b);
}
// method with string andint parameter
void display(string b, int a) {
Console.WriteLine("string: " + b);
Console.WriteLine("int: " + a);
}
static void Main(string[] args) {
Program p1 = new Program();
p1.display(100, "Programming");
p1.display("Programiz", 400);
Console.ReadLine();
}
}
}
Output
In the above program, we have overloaded the display() method with different orders of parameters.
Based on the order of arguments passed during the method call, the corresponding method is called.
p1.display(100, "Programming")- calls method withintandstringparameter respectivelyp1.display("Programiz", 400)- calls method withstringandintparameter respectively
C# Constructor Overloading
In this article, you’ll learn about constructor overloading in C# with the help of examples.
In C#, similar to method overloading, we can also overload constructors. For constructor overloading, there must be two or more constructors with the same name but different
- number of parameters
- types of parameters
- order of parameters
Before you learn about constructor overloading, make sure to know about C# constructors.
We can perform constructor overloading in the following ways:
1. Different number of parameters
We can overload the constructor if the number of parameters in a constructor are different.
Here, we have three constructors in class Car. It is possible to have more than one constructor because the number of parameters in constructors is different.
Notice that,
Car() { }- has no parameterCar(string brand) { }- has one parameterCar(string brand, int price) { }- has two parameters
Example: Constructor Overloading with different number of parameter
using System;
namespace ConstructorOverload {
class Car {
// constructor with no parameter
Car() {
Console.WriteLine("Car constructor");
}
// constructor with one parameter
Car(string brand) {
Console.WriteLine("Car constructor with one parameter");
Console.WriteLine("Brand: " + brand);
}
static void Main(string[] args) {
// call with no parameter
Car car = new Car();
Console.WriteLine();
// call with one parameter
Car car2 = new Car("Bugatti");
Console.ReadLine();
}
}
}
Output
In the above example, we have overloaded the Car constructor:
- one constructor has one parameter
- another has two parameter
Based on the number of the argument passed during the constructor call, the corresponding constructor is called.
Here,
- Object car - calls constructor with one parameter
- Object car2 - calls constructor with two parameter
2. Different types of parameters
Here, we have two Car constructors with the same number of parameters. We are able to create constructors with the same parameters because the data type inside the parameters is different.
Notice that,
Car(string brand) { }- has parameter ofstringtypeCar(int price) { }- has parameter ofinttype
Example: Constructor overloading with different types of parameters
using System;
namespace ConstructorOverload {
class Car {
// constructor with string parameter
Car(string brand) {
Console.WriteLine("Brand: " + brand);
}
// constructor with int parameter
Car(int price) {
Console.WriteLine("Price: " + price);
}
static void Main(string[] args) {
// call constructor with string parameter
Car car = new Car("Lamborghini");
Console.WriteLine();
// call constructor with int parameter
Car car2 =new Car(50000);
Console.ReadLine();
}
}
}
Output
In the above program, we have overloaded the constructor with different types of parameters.
Here,
- Object car - calls constructor with
stringtype parameter - Object car2 - calls constructor with
inttype parameter
3. Different order of parameters
Here, we have two constructors with the same number of parameters. This is possible because the order of data type in parameters is different.
Notice that,
Car(string brand, int price) { }-stringdata type comes beforeintCar(int speed, string color) { }-intdata type comes beforestring
Example: Constructor overloading with different order of parameters
using System;
namespace ConstructorOverload {
class Car {
// constructor with string and int parameter
Car(string brand, int price) {
Console.WriteLine("Brand: " + brand);
Console.WriteLine("Price: " + price);
}
// constructor with int and string parameter
Car(int speed, string color) {
Console.WriteLine("Speed: " + speed + " km/hr");
Console.WriteLine("Color: " + color);
}
static void Main(string[] args) {
// call constructor with string and int parameter
Car car = new Car("Bugatti", 50000);
Console.WriteLine();
// call constructor with int and string parameter
Car car2 =new Car(60, "Red");
Console.ReadLine();
}
}
}
Output
In the above program, we have overloaded the constructors with different orders of parameters.
Here,
- Object car - calls constructor with
stringandintparameter respectively - Object car2 - calls constructor with
intandstringparameter respectively
Additional Topics
C# using
In this tutorial, we will learn about C# using and using static to import external resources in a program with the help of examples.
In C#, we use the using keyword to import external resources (namespaces, classes, etc) inside a program.
For example,
// using System namespace
using System;
namespace Program {
class Program1 {
static void Main(string[] args) {
Console.WriteLine("Hello World!");
}
}
}
Output
In the above example, notice the line
Here, we are importing the System namespace inside our program.
This helps us to directly use the classes present in the System namespace.
Also, because of this, we don't have to write the fully qualified name of the print statement.
// full print statement
System.Console.WriteLine("Hello World!");
// print statement with using System;
Console.WriteLine("Hello World!");
To learn more about the namespace, visit C# namespaces.
C# using to create an alias
We can also create aliases with the help of using in C#. For example,
// creating alias for System.Console
using Programiz = System.Console;
namespace HelloWorld {
class Program {
static void Main(string[] args) {
// using Programiz alias instead of System.Console
Programiz.WriteLine("Hello World!");
}
}
}
Output
In the above program, we have created an alias forSystem.Console.
This allows us to use the alias Programiz instead of System.Console.
Here, Programiz will work just like System.Console.
C# using static directive
In C#, we can also import classes in our program. Once we import these classes, we can use the static members (fields, methods) of the class.
We use the using static directive to import classes in our program.
Example: C# using static with System.Math
using System;
// using static directive
using static System.Math;
namespace Program {
class Program1 {
public static void Main(string[] args) {
double n = Sqrt(9);
Console.WriteLine("Square root of 9 is " + n);
}
}
}
Output
In the above example, notice the line,
Here, this line helps us to directly access the methods of the Math class.
We have used the Sqrt() method directly without specifying the Math class.
If we don't use the using static System.Math in our program, we have to include the class name Math while using Sqrt().
For example,
using System;
namespace Program {
class Program1 {
public static void Main(string[] args) {
// using the class name Math
double n = Math.Sqrt(9);
Console.WriteLine("Square root of 9 is " + n);
}
}
}
Output
In the above example, notice the line,
Here, we are using Math.Sqrt() to compute the square root of 9. This is because we haven't imported the System.Math in this program.
C# Type Conversion
In this tutorial, we will learn about the C# type conversion and its types with the help of examples.
The process of converting the value of one type (int, float, double, etc.) to another type is known as type conversion.
In C#, there are two basic types of type conversion:
- Implicit Type Conversions
- Explicit Type Conversions
1. Implicit Type Conversion in C
In implicit type conversion, the C# compiler automatically converts one type to another.
Generally, smaller types like int (having less memory size) are automatically converted to larger types like double (having larger memory size).
Example: Implicit Type Conversion
using System;
namespace MyApplication {
class Program {
static void Main(string[] args) {
int numInt = 500;
// get type of numInt
Type n = numInt.GetType();
// Implicit Conversion
double numDouble = numInt;
// get type of numDouble
Type n1 = numDouble.GetType();
// Value before conversion
Console.WriteLine("numInt value: "+numInt);
Console.WriteLine("numInt Type: " + n);
// Value after conversion
Console.WriteLine("numDouble value: "+numDouble);
Console.WriteLine("numDouble Type: " + n1);
Console.ReadLine();
}
}
}
Output
In the above example, we have created an int type variable named numInt.
Notice the line,
Here, we are assigning the int type variable to a double type variable.
In this case, the C# compiler automatically converts the int type value to double.
Notice that we have used the GetType() method to check the type of numInt and numDouble variables.
Note: In implicit type conversion, smaller types are converted to larger types. Hence, there is no loss of data during the conversion.
2. C# Explicit Type Conversion
In explicit type conversion, we explicitly convert one type to another.
Generally, larger types like double (having large memory size) are converted to smaller types like int (having small memory size).
Example: Explicit Type Conversion
using System;
namespace MyApplication {
class Program {
static void Main(string[] args) {
double numDouble = 1.23;
// Explicit casting
int numInt = (int) numDouble;
// Value before conversion
Console.WriteLine("Original double Value: "+numDouble);
// Value before conversion
Console.WriteLine("Converted int Value: "+numInt);
Console.ReadLine();
}
}
}
Output
In the above example, we have created a double variable named numDouble. Notice the line,
Here, (int) is a cast expression that explicitly converts the double type to int type.
We can see the original value is 1.23 whereas the converted value is 1. Here, some data is lost during the type conversion. This is because we are explicitly converting the larger data type double to a smaller type int.
Note: The explicit type conversion is also called type casting.
C# Type Conversion using Parse()
In C#, we can also use the Parse() method to perform type conversion.
Generally, while performing type conversion between non-compatible types like int and string, we use Parse().
Example: Type Conversion using Parse()
using System;
namespace Conversion {
class Program {
static void Main(string[] args) {
string n = "100";
// converting string to int type
int a = int.Parse(n);
Console.WriteLine("Original string value: "+n);
Console.WriteLine("Converted int value: "+a);
Console.ReadLine();
}
}
}
Output
In the above example, we have converted a string type to an int type.
Here, the Parse() method converts the numeric string 100 to an integer value.
Note: We cannot use Parse() to convert a textual string like "test" to an int. For example,
C# Type Conversion using Convert Class
In C#, we can use the Convert class to perform type conversion. The Convert class provides various methods to convert one type to another.
| Method | Description |
|---|---|
ToBoolean() |
converts a type to a Boolean value |
ToChar() |
converts a type to a char type |
ToDouble() |
converts a type to a double type |
ToInt16() |
converts a type to a 16-bit int type |
ToString() |
converts a type to a string |
Let us look at some examples:
Example: Convert int to String and Double
using System;
using System;
namespace Conversion {
class Program {
static void Main(string[] args) {
// create int variable
int num = 100;
Console.WriteLine("int value: " + num);
// convert int to string
string str = Convert.ToString(num);
Console.WriteLine("string value: " + str);
// convert int to Double
Double doubleNum = Convert.ToDouble(num);
Console.WriteLine("Double value: " + doubleNum);
Console.ReadLine();
}
}
}
Output
In the above example,
- Convert.ToString(a) - converts an
inttype num tostring - Convert.ToDouble(a) - converts num to the
Doubletype
Example: Convert string to Double and vice-versa
using System;
namespace Conversion {
class Program {
static void Main(string[] args) {
// create string variable
string str = "99.99";
Console.WriteLine("Original string value: " + str);
// convert string to double
Double newDouble = Convert.ToDouble(str);
Console.WriteLine("Converted Double value: " + newDouble);
// create double variable
double num = 88.9;
Console.WriteLine("Original double value: " + num);
// converting double to string
string newString = Convert.ToString(num);
Console.WriteLine("Converted string value: " + newString);
Console.ReadLine();
}
}
}
Output
Original string value: 99.99
Converted Double value: 99.99
Original double value: 88.9
Converted string value: 88.9
In the above example,
- Convert.ToDouble(str)- converts a
stringtype str toDouble - Convert.ToString(num) - converts a
doubletype num to thestring
Example 3: Convert int to Boolean
using System;
namespace Conversion {
class Program {
static void Main(string[] args) {
// create int variables
int num1 = 0;
int num2 = 1;
// convert int to Boolean
Boolean bool1 = Convert.ToBoolean(num1);
Boolean bool2 = Convert.ToBoolean(num2);
Console.WriteLine("Boolean value of 0 is: " + bool1);
Console.WriteLine("Boolean value of 1 is: " + bool2);
Console.ReadLine();
}
}
}
Output
In the above example, we have created two integer variables: num1 and num2 with values 0 and 1 respectively. Here,
- Convert.ToBoolean(num1) - converts 0 to a
BooleanvalueFalse - Convert.ToBoolean(num2) - converts 1 to a
BooleanvalueTrue
Note: In C#, the integer value 0 is considered False and all other values are considered True.
C# Preprocessor directives
In this tutorial, we’ll learn about Preprocessor Directives, available directives in C#, and when, why and how why they are used.
As the name justifies, preprocessor directives are a block of statements that gets processed before the actual compilation starts. C# preprocessor directives are the commands for the compiler that affects the compilation process.
These commands specifies which sections of the code to compile or how to handle specific errors and warnings.
C# preprocessor directive begins with a # (hash) symbol and all preprocessor directives last for one line. Preprocessor directives are terminated by new line rather than semicolon.
The preprocessor directives available in C# are:
| Preprocessor Directive | Description | Syntax |
| --- | --- | --- |
| #if | Checks if a preprocessor expression is true or not | #if preprocessor-expression
code to compile
#endif |
| #elif | Used along with #if to check multiple preprocessor expressions | #if preprocessor-expression-1
code to compile
#elif preprocessor-expression-2
code to compile
#endif |
| #else | Used along with #if to create compound conditional directive. | #if preprocessor-expression
code to compile
#elif
code to compile
#endif |
| #endif | Used along with #if to indicate the end of a conditional directive | #if preprocessor-expression
code to compile
#endif |
| #define | Used to define a symbol | #define SYMBOL |
| #undef | Used to undefine a symbol | #undef SYMBOL |
| #warning | Allows us to generate level 1 warning from our code | #warning warning-message |
| #error | Allows us to generate error from our code | #error error-message |
| #line | Allows us to modify the compiler's line number and filename to display errors and warnings | #line line-number file-name |
| #region | Allows us to create a region that can be expanded or collapsed when using a Visual Studio Code Editor | #region region-description
codes
#endregion |
| #endregion | Indicates the end of a region | #region region-description
codes
#endregion |
| #pragma | Gives the compiler special instructions for the compilation of the file in which it appears. | #pragma pragma-name pragma-arguments |
#define directive
-
The
#definedirective allows us to define a symbol. -
Symbols that are defined when used along with
#ifdirective will evaluate to true.
-
These symbols can be used to specify conditions for compilation.
-
Syntax:
- For example:
Here, TESTING is a symbol.
#undef directive
-
The
#undefdirective allows us to undefine a symbol. -
Undefined symbols when used along with
#ifdirective will evaluate to false. -
Syntax:
- For example:
Here, TESTING is a symbol.
#if directive
-
The
#ifdirective are used to test the preprocessor expression. -
A preprocessor expression may consists of a symbol only or combination of symbols along with operators like
&&(AND),||(OR),!(NOT). -
#ifdirective is followed by an#endifdirective. -
The codes inside the
#ifdirective is compiled only if the expression tested with#ifevaluates to true.
- Syntax:
- For example:
Example 1: How to use #if directive?
#define CSHARP
using System;
namespace Directive
{
class ConditionalDirective
{
public static void Main(string[] args)
{
#if (CSHARP)
Console.WriteLine("CSHARP is defined");
#endif
}
}
}
When we run the program, the output will be:
In the above program, CSHARP symbol is defined using the #define directive at the beginning of program. Inside the Main() method, #if directive is used to test whether CSHARP is true or not. The block of code inside #if directive is compiled only if CSHARP is defined.
#elif directive
-
The
#elifdirective is used along with #if directive that lets us create a compound conditional directive. -
It is used when testing multiple preprocessor expression.
-
The codes inside the
#elifdirective is compiled only if the expression tested with that#elifevaluates to true.
- Syntax:
#if preprocessor-expression-1
code to compile
#elif preprocessor-expression-2
code-to-compile
#endif
- For example:
#if TESTING
Console.WriteLine("Currently Testing");
#elif TRAINING
Console.WriteLine("Currently Training");
#endif
#if TESTING
Console.WriteLine("Currently Testing");
#elif TRAINING
Console.WriteLine("Currently Training");
#endif
#else directive
-
The
#elsedirective is used along with#ifdirective. -
If none of the expression in the preceding
#ifand#elif(if present) directives are true, the codes inside the#elsedirective will be compiled.
- Syntax:
#if preprocessor-expression-1
code to compile
#elif preprocessor-expression-2
code-to-compile
#else
code-to-compile
#endif
- For example:
#if TESTING
Console.WriteLine("Currently Testing");
#elif TRAINING
Console.WriteLine("Currently Training");
#else
Console.WriteLine("Neither Testing nor Training");
#endif
#endif directive
-
The
#endifdirective is used along with#ifdirective to indicate the end of#ifdirective. -
Syntax:
- For example:
Example 2: How to use conditional directive (if, elif, else, endif) ?
#define CSHARP
#undef PYTHON
using System;
namespace Directive
{
class ConditionalDirective
{
static void Main(string[] args)
{
#if (CSHARP && PYTHON)
Console.WriteLine("CSHARP and PYTHON are defined");
#elif (CSHARP && !PYTHON)
Console.WriteLine("CSHARP is defined, PYTHON is undefined");
#elif (!CSHARP && PYTHON)
Console.WriteLine("PYTHON is defined, CSHARP is undefined");
#else
Console.WriteLine("CSHARP and PYTHON are undefined");
#endif
}
}
}
When we run the program, the output will be:
In this example, we can see the use of #elif and #else directive. These directive are used when there are multiple conditions to be tested. Also, symbols can be combined using logical operators to form a preprocessor expression.
#warning directive
-
The
#warningdirective allows us to generate a user-defined level one warning from our code. -
Syntax:
- For example:
Example 3: How to use #warning directive?
using System;
namespace Directives
{
class WarningDirective
{
public static void Main(string[] args)
{
#if (!CSHARP)
#warning CSHARP is undefined
#endif
Console.WriteLine("#warning directive example");
}
}
}
When we run the program, the output will be:
Program.cs(10,26): warning CS1030: #warning: 'CSHARP is undefined' [/home/myuser/csharp/directives-project/directives-project.csproj]
#warning directive example
After running the above program, we will see the output as above. The text represents a warning message. Here, we are generating a user-defined warning message using the #warning directive.
Note that the statements after the #warning directive are also executed. It means that the #warning directive does not terminate the program but just throws a warning.
#error directive
-
The
#errordirective allows us to generate a user-defined error from our code. -
Syntax:
- For example:
Example 4: How to use #error directive?
using System;
namespace Directive
{
class Error
{
public static void Main(string[] args)
{
#if (!CSHARP)
#error CSHARP is undefined
#endif
Console.WriteLine("#error directive example");
}
}
}
When we run the program, the output will be:
Program.cs(10,24): error CS1029: #error: 'CSHARP is undefined' [/home/myuser/csharp/directives-project/directives-project.csproj]
The build failed. Please fix the build errors and run again.
We will see some errors, probably like above. Here we are generating a user-defined error.
Another thing to note here is the program will be terminated and the line #error directive example won't be printed as it was in the #warning directive.
#line directive
-
The
#linedirective allows us to modify the line number and the filename for errors and warnings. -
Syntax:
- For example:
Example 5: How to use #line directive?
using System;
namespace Directive
{
class Error
{
public static void Main(string[] args)
{
#line 200 "AnotherProgram.cs"
#warning Actual Warning generated by Program.cs on line 10
}
}
}
When we run the program, the output will be:
AnotherProgram.cs(200,22): warning CS1030: #warning: 'Actual Warning generated by Program.cs on line 10' [/home/myuser/csh
arp/directive-project/directive-project.csproj]
We have saved the above example as Program.cs. The warning was actually generated at line 10 by Program.cs. Using the #line directive, we have changed the line number to 200 and the filename to AnotherProgram.cs that generated the error.
#region and #endregion directive
-
The
#regiondirective allows us to create a region that can be expanded or collapsed when using a Visual Studio Code Editor. -
This directive is simply used to organize the code.
-
The #region block can not overlap with a
#ifblock. However, a#regionblock can be included within a#ifblock and a#ifblock can overlap with a#regionblock. -
#endregiondirective indicates the end of a#regionblock.
- Syntax:
Example 6: How to use #region directive?
using System;
namespace Directive
{
class Region
{
public static void Main(string[] args)
{
#region Hello
Console.WriteLine("Hello");
Console.WriteLine("Hello");
Console.WriteLine("Hello");
Console.WriteLine("Hello");
Console.WriteLine("Hello");
#endregion
}
}
}
When we run the program, the output will be:
#pragma directive
-
The
#pragmadirective is used to give the compiler some special instructions for the compilation of the file in which it appears. -
The instruction may include disabling or enabling some warnings.
-
C# supports two
#pragmainstructions: -
#pragma warning: Used for disabling or enabling warnings #pragma checksum: It generates checksums for source files which will be used for debugging.
- Syntax:
- For example:
Example 7: How to use #pragma directive?
using System;
namespace Directive
{
class Error
{
public static void Main(string[] args)
{
#pragma warning disable
#warning This is a warning 1
#pragma warning restore
#warning This is a warning 2
}
}
}
When we run the program, the output will be:
Program.cs(12,22): warning CS1030: #warning: 'This is a warning 2' [/home/myuser/csharp/directive-project/directive-project.csproj]
We can see that only the second warning is displayed on the output screen.
This is because, we initially disabled all warnings before the first warning and restored them only before the second warning. This is the reason why the first warning was hidden.
We can also disable specific warning instead of all warning.
To learn more about #pragma, visit #pragma (C# reference).
Namespaces in C# Programming
In this tutorial, we will learn about Namespaces, how to define it, access its members, and use it in a C# program.
Namespaces are used in C# to organize and provide a level of separation of codes.
They can be considered as a container which consists of other namespaces, classes, etc.
A namespace can have following types as its members:
- Namespaces (Nested Namespace)
- Classes
- Interfaces
- Structures
- Delegates
We will discuss about these topics in later tutorials. For now we will stick with classes and namespaces.
Namespaces are not mandatory in a C# program, but they do play an important role in writing cleaner codes and managing larger projects.
Let's understand the concept of namespace with a real life scenario. We have a large number of files and folders in our computer.
Imagine how difficult it would be to manage them if they are placed in a single directory. This is why we put related files and folders in a separate directory. This helps us to manage our data properly.
The concept of namespace is similar in C#. It helps us to organize different members by putting related members in the same namespace.
Namespace also solves the problem of naming conflict. Two or more classes when put into different namespaces can have same name.
Defining Namespace in C
We can define a namespace in C# using the namespace keyword as:
For example:
namespace MyNamespace
{
class MyClass
{
public void MyMethod()
{
System.Console.WriteLine("Creating my namespace");
}
}
}
In the above example, a namespace MyNamespace is created.
It consists of a class MyClass as its member.
MyMethod is a method of class MyClass.
Accessing Members of Namespace in C
The members of a namespace can be accessed using the dot(.) operator.
The syntax for accessing the member of namespace is,
For example, if we need to create an object of MyClass, it can be done as,
We will discuss about creating objects in later tutorials. For now just focus on how the class MyClass is accessed.
Example 1: Introducing Namespace in C# Program
using System;
namespace MyNamespace
{
public class SampleClass
{
public static void myMethod()
{
Console.WriteLine("Creating my namespace");
}
}
}
namespace MyProgram
{
public class MyClass
{
public static void Main()
{
MyNamespace.SampleClass.myMethod();
}
}
}
When we run the program, the output will be:
In the above program, we have created our own namespace MyNamespace
and accessed its members from Main() method inside MyClass.
As said earlier, the dot (.) operator is used to access the member of namespace.
In the Main() method, myMethod() method is called using the dot (.) operator.
Using a Namespace in C# [The using Keyword]
A namespace can be included in a program using the using keyword. The syntax is,
For example,
The advantage of this approach is we don't have to specify the fully qualified name of the members of that namespace every time we are accessing it. Once the line
is included at the top of the program. We can write
Instead of the fully qualified name i.e.
Nested Namespace in C
A namespace can contain another namespace.
It is called nested namespace.
The nested namespace and its members can also be accessed
using the dot (.) operator.
The syntax for creating nested namespace is as follows:
Example 2: Nested Namespace in C
using System;
// Nested Namespace
namespace MyNamespace
{
namespace Nested
{
public class SampleClass
{
public static void myMethod()
{
Console.WriteLine("Nested Namespace Example");
}
}
}
}
namespace MyProgram
{
public class MyClass
{
public static void Main()
{
MyNamespace.Nested.SampleClass.myMethod();
}
}
}
When we run the program, the output will be:
This example illustrates how nested namespace can be implemented in C#.
Here, we now have an extra namespace inside MyNamespace called Nested.
So, instead of using MyNamespace.SampleClass.myMethod(),
we have to use MyNamespace.Nested.SampleClass.myMethod().
C# struct
In this tutorial, you will learn about structs in C# with the help of examples.
The struct (structure) is like a class in C# that is used to store data. However, unlike classes, a struct is a value type.
Suppose we want to store the name and age of a person. We can create two variables: name and age and store value.
However, suppose we want to store the same information of multiple people.
In this case, creating variables for an individual person might be a tedious task. To overcome this we can create a struct that stores name and age. Now, this struct can be used for every person.
Define struct in C
In C#, we use the struct keyword to define a struct. For example,
Here, id is a field inside the struct. A struct can include methods, indexers, etc as well.
Declare struct variable
Before we use a struct, we first need to create a struct variable. We use a struct name with a variable to declare a struct variable. For example,
In the above example, we have created a struct named Employee. Here, we have declared a variable emp of the struct Employee.
Access C# struct
We use the struct variable along with the . operator to access members of a struct. For example,
struct Employee {
public int id;
}
...
// declare emp of struct Employee
Employee emp;
// access member of struct
emp.id = 1;
Here, we have used variable emp of a struct Employee with . operator to access members of the Employee.
This accesses the id field of struct Employee.
Note: Primitive data types like int, bool, float are pre-defined structs in C#.
Example: C# Struct
using System;
namespace CsharpStruct {
// defining struct
struct Employee {
public int id;
public void getId(int id) {
Console.WriteLine("Employee Id: " + id);
}
}
class Program {
static void Main(string[] args) {
// declare emp of struct Employee
Employee emp;
// accesses and sets struct field
emp.id = 1;
// accesses struct methods
emp.getId(emp.id);
Console.ReadLine();
}
}
}
Output
In the above program, we have created a struct named Employee. It contains a field id and a method getId().
Inside the Program class, we have declared a variable emp of struct Employee. We then used the emp variable to access fields and methods of the class.
Note: We can also instantiate a struct using the new keyword. For example,
Here, this line calls the parameterless constructor of the struct and initializes all the members with default values.
Constructors in C# struct
In C#, a struct can also include constructors. For example,
struct Employee {
public int id;
// constructor
public Employee(int employeeId) {
id = employeeId
}
}
Here, we have created a parameterized constructor Employee() with parameter employeeId.
Note: We cannot create parameterless constructors in C# version 9.0 or below.
Example: Constructor in C# structs
using System;
namespace CsharpStruct {
// defining struct
struct Employee {
public int id;
public string name;
// parameterized constructor
public Employee(int employeeId, string employeeName) { id = employeeId; name = employeeName; }
}
class Program {
static void Main(string[] args) {
// calls constructor of struct
Employee emp = new Employee(1, "Brian");
Console.WriteLine("Employee Name: " + emp.name);
Console.WriteLine("Employee Id: " + emp.id);
Console.ReadLine();
}
}
}
Output
In the above example, we have created a parameterized constructor inside the Employee struct. Inside the constructor, we have assigned the values of fields: id and name.
Notice the line,
Like in C# classes, we are using the new keyword to call the constructor.
Here, 1 and "Brian" are arguments passed to the constructor,
where they are assigned to the parameters employeeID and employeeName respectively."
Note: We must assign the value for every field of struct inside the parameterized constructor. For example,
Here, we have not assigned the value for the name field. So the code will generate an error.
Properties in C# struct
We can also use properties inside a C# struct. For example,
using System;
namespace CsharpStruct {
// defining struct
struct Employee {
public int id;
// creates property
public int Id { // returns id field
get { return id; } // sets id field
set { id = value; } }
}
class Program {
static void Main(string[] args) {
// calls the constructor of struct
Employee emp = new Employee();
emp.Id = 1;
Console.WriteLine("Employee Id: " + emp.Id);
Console.ReadLine();
}
}
}
Output
In the above example, we have Id property inside the Employee struct.
The get method returns the id field and the set method assigns the value to the id field.
Difference between class and struct in C
In C# classes and structs look similar. However, there are some differences between them.
A class is a reference type whereas a struct is a value type. For example,
using System;
namespace CsharpStruct {
// defining class
class Employee {
public string name;
}
class Program {
static void Main(string[] args) {
Employee emp1 = new Employee();
emp1.name = "John";
// assign emp1 to emp2
Employee emp2 = emp1;
emp2.name = "Ed";
Console.WriteLine("Employee1 name: " + emp1.name);
Console.ReadLine();
}
}
}
Output
In the above example, we have assigned the value of emp1 to emp2. The emp2 object refers to the same object as emp1. So, an update in emp2 updates the value of emp1 automatically.
This is why a class is a reference type.
Contrary to classes, when we assign one struct variable to another, the value of the struct gets copied to the assigned variable. So updating one struct variable doesn't affect the other. For example,
using System;
namespace CsharpStruct {
// defining struct
struct Employee {
public string name;
}
class Program {
static void Main(string[] args) {
Employee emp1 = new Employee();
emp1.name = "John";
// assign emp1 to emp2
Employee emp2 = emp1;
emp2.name = "Ed";
Console.WriteLine("Employee1 name: " + emp1.name);
Console.ReadLine();
}
}
}
Output
When we assign the value of emp1 to emp2, a new value emp2 is created. Here, the value of emp1 is copied to emp2. So, change in emp2 does not affect emp1.
This is why struct is a value type.
Moreover, inheritance is not possible in the structs whereas it is an important feature of the C# classes.
References
Extras
-
Creating a Simple Dynamic-Link Library - Win32 apps | Microsoft Docs
-
How to create a DLL library in C and then use it with C# - CodeProject
Extras
https://www.codementor.io/@a_hathon/building-and-using-dlls-in-c-d7rrd4caz