Week-3 (Git Version Management)
CE103 Algorithms and Programming I
Week-3
Fall Semester, 2021-2022
Introduction to Source Code Management Systems
Git, Github, Gitlab, Bitbucket, Maven, SVN, TFS
Source code management (SCM) is used to track modifications to a source code repository. SCM tracks a running history of changes to a code base and helps resolve conflicts when merging updates from multiple contributors. SCM is also synonymous with Version control. As software projects grow in lines of code and contributor head count, the costs of communication overhead and management complexity also grow. SCM is a critical tool to alleviate the organizational strain of growing development costs.
Features of Source Code Management Systems
-
Authenticated access for commits
-
Revision history on files
-
Atomic commits of multiple files
-
Versioning/Tagging
Why Do We Need Source Code Management Systems? (1)
We can save the file with a different name if it’s our school project or one-time papers but for a well-equipped software development? Not a chance.
Why Do We Need Source Code Management Systems? (2)
Big projects need a version control system to track the changes and avoid misunderstanding. A good SCM does the following:
- Backup and Restore
- Synchronization
- Short-Term Undo
- Long-Term Undo
- Track Changes
- Ownership
- Branching and Merging
Why Do We Need Source Code Management Systems? (3)
Backup and Restore – Files can be saved at any moment and can be restored from the last saved.
Why Do We Need Source Code Management Systems? (4)
Synchronization – Programmers can get the latest code and fetch the up-to-date codes from the repository.
Why Do We Need Source Code Management Systems? (5)
Short-Term Undo – Working with a file and messed it up. We can do a short-term undo to the last known version.
Why Do We Need Source Code Management Systems? (6)
Long-Term Undo – It helps when we have to make a release version rollback. Something like going to the last version which was created a year
Why Do We Need Source Code Management Systems? (7)
Track Changes– We can track the changes as when anyone is making any change, he can leave a commit message as for why the change was done.
Why Do We Need Source Code Management Systems? (8)
Ownership– With every commit made to the master branch, it will ask the owner permission to merge it.
Why Do We Need Source Code Management Systems? (9)
Branching and Merging – You can create a branch of your source code and create the changes. Once the changes are approved, you can merge it with the master branch.
Why Do We Need Source Code Management Systems? (10)
Types of Version Control Systems
- Centralized Version Control (TFS, Subversion)
- Distributed Version Control (Git and Mercurial)
Centralized Version Control (TFS, Subversion) (1)
The main concept of Centralized Version Control is that it works in a client and server relationship. The repository is located in one place and allows access to multiple clients.
Centralized Version Control (TFS, Subversion) (2)

Centralized Version Control (TFS, Subversion) (3)

Centralized Version Control (TFS, Subversion) (4)
It’s very similar to FTP where you have FTP clients which connect to FTP server. Here all the user changes and commits have to pass through the central server. For Ex: Subversion.
Centralized Version Control (TFS, Subversion) (5)
The benefits of centralized version control are:
-
It’s easy to understand.
-
There are more GUI and IDE clients.
-
You have more control over the users and access.
Centralized Version Control (TFS, Subversion) (6)
We do have drawbacks also:
-
It is dependent on the access to the server.
-
It can be slower because every command from the client has to pass the server.
-
Branching and merging strategies are difficult to use.
Distributed Version Control (Git and Mercurial) (1)
These systems are newer to use. In Distributed Version Control, each user has their own copy of the entire repository as well as the files and history. For Ex: Git and Mercurial
Distributed Version Control (Git and Mercurial) (2)

Distributed Version Control (Git and Mercurial) (3)

Distributed Version Control (Git and Mercurial) (4)
The benefits of distributed version control are:
-
More powerful and easy change tracking.
-
No need of a centralized server. Most of the functionalities work in offline mode also apart from sharing the repositories.
-
Branching and Merging strategies are more easy and reliable.
-
It’s faster than the other one.
List of Source Code Version Management Tools (1)

List of Source Code Version Management Tools (2)
-
Github
-
GitLab
-
BitBucket
-
SourceForge
-
Beanstalk
List of Source Code Version Management Tools (3)
-
Apache Allura
-
AWS CodeCommit
-
Launchpad
-
Phabricator
-
GitBucket
GIT (Distributed Source Code Management) (1)

GIT (Distributed Source Code Management) (2)

GIT (Distributed Source Code Management) (3)

GIT (Distributed Source Code Management) (4)

GIT (Distributed Source Code Management) (5)
A Basic Overview of How Git Works (1)
-
Create a “repository” (project) with a git hosting tool (like Bitbucket)
-
Copy (or clone) the repository to your local machine
-
Add a file to your local repo and “commit” (save) the changes
-
“Push” your changes to your master branch
GIT (Distributed Source Code Management) (6)
A Basic Overview of How Git Works (2)
-
Make a change to your file with a git hosting tool and commit
-
“Pull” the changes to your local machine
-
Create a “branch” (version), make a change, commit the change
-
Open a “pull request”.
-
“Merge” your branch to the master branch
GIT (Distributed Source Code Management) (7)
Some of The Basic Operations in GIT are
-
Initialize
-
Add
-
Commit
-
Pull
-
Push
GIT (Distributed Source Code Management) (8)
Some of The Basic Operations in GIT are

GIT (Distributed Source Code Management) (9)
Some of The Basic Operations in GIT are
-
Branching
-
Merging
-
Rebasing
GIT (Distributed Source Code Management) (10)
Some of The Basic Operations in GIT are

GIT (Distributed Source Code Management) (8)
A brief idea about how these operations work with the Git repositories (1)

GIT (Distributed Source Code Management) (9)
A brief idea about how these operations work with the Git repositories (2)

GIT (Distributed Source Code Management) (10)
A brief idea about how these operations work with the Git repositories (3)
For more detailed cheetsheat please check the following interactive map
NDP Software :: Git Cheatsheet

Installation of GIT (1)
Check Installation Already Completed

Installation of GIT (2)
If your console gives error about git command follow the steps in the link
Install Git | Atlassian Git Tutorial
In this link you will should download following setup according to your operating system
Installation of GIT (3)
GIT Setup Files
Installation of GIT (4)
Download and install GIT from the following links (both have same github release path)
Installation of GIT (5)
After running setup follow the steps below

Installation of GIT (6)

Installation of GIT (7)

Installation of GIT (8)

Installation of GIT (9)

Installation of GIT (10)

Installation of GIT Extension (Windows) (1)
You can install Git GUI from https://git-scm.com/downloads/guis I prefer to use git extension https://gitextensions.github.io/ and https://tortoisegit.org/
Also Download KDiff3 KDiff3 - Browse Files at SourceForge.net
These extensions provide GUI for git operations to make process easier.
Configuration of GIT Extension (Windows) (1)

Configuration of GIT Extension (Windows) (2)
If you install git everything should be green and this configuration is stored on .gitconfig on your home C:/Windows/Users/<user>/.gitconfig
Configuration of GIT Extension (Windows) (3)
[core]
    editor = \"C:/Program Files (x86)/GitExtensions/GitExtensions.exe\" fileeditor
    autocrlf = true
    quotePath = false
    commitGraph = true
    longpaths = true
[user]
    email = xxxxxxx@gmail.com
    name = xxxx xxxxxx
[filter "lfs"]
    clean = git-lfs clean -- %f
    smudge = git-lfs smudge -- %f
    process = git-lfs filter-process
    required = true
[pull]
    rebase = false
[fetch]
    prune = false
[rebase]
    autoStash = false
[credential]
    helper = manager
[diff]
    guitool = kdiff3
[difftool "kdiff3"]
    path = C:/Program Files/KDiff3/kdiff3.exe
    cmd = \"C:/Program Files/KDiff3/kdiff3.exe\" \"$LOCAL\" \"$REMOTE\"
[merge]
    guitool = tortoisemerge
[mergetool "tortoisemerge"]
    path = C:/Program Files/TortoiseGit/bin/TortoiseGitMerge.exe
    cmd = \"C:/Program Files/TortoiseGit/bin/TortoiseGitMerge.exe\" -base:\"$BASE\" -mine:\"$LOCAL\" -theirs:\"$REMOTE\" -merged:\"$MERGED\"
[receive]
    advertisePushOptions = true
[gc]
    writeCommitGraph = true
Configuration of GIT Extension (Windows) (4)
Also in extension you can see similar settings

Configuration of GIT Extension (Windows) (5)
Samples
MergeTool
Path to mergetool
Mergetool command
"C:/Program Files/TortoiseGit/bin/TortoiseGitMerge.exe" -base:"$BASE" -mine:"$LOCAL" -theirs:"$REMOTE" -merged:"$MERGED"
Configuration of GIT Extension (Windows) (6)
Difftool
Path to difftool
Difftool command
Configuration of GIT Extension (Windows) (7)
If you see something as merge and diff tool is not configured, follow the similar settings above on your computer. If you installed kdiff3, tortoisegit and extension you will have same diff and merge tools
This topic also help you
Git: How can I configure KDiff3 as a merge tool and diff tool? - Stack Overflow
Configuration of GIT Extension (Windows) (8)

Configuration of GIT Extension (Windows) (9)
Open Git->Config, in your settings you will see path to mergetool and difftool will be empty fill settings like that below find executables in your computer and copy paths to here.
Configuration of GIT Extension (Windows) (10)
Configuration of GIT Extension (Windows) (11)
Also if we want to change and use different diff and merge tool then we can do this with gitbash console as below
Find TortoiseGitIDiff.exe and TortoiseGitMerge.exe

Configuration of GIT Extension (Windows) (12)
Copy path of this applications
C:\Program Files\TortoiseGit\bin\TortoiseGitMerge.exe
C:\Program Files\TortoiseGit\bin\TortoiseGitIDiff.exe
Configuration of GIT Extension (Windows) (13)
open a gitbash console and run following commands
git config --global merge.tool TortoiseGitMerge
git config --global mergetool.TortoiseGitMerge.path "C:/Program Files/TortoiseGit/bin/TortoiseGitMerge.exe"
git config --global mergetool.TortoiseGitMerge.trustExitCode false

git config --global diff.guitool TortoiseGitIDiff
git config --global difftool.TortoiseGitIDiff.path "C:/Program Files/TortoiseGit/bin/TortoiseGitIDiff.exe"
git config --global difftool.TortoiseGitIDiff.trustExitCode false
This updates will be stored on .gitconfig
Using the GIT Extension (1)
right click in the git folder and use Git Extension menu for operations.
for sample commit click "Commit"

Using the GIT Extension (1)
from opening window first stage related files and then write a good commit message
finally click commit to local. You can also commit&push it to remote repository.

GIT Installation Completed..


Installation of gig (git ignore creator) (1)
Requirements
-
Python >= 3.6
-
Internet connection
Installation of gig (git ignore creator) (2)

Installation of gig (git ignore creator) (3)
Usage of gig (1)
List all gitignore templates
Usage of gig (2)
Sample gitignore for C Java and Visual Studio
Usage of gig (3)
There is a portal for this also by Toptal
•gitignore.io - Create Useful .gitignore Files For Your Project

Usage of gig (4)
for samples you can check the following links.
https://github.com/github/gitignore
https://dev.to/shihanng/gig-a-gitignore-generator-opc
Configuration of GIT (1)
It is important to configure your Git because any commits that you make are associated with your configuration details.
configuring Git with your username and email. In order to do that, type the following commands in your Git Bash:
Configuration of GIT (2)

Configuration of GIT (3)
git configuration files are located on the user folder

Configuration of GIT (4)
If you want to view all your configuration details, use the command below

Using .gitignore files with git-extension (1)
with gitignore file

Using .gitignore files with git-extension (2)
without gitignore file (just move to another location)

Github Create Repo

Initilization of Repo (not existing in github)
git init
-
In order to do that, we use the command git init.
-
git init creates an empty Git repository or re-initializes an existing one. It basically creates a .git directory with sub directories and template files. Running a git init in an existing repository will not overwrite things that are already there. It rather picks up the newly added templates.
git init

Adding Initiated Repo Remote Upstream Repo (Link with Github Repo) (1)
If you enter following command in the git folder you will see nothing
That mean this repository do not have a remote upstream repository such as a github or bitbucket repo.
Adding Initiated Repo Remote Upstream Repo (Link with Github Repo) (2)
Open the github and bitbucket repository and copy project path from

Adding Initiated Repo Remote Upstream Repo (Link with Github Repo) (3)
you will see the following sample from github code button
Adding Initiated Repo Remote Upstream Repo (Link with Github Repo) (4)
copy link and use with following command
Adding Initiated Repo Remote Upstream Repo (Link with Github Repo) (5)
then you can check your remote setting with
$ git remote -v
origin  https://github.com/ucoruh/ce103-sample-text.git (fetch)
origin  https://github.com/ucoruh/ce103-sample-text.git (push)
Adding Initiated Repo Remote Upstream Repo (Link with Github Repo) (6)
you can check the following sample
How to Add a New Remote to your Git Repo | Assembla Help Center
Now you can push your local changes to remote repository
If you see a repository on Github then you can download with following operation
Checkout a Repository (1)
create a working copy of a local repository by running the command
Checkout a Repository (2)
Sample clone command
Checkout a Repository (3)
when using a remote server, your command will be
Checking Repository Status (1)
git status
The git status command lists all the modified files which are ready to be added to the local repository.
Checking Repository Status (2)
git status

Adding Files to Index (1)
git add
This command updates the index using the current content found in the working tree and then prepares the content in the staging area for the next commit.
Adding Files to Index (1)
git add
Created two more files edureka3.txt and edureka4.txt. Let us add the files using the command git add -A. This command will add all the files to the index which are in the directory but not updated in the index yet.

Commit Changes (1)
git commit
•It refers to recording snapshots of the repository at a given time. Committed snapshots will never change unless done explicitly.
Commit Changes (2)
git commit
Let me explain how commit works with the diagram below

Here, C1 is the initial commit, i.e. the snapshot of the first change from which another snapshot is created with changes named C2. Note that the master points to the latest commit. Now, when I commit again, another snapshot C3 is created and now the master points to C3 instead of C2.
Commit Changes (3)
git commit
Commands:

Now, if you want to commit a snapshot of all the changes in the working directory at once, you can use the command below
Commit Changes (4)
git commit
Please check writing good commit messages article below
How to write a good commit message - DEV Community
Writing Good Commit Messages (1)
Writing Good Commit Messages (2)
1. Type
- feat - a new feature
- fix - a bug fix
- docs - changes in documentation
- style - everything related to styling
- refactor - code changes that neither fixes a bug or adds a feature
- test - everything related to testing
- chore - updating build tasks, package manager configs, etc
Writing Good Commit Messages (3)
2. Subject
This contains a short description of the changes made. It shouldn't be greater than 50 characters, should begin with a capital letter and written in the imperative eg. Add instead of Added or Adds.
Writing Good Commit Messages (4)
3. Body
The body is used to explain what changes you made and why you made them. Not all commits are complex enough that they need a body, especially if you are working on a personal project alone, and as such writing a body is optional.
A blank line between the body and the subject is required and each line should have no more than 72 characters.
Writing Good Commit Messages (5)
4.Footer
The footer is also optional and mainly used when you are using an issue tracker to reference the issue ID.
Writing Good Commit Messages (6)
Example Commit Message
feat: Summarize changes in around 50 characters or less

More detailed explanatory text, if necessary. Wrap it to about 72
characters or so. In some contexts, the first line is treated as the
subject of the commit and the rest of the text as the body. The
blank line separating the summary from the body is critical (unless
you omit the body entirely); various tools like `log`, `shortlog`
and `rebase` can get confused if you run the two together.

Explain the problem that this commit is solving. Focus on why you
are making this change as opposed to how (the code explains that).
Are there side effects or other unintuitive consequences of this
change? Here's the place to explain them.

Further paragraphs come after blank lines.

 - Bullet points are okay, too

 - Typically a hyphen or asterisk is used for the bullet, preceded
   by a single space, with blank lines in between, but conventions
   vary here

If you use an issue tracker, put references to them at the bottom,
like this:

Resolves: #123
See also: #456, #789
Writing Good Commit Messages (7)

Add Files to Index (1)
I have created two more text files in my working directory viz. edureka5.txt and edureka6.txt but they are not added to the index yet.
I am adding edureka5.txt using the command
Add Files to Index (2)

Add Files to Index (3)
I have added edureka5.txt to the index explicitly but not edureka6.txt and made changes in the previous files. I want to commit all changes in the directory at once.
Add Files to Index (4)
This command will commit a snapshot of all changes in the working directory but only includes modifications to tracked files i.e. the files that have been added with git add at some point in their history. Hence, edureka6.txt was not committed because it was not added to the index yet. But changes in all previous files present in the repository were committed, i.e. edureka1.txt, edureka2.txt, edureka3.txt, edureka4.txt and edureka5.txt. Now I have made my desired commits in my local repository
Add Files to Index (5)
your local repository consists of three "trees" maintained by git. the first one is your Working Directory which holds the actual files. the second one is the Index which acts as a staging area and finally the HEAD which points to the last commit you've made
Add Files to Index (6)

Update local repo before sending (1)
Fetching
If we have a remote Git branch, for example a branch on Github, it can happen that the remote branch has commits that the current branch doesn't have! Maybe another branch got merged, your colleague pushed a quick fix, and so on.
Update local repo before sending (2)
Fetching
We can get these changes locally, by performing a git fetch on the remote branch! It doesn't affect your local branch in any way: a fetch simply downloads new data.
Update local repo before sending (3)
Fetching
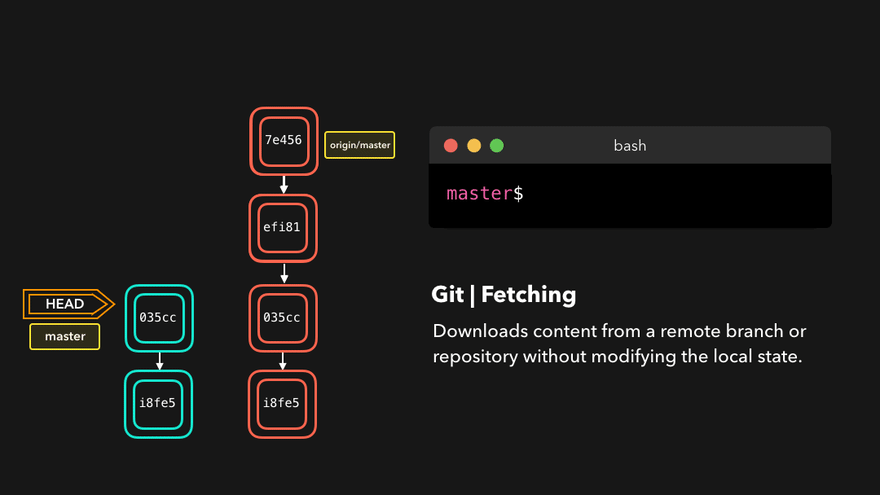
Update local repo before sending (4)
Fetching
We can now see all the changes that have been made since we last pushed! We can decide what we want to do with the new data now that we have it locally.
Update local repo before sending (5)
Pulling
Although a git fetch is very useful in order to get the remote information of a branch, we can also perform a git pull. A git pull is actually two commands in one: a git fetch, and a git merge. When we're pulling changes from the origin, we're first fetching all the data like we did with a git fetch, after which the latest changes are automatically merged into the local branch
Update local repo before sending (6)
Pulling

Update local repo before sending (7)
Pulling
Awesome, we're now perfectly in sync with the remote branch and have all the latest changes!
Update local repo before sending (8)
Pulling
git pull
Note that before you affect changes to the central repository you should always pull changes from the central repository to your local repository to get updated with the work of all the collaborators that have been contributing in the central repository. For that we will use the pull command.
Update local repo before sending (9)
Pulling
git pull
But first, you need to set your central repository as origin using the command
Update local repo before sending (10)
Pulling / git pull

Now that my origin is set
Update local repo before sending (11)
Pulling / git pull
let us extract files from the origin using pull. For that use the command
Update local repo before sending (12)
Pulling / git pull

This command will copy all the files from the master branch of remote repository to your local repository.
Update local repo before sending (13)
Pulling / git pull
Since my local repository was already updated with files from master branch, hence the message is Already up-to-date. Refer to the screen shot above
Update local repo before sending (14)
Pulling / git pull
One can also try pulling files from a different branch using the following command:
Update local repo before sending (15)
Pulling / git pull
Your local Git repository is now updated with all the recent changes. It is time you make changes in the central repository by using the push command.
Send Changes to Remote Repo (1)
git push
- This command transfers commits from your local repository to your remote repository. It is the opposite of pull operation.
Send Changes to Remote Repo (2)
git push
- Pulling imports commits to local repositories whereas pushing exports commits to the remote repositories
Send Changes to Remote Repo (3)
git push
- The use of git push is to publish your local changes to a central repository. After you’ve accumulated several local commits and are ready to share them with the rest of the team,
Send Changes to Remote Repo (4)
git push
you can then push them to the central repository by using the following command
Send Changes to Remote Repo (5)
git push
This remote refers to the remote repository which had been set before using the pull command.
Send Changes to Remote Repo (6)
git push
- This pushes the changes from the local repository to the remote repository along with all the necessary commits and internal objects. This creates a local branch in the destination repository
Send Changes to Remote Repo (7)
git push
The below files are the files which we have already committed previously in the commit section and they are all “push-ready“.
Send Changes to Remote Repo (8)
git push
I will use the command git push origin master to reflect these files in the master branch of my central repository.
Send Changes to Remote Repo (9)
git push

Send Changes to Remote Repo (10)
git push

Send Changes to Remote Repo (11)
git push

Send Changes to Remote Repo (12)
git push
To prevent overwriting, Git does not allow push when it results in a non-fast forward merge in the destination repository.
Send Changes to Remote Repo (13)
git push
A non-fast forward merge means an upstream merge i.e. merging with ancestor or parent branches from a child branch To enable such merge, use the command below
The above command forces the push operation even if it results in a non-fast forward merge
Branching (1)
git branch
Branches in Git are nothing but pointers to a specific commit. Git generally prefers to keep its branches as lightweight as possible.
Branching (2)
git branch
There are basically two types of branches viz.
-
local branches
-
remote tracking branches.
Branching (3)
git branch
A local branch is just another path of your working tree. On the other hand, remote tracking branches have special purposes. Some of them are:
They link your work from the local repository to the work on central repository.
Branching (4)
git branch
They automatically detect which remote branches to get changes from, when you use git pull.

Branching (5)
Learn current branch
You can check what your current branch is by using the command
The one mantra that you should always be chanting while branching is “branch early, and branch often”
Branching (6)
List Local Branches
Branching (7)
List Remote Branches
Branching (8)
List All Local and Remote Branches
Branching (9)
(after pull-request action in github)
If you merged your branch to base branch in github and delete it on github your local branch list will not be updated by it self. You have to use the following command to update local and remote branch lists. Use the following command to syncronize your repository with remote upstream repo.
Branching (10)
Create Branch
To create a new branch we use the following command
The diagram below shows the workflow when a new branch is created. When we create a new branch it originates from the master branch itself.
Branching (11)
Create Branch

Branching (12)
Create Branch
Since there is no storage/memory overhead with making many branches, it is easier to logically divide up your work rather than have big chunky branches
You can create and change branch with following command, create a new branch named "feature_x" and switch to it using
Branching (13)
Change Branch
Branching (14)
Change Branch

Branching includes the work of a particular commit along with all parent commits. As you can see in the diagram above, the newBranch has detached itself from the master and hence will create a different path
Branching (15)
Delete Local Branch
and delete the branch again, before doing this switch to main or master branches.
Branching (16)
Delete Remote Branch
and delete the branch again, before doing this switch to main or master branches.
How to delete remote branches in Git
Branching (17)
Push Specific Branch to Remote
A branch is not available to others unless you push the branch to your remote repository
Branching (18)
Update & Merge (Conflicts)
to update your local repository to the newest commit, execute
in your working directory to fetch and merge remote changes.
to merge another branch into your active branch (e.g. master), use
Branching (19)
Update & Merge (Conflicts)
in both cases git tries to auto-merge changes. Unfortunately, this is not always possible and results in conflicts. You are responsible to merge those conflicts manually by editing the files shown by git. After changing, you need to mark them as merged with
before merging changes, you can also preview them by using
Git merge conflicts | Atlassian Git Tutorial
Branching (20)
Update & Merge (Conflicts)
There are two types of merges Git can perform: a fast-forward, or a no-fast-forward
Branching (21)
Update & Merge (Conflicts)
Fast-forward (--ff)
A fast-forward merge can happen when the current branch has no extra commits compared to the branch we’re merging. Git is... lazy and will first try to perform the easiest option: the fast-forward! This type of merge doesn’t create a new commit, but rather merges the commit(s) on the branch we’re merging right in the current branch
Branching (22)
Update & Merge (Conflicts)
Fast-forward (--ff)
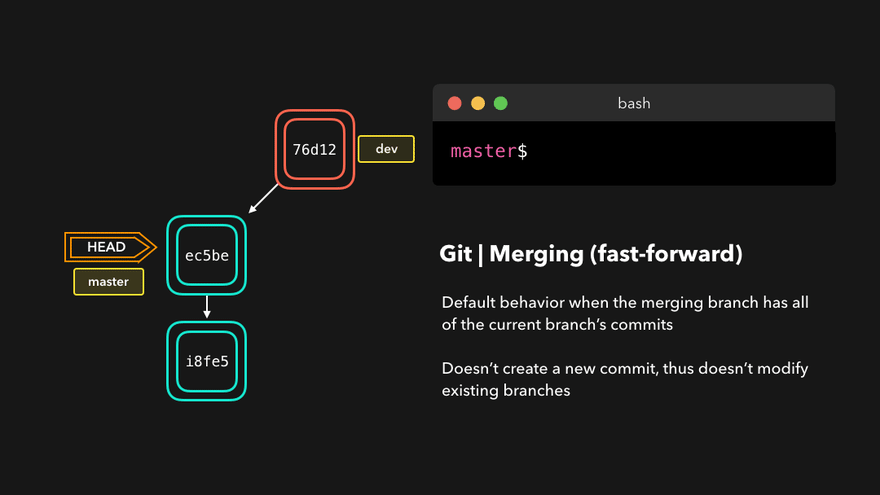
Branching (23)
Update & Merge (Conflicts)
Perfect! We now have all the changes that were made on the dev branch available on the master branch. So, what's the no-fast-forward all about?
Branching (24)
Update & Merge (Conflicts)
No-fast-foward (--no-ff)
It's great if your current branch doesn't have any extra commits compared to the branch that you want to merge, but unfortunately that's rarely the case! If we committed changes on the current branch that the branch we want to merge doesn't have, git will perform a no-fast-forward merge.
Branching (25)
Update & Merge (Conflicts)
No-fast-foward (--no-ff)
With a no-fast-forward merge, Git creates a new merging commit on the active branch. The commit's parent commits point to both the active branch and the branch that we want to merge!
Branching (26)
Update & Merge (Conflicts)
No-fast-foward (--no-ff)

Branching (27)
Update & Merge (Conflicts)
No-fast-foward (--no-ff)
No big deal, a perfect merge! The master branch now contains all the changes that we've made on the dev branch.
Branching (28)
Merge Conflicts
Although Git is good at deciding how to merge branches and add changes to files, it cannot always make this decision all by itself This can happen when the two branches we're trying to merge have changes on the same line in the same file, or if one branch deleted a file that another branch modified, and so on.
Branching (29)
Merge Conflicts
In that case, Git will ask you to help decide which of the two options we want to keep! Let's say that on both branches, we edited the first line in the README.md.
Branching (30)
Merge Conflicts

If we want to merge dev into master, this will end up in a merge conflict: would you like the title to be Hello! or Hey!?
Branching (31)
Merge Conflicts
When trying to merge the branches, Git will show you where the conflict happens. We can manually remove the changes we don't want to keep, save the changes, add the changed file again, and commit the changes

Branching (32)
Merge Conflicts
Although merge conflicts are often quite annoying, it makes total sense: Git shouldn't just assume which change we want to keep
Branching (33)
Sample Conflict -1
participants.txt
(I added a hyphen before each name)
Branching (34)
Sample Conflict -1
Create a new branch called marketing using the following syntax
Branching (35)
Sample Conflict -1
Now open the participants.txt file and start entering the names for the marketing department below the finance team list, as follows: (I added a hyphen before each name)
Branching (36)
Sample Conflict -1
Open the file and delete the names Alexander and Stacy, save, close, add the changes, and commit with the commit message Final list from Finance team
Branching (37)
Sample Conflict -1
Open the file and add the fifth name, Amanda, for the marketing team, save, add, and commit
names entered for marketing have been confirmed; now we need to merge these two lists, which can be done by the following command
Branching (38)
Sample Conflict -1
Auto-merging participants.txt
CONFLICT (content): Merge conflict in participants.txt
Automatic merge failed; fix conflicts and then commit the result.
Branching (39)
Sample Conflict -1
Finance team
-Charles
-Lisa
-John
<<<<<<< HEAD
-Stacy
-Alexander

Marketing team
- Collins
- Linda
- Patricia
- Morgan
- Amanda
=======
>>>>>>> master
Branching (40)
Sample Conflict -1
<<<<<<<
Changes made on the branch that is being merged into. In most cases,
this is the branch that I have currently checked out (i.e. HEAD).
|||||||
The common ancestor version.
=======
Changes made on the branch that is being merged in. This is often a
feature/topic branch.
>>>>>>>
Branching (41)
Sample Conflict -1
- remove them
- keep the lines you want to see in the final version of the file
- add and commit
Branching (42)
Sample Conflict -1
If we want to save all to our version
git checkout --ours .  # checkout our local version of all files
git add -u             # mark all conflicted files as merged
git commit             # commit the merge
Branching (43)
Sample Conflict -1
If we want to discard all our revision
git checkout --theirs .  # checkout remote version of all files
git add -u             # mark all conflicted files as merged
git commit             # commit the merge
Branching (44)
Sample Conflict -2
You're going to pull some changes, but oops, you're not up to date:
git fetch origin
git pull origin master

From ssh://gitosis@example.com:22/projectname
 * branch            master     -> FETCH_HEAD
Updating a030c3a..ee25213
error: Entry 'filename.c' not uptodate. Cannot merge.
Branching (45)
Sample Conflict -2
So you get up-to-date and try again, but have a conflict:
git add filename.c
git commit -m "made some wild and crazy changes"
git pull origin master

From ssh://gitosis@example.com:22/projectname
 * branch            master     -> FETCH_HEAD
Auto-merging filename.c
CONFLICT (content): Merge conflict in filename.c
Automatic merge failed; fix conflicts and then commit the result.
Branching (46)
Sample Conflict -2
So you decide to take a look at the changes:
Oh my, oh my, upstream changed some things, but just to use my changes...no...their changes...
git checkout --ours filename.c
git checkout --theirs filename.c
git add filename.c
git commit -m "using theirs"
Branching (47)
Sample Conflict -2
And then we try a final time
git pull origin master

From ssh://gitosis@example.com:22/projectname
 * branch            master     -> FETCH_HEAD
Already up-to-date.
Tagging
it's recommended to create tags for software releases. this is a known concept, which also exists in SVN. You can create a new tag named 1.0.0 by executing
the 1b2e1d63ff stands for the first 10 characters of the commit id you want to reference with your tag. You can get the commit id by looking at the...
Log (1)
in its simplest form, you can study repository history using.. git log
You can add a lot of parameters to make the log look like what you want. To see only the commits of a certain author:
Log (2)
To see a very compressed log where each commit is one line:
Log (3)
Or maybe you want to see an ASCII art tree of all the branches, decorated with the names of tags and branches:
Log (4)
See only which files have changed:
Log (5)
These are just a few of the possible parameters you can use. For more, see
Replace Local Changes (1)
In case you did something wrong, which for sure never happens ;), you can replace local changes using the command
this replaces the changes in your working tree with the last content in HEAD. Changes already added to the index, as well as new files, will be kept.
Replace Local Changes (2)
if you use dot (.) then all local changes will be rollbacked.
Replace Local Changes (3)
If you instead want to drop all your local changes and commits, fetch the latest history from the server and point your local master branch at it like this
Reflog (1)
Everyone makes mistakes, and that's totally okay! Sometimes it may feel like you've corrupt your git repo so badly that you just want to delete it entirely.
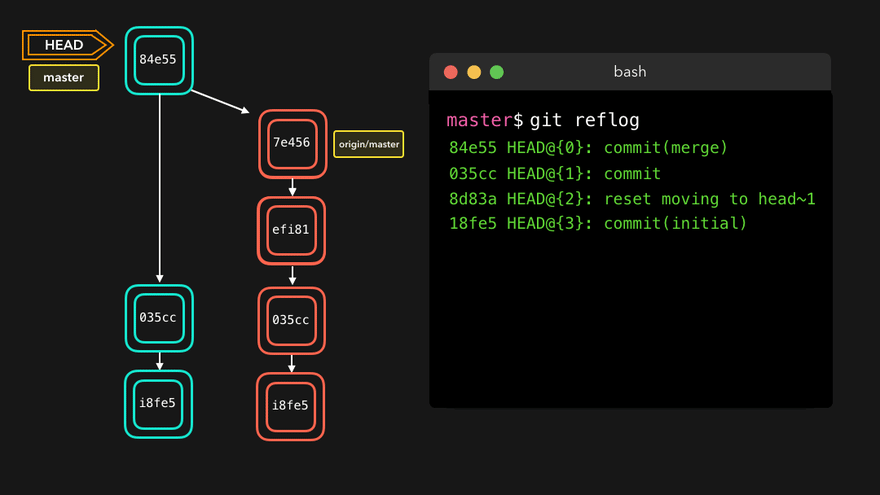
Reflog (2)
git reflog is a very useful command in order to show a log of all the actions that have been taken! This includes merges, resets, reverts: basically any alteration to your branch.
Reflog (3)

Reflog (4)
If you made a mistake, you can easily redo this by resetting HEAD based on the information that reflog gives us!
Say that we actually didn't want to merge the origin branch. When we execute the git reflog command, we see that the state of the repo before the merge is at HEAD@{1}. Let's perform a git reset to point HEAD back to where it was on HEAD@{1}!
Reflog (5)
We can see that the latest action has been pushed to the reflog
Resetting (1)
It can happen that we committed changes that we didn't want later on. Maybe it's a WIP commit, or maybe a commit that introduced bugs! In that case, we can perform a git reset.
Resetting (2)
A git reset gets rid of all the current staged files and gives us control over where HEAD should point to.
Soft Reset (1)
A soft reset moves HEAD to the specified commit (or the index of the commit compared to HEAD), without getting rid of the changes that were introduced on the commits afterward!
Soft Reset (2)
Let's say that we don't want to keep the commit 9e78i which added a style.css file, and we also don't want to keep the commit 035cc which added an index.js file. However, we do want to keep the newly added style.css and index.js file! A perfect use case for a soft reset.
Soft Reset (3)

Soft Reset (2)
When typing git status, you'll see that we still have access to all the changes that were made on the previous commits. This is great, as this means that we can fix the contents of these files and commit them again later on!
Hard reset (1)
Sometimes, we don't want to keep the changes that were introduced by certain commits. Unlike a soft reset, we shouldn't need to have access to them any more. Git should simply reset its state back to where it was on the specified commit: this even includes the changes in your working directory and staged files!
Hard reset (2)
Git has discarded the changes that were introduced on 9e78i and 035cc, and reset its state to where it was on commit ec5be.

Reverting (1)
Another way of undoing changes is by performing a git revert. By reverting a certain commit, we create a new commit that contains the reverted changes!
Reverting (2)
Let's say that ec5be added an index.js file. Later on, we actually realize we didn't want this change introduced by this commit anymore! Let's revert the ec5be commit.
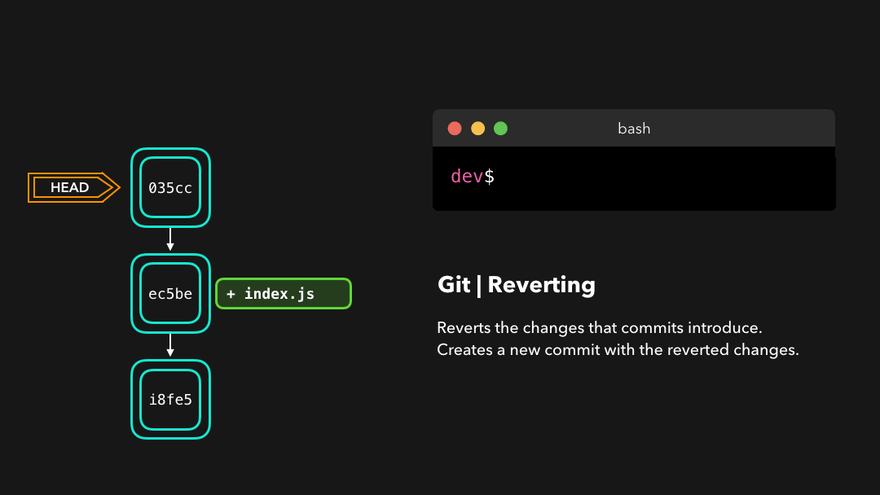
Perfect! Commit 9e78i reverted the changes that were introduced by the ec5be commit.
Reverting (3)
Performing a git revert is very useful in order to undo a certain commit, without modifying the history of the branch.
Cherry-picking (1)
When a certain branch contains a commit that introduced changes we need on our active branch, we can cherry-pick that command! By cherry-picking a commit, we create a new commit on our active branch that contains the changes that were introduced by the cherry-picked commit.
Cherry-picking (1)
Say that commit 76d12 on the dev branch added a change to the index.js file that we want in our master branch. We don't want the entire we just care about this one single commit!

Cool, the master branch now contains the changes that 76d12 introduced
Rebasing (1)
We just saw how we could apply changes from one branch to another by performing a git merge. Another way of adding changes from one branch to another is by performing a git rebase.
Rebasing (2)
A git rebase copies the commits from the current branch, and puts these copied commits on top of the specified branch.

Perfect, we now have all the changes that were made on the master branch available on the dev branch!
Rebasing (3)
A big difference compared to merging, is that Git won't try to find out which files to keep and not keep. The branch that we're rebasing always has the latest changes that we want to keep! You won't run into any merging conflicts this way, and keeps a nice linear Git history.
Rebasing (4)
This example shows rebasing on the master branch. In bigger projects, however, you usually don't want to do that. A git rebase changes the history of the project as new hashes are created for the copied commits!
Rebasing (5)
Rebasing is great whenever you're working on a feature branch, and the master branch has been updated. You can get all the updates on your branch, which would prevent future merging conflicts!
Interactive Rebase (1)
Before rebasing the commits, we can modify them! We can do so with an interactive rebase. An interactive rebase can also be useful on the branch you're currently working on, and want to modify some commits.
Interactive Rebase (2)
There are 6 actions we can perform on the commits we're rebasing:
reword: Change the commit messageedit: Amend this commitsquash: Meld commit into the previous commitfixup: Meld commit into the previous commit, without keeping the commit's log messageexec: Run a command on each commit we want to rebasedrop: Remove the commit
Interactive Rebase (3)
Awesome! This way, we can have full control over our commits. If we want to remove a commit, we can just drop it.

Interactive Rebase (4)
Or if we want to squash multiple commits together to get a cleaner history, no problem!

Interactive rebasing gives you a lot of control over the commits you're trying to rebase, even on the current active branch
Useful Hints (1)
built-in git GUI
Useful Hints (2)
use colorful git output
Useful Hints (3)
show log on just one line per commit
Useful Hints (4)
use interactive adding
HEAD~2          // previous two commits fro head
HEAD~~         // previous two commits from head
HEAD@{2}     // reflog order
18fe5              // previous commit hash
GIT Flow

A successful Git branching model » nvie.com
Hotfix

OneFlow – a Git branching model and workflow | End of Line Blog
a simple git branching model · GitHub
GIT Decision Tree
http://justinhileman.info/article/git-pretty/git-pretty.png

GIT in action (1)

GIT in action (2)

GIT in action (3)

GIT in action (4)

GIT in action (5)

GIT in action (6)

GIT in action (7)

Gource

References (1)
Source Code Management | Atlassian Git Tutorial.
What is Source Code Management or Version Control ? - The Linux Juggernaut
https://www.edureka.co/blog/how-to-use-github/
https://www.edureka.co/blog/git-tutorial/
https://www.edureka.co/blog/install-git/
References (2)
git - the simple guide - no deep shit!
GitHub - rogerdudler/git-guide: git - the simple guide
https://dev.to/lydiahallie/cs-visualized-useful-git-commands-37p1#merge
How to write a good commit message - DEV Community
https://blog.xebialabs.com/2016/06/14/periodic-table-devops-tools-v-2/
References (3)
https://harness.io/2018/01/devops-tools-lifecycle-mesh-2018/
https://medium.com/swlh/how-to-become-an-devops-engineer-in-2020-80b8740d5a52
https://www.lucidchart.com/blog/devops-process-flow
References (4)
git - the simple guide - no deep shit!
Git Tutorial | Commands And Operations In Git | Edureka
How to write a good commit message - DEV Community
An Introduction to Git and GitHub by Brian Yu - YouTube
References (5)
https://education.github.com/git-cheat-sheet-education.pdf